How to Lay Vinyl Flooring in a Bathroom
Installing vinyl flooring in a bathroom is a popular choice for homeowners due to its durability, water resistance, and relatively straightforward installation process. This article provides a comprehensive guide on how to properly lay vinyl flooring in a bathroom, covering preparation, installation techniques, and essential considerations for a long-lasting and aesthetically pleasing result.
Vinyl flooring is available in various forms, including sheet vinyl, vinyl tiles, and luxury vinyl planks (LVP). Sheet vinyl offers the advantage of fewer seams, minimizing water penetration risks, making it suitable for bathrooms prone to moisture. Vinyl tiles and LVP offer greater design flexibility and ease of replacement if individual pieces are damaged. The chosen type of vinyl flooring will influence some installation details, but the fundamental principles remain consistent.
Successful vinyl flooring installation hinges on meticulous preparation. A poorly prepared subfloor can lead to unevenness, adhesive failures, and ultimately, a compromised flooring surface. Therefore, dedicating sufficient time and effort to the preliminary stages is crucial for achieving a professional-looking and durable final product.
Subfloor Preparation: The Foundation for Success
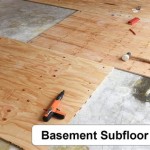
The subfloor is the underlying surface upon which the vinyl flooring will be installed. Commonly, subfloors in bathrooms consist of plywood, OSB (oriented strand board), or concrete. Regardless of the material, the subfloor must meet specific criteria before installation can proceed.
Firstly, the subfloor must be structurally sound. Any signs of weakness, rotting, or water damage must be addressed before proceeding. Replace any compromised sections of plywood or OSB with new material of similar thickness and grade. For concrete subfloors, repair any cracks or crumbling areas with a concrete patching compound.
Secondly, the subfloor must be clean and free of debris. Thoroughly sweep and vacuum the entire surface to remove dust, dirt, and any loose particles. Remove any existing flooring materials, adhesives, or staples. Scrape away any stubborn residues with a floor scraper.
Thirdly, the subfloor must be level and smooth. Vinyl flooring is relatively thin and will conform to any imperfections in the subfloor. Use a long, straight edge or a level to identify any dips, bumps, or uneven areas. Fill any low spots with a self-leveling underlayment specifically designed for flooring applications. Allow the self-leveling compound to dry completely according to the manufacturer's instructions before proceeding.
Finally, the subfloor must be dry. Moisture is the enemy of vinyl flooring, as it can lead to adhesive failure and mold growth. Use a moisture meter to verify that the subfloor meets the moisture content requirements specified by the vinyl flooring manufacturer. If the moisture level is too high, identify and address the source of the moisture before proceeding. In some cases, installing a moisture barrier may be necessary.
Once the subfloor preparation is complete, prime it with a suitable primer. The primer ensures that the adhesive bonds properly with the subfloor. Choose a primer specifically recommended by the vinyl flooring manufacturer.
Essential Tools and Materials
Having the right tools and materials readily available will streamline the installation process and ensure a professional finish. Here is a list of essential items:
- Vinyl flooring (sheet vinyl, vinyl tiles, or LVP)
- Measuring tape
- Utility knife with sharp blades
- Straight edge or metal ruler
- T-square
- Pencil or marker
- Adhesive (if required, based on the type of vinyl flooring)
- Notched trowel (if using adhesive)
- Seam roller (for sheet vinyl)
- Rubber mallet (for vinyl tiles or LVP)
- Spacers (for vinyl tiles or LVP)
- Floor roller (optional, but recommended for sheet vinyl)
- Moisture meter
- Self-leveling underlayment (if required)
- Subfloor primer
- Caulk (for sealing edges)
- Safety glasses
- Knee pads
- Gloves
Ensure the adhesive is compatible with the chosen vinyl flooring and subfloor material. Review the adhesive manufacturer’s instructions regarding curing times, application methods and any specific requirements.
Laying Vinyl Flooring: Step-by-Step Instructions
The specific steps for laying vinyl flooring will vary depending on the type of flooring chosen. However, the following general guidelines apply to most installations:
1. Acclimation:
Allow the vinyl flooring to acclimate to the bathroom environment for at least 48 hours before installation. This allows the material to adjust to the temperature and humidity, minimizing expansion and contraction after installation. Store the flooring in the room where it will be installed.2. Planning the Layout:
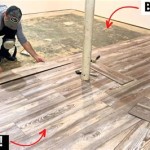
Before applying any adhesive or cutting any flooring, plan the layout. For sheet vinyl, unroll the sheet and position it in the room, allowing for excess material around the perimeter. For vinyl tiles or LVP, start from the center of the room and work outwards, ensuring that the tiles or planks are aligned properly. Use spacers to maintain consistent gaps between the flooring and the walls.3. Cutting the Flooring:
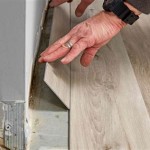
Carefully cut the vinyl flooring to fit the room dimensions. For sheet vinyl, use a utility knife and a straight edge to trim the excess material around the perimeter. Make sure to leave a small gap (approximately 1/4 inch) between the flooring and the walls to allow for expansion and contraction. For vinyl tiles or LVP, use a utility knife or a specialized flooring cutter to cut the tiles or planks to the appropriate size. When making cuts around obstacles like toilets or pipes, use a template to ensure a precise fit.4. Applying Adhesive (if required):
If the vinyl flooring requires adhesive, apply it to the subfloor using a notched trowel. Follow the adhesive manufacturer's instructions regarding the amount of adhesive to use and the open time (the time allowed for the adhesive to become tacky before installing the flooring). Work in small sections to prevent the adhesive from drying out.5. Installing the Flooring:
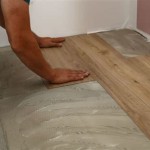
Carefully position the vinyl flooring onto the adhesive. For sheet vinyl, use a seam roller or a floor roller to press the flooring firmly into the adhesive, working from the center outwards to remove any air bubbles. For vinyl tiles or LVP, use a rubber mallet to tap the tiles or planks into place. Ensure that the tiles or planks are tightly butted together and that the spacers are properly positioned.6. Seaming Sheet Vinyl:
If using sheet vinyl and a seam is necessary, overlap the two pieces of vinyl slightly and use a seam cutter to create a clean, seamless joint. Then, apply a seam sealer to the joint to prevent water penetration.7. Rolling the Floor:
Once the flooring is installed, use a floor roller to ensure that it is firmly bonded to the subfloor. This is particularly important for sheet vinyl.8. Sealing the Edges:
After the adhesive has cured completely, apply a bead of caulk around the perimeter of the room to seal the edges of the flooring. This will prevent water from seeping under the flooring and causing damage.Addressing Common Challenges
Even with careful preparation and execution, certain challenges may arise during the installation process. Understanding how to address these challenges will contribute to a successful outcome.
1. Uneven Subfloor:
If the self-leveling underlayment does not completely eliminate all imperfections in the subfloor, minor adjustments can be made during installation. For sheet vinyl, a thicker adhesive can sometimes compensate for slight unevenness. For vinyl tiles or LVP, thin shims can be used to level individual tiles or planks.2. Difficult Cuts:
Making precise cuts around complex shapes, such as toilets or pipes, can be challenging. Create a template using cardboard or construction paper to accurately trace the shape. Transfer the template to the vinyl flooring and carefully cut along the lines.3. Adhesive Issues:
Applying too much adhesive can result in oozing seams and a messy finish. Applying too little adhesive can result in poor adhesion and loose flooring. Follow the adhesive manufacturer's instructions carefully and test a small area before proceeding with the entire installation.4. Air Bubbles:
Air bubbles can sometimes appear under sheet vinyl after installation. Use a utility knife to carefully puncture the bubble and then use a seam roller to press the vinyl firmly into the adhesive. Apply a small amount of weight to the area until the adhesive has cured completely.5. Seam Gaps:
Gaps between vinyl tiles or LVP can occur if the tiles or planks are not properly butted together or if the subfloor is not level. Use a rubber mallet to gently tap the tiles or planks together. If necessary, use shims to level the subfloor.Properly installed vinyl flooring in a bathroom offers a durable, water-resistant, and aesthetically pleasing surface. Careful preparation and adherence to recommended installation techniques will result in a long-lasting and trouble-free flooring solution.

How To Install Vinyl Plank Flooring In A Bathroom Fixthisbuildthat

How To Lay Vinyl Floor In A Bathroom Dove Cottage

How To Lay Vinyl Floor In A Bathroom Dove Cottage

How To Install Sheet Vinyl Floor Decor Adventures

Installing Lifeproof Luxury Vinyl Plank Flooring Bathroom

How To Install Vinyl Plank Flooring In A Bathroom

Dos And Don Ts For Installing Vinyl Plank Floors In The Bathroom Advice Homeowners

How To Install Sheet Vinyl Floor Decor Adventures

How To Install Vinyl Plank Flooring In A Bathroom

How To Install Vinyl Plank Flooring In A Bathroom Fixthisbuildthat
See Also