How to Lay Vinyl Plank Flooring Over Tile
Vinyl plank flooring offers a durable, attractive, and relatively affordable alternative to other flooring options like hardwood, laminate, or ceramic tile. Its water resistance makes it suitable for various rooms, including kitchens and bathrooms. Furthermore, its ease of installation makes it a popular choice for DIY enthusiasts. One common question arises regarding installation: Can vinyl plank flooring be installed directly over existing tile? The answer is yes, but the success of such an installation hinges on proper preparation and adherence to specific guidelines. This article outlines the steps involved in successfully laying vinyl plank flooring over existing tile.
Preparing the Tile Surface
The critical first step in laying vinyl plank flooring over tile involves thorough preparation of the existing tile surface. The goal is to create a smooth, level, and stable base for the new flooring. Neglecting this stage can lead to issues such as unevenness, plank separation, and ultimately, a compromised finished product. The preparation process involves several key considerations.
First, the existing tile must be meticulously inspected for damage. This includes checking for loose tiles, cracked tiles, or any significant height variations between tiles. Loose tiles must be re-secured or, if that's not possible, removed and the resulting void filled with a leveling compound suitable for tile. Cracked tiles should also be repaired or replaced. Minor cracks can sometimes be filled with epoxy-based crack fillers, while severely damaged tiles are best replaced entirely. If replacing tiles, ensure the replacement tiles are of the same thickness as the surrounding tiles to maintain a level surface.
Cleaning is another crucial aspect of surface preparation. The tile surface needs to be thoroughly cleaned to remove any dirt, grease, wax, or other contaminants that could interfere with the adhesion of the vinyl plank flooring. A degreasing cleaner suitable for tile should be used, followed by a thorough rinsing with clean water. Allow the tile surface to dry completely before proceeding to the next step.
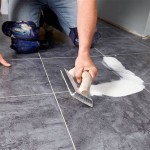
Leveling is perhaps the most time-consuming but essential step. Vinyl plank flooring requires a relatively smooth and level subfloor to prevent issues such as plank bending, clicking noise, and premature wear. Any grout lines or height variations between tiles must be addressed. This typically involves using a self-leveling underlayment compound specifically designed for use over tile. Follow the manufacturer's instructions carefully regarding mixing and application. The self-leveling compound will flow into the grout lines and create a smooth, level surface.
Once the self-leveling compound has been applied and allowed to cure completely (according to the manufacturer's instructions), inspect the surface for any imperfections. Small bumps or ridges can be removed with a floor scraper or sanding block. The surface should then be vacuumed thoroughly to remove any dust or debris before proceeding with the vinyl plank installation.
Choosing the Right Vinyl Plank Flooring
Selecting the appropriate vinyl plank flooring is crucial for a successful installation over tile. Not all vinyl plank flooring is created equal, and certain types are better suited for installation over existing hard surfaces like tile. Consider the following factors when making your selection.
Thickness is a significant consideration. Thicker vinyl planks tend to be more forgiving of minor imperfections in the subfloor and provide better sound insulation. A thicker plank will also feel more comfortable underfoot. Look for planks that are at least 4mm thick for installation over tile. Some high-end vinyl planks can be even thicker, offering superior performance and durability.
Wear Layer is another critical factor. The wear layer is the transparent top layer that protects the vinyl plank from scratches, stains, and wear. A thicker wear layer will provide better protection and extend the life of the flooring. For high-traffic areas, choose a vinyl plank with a wear layer of at least 20 mil (0.5mm). For less demanding areas, a 12 mil wear layer may be sufficient.
Water Resistance is a key benefit of vinyl plank flooring. However, some vinyl planks offer better water resistance than others. Look for vinyl planks that are labeled as waterproof, especially if you are installing the flooring in a bathroom or kitchen. Water-resistant planks may be sufficient for areas with occasional spills, but waterproof planks provide superior protection against moisture damage.
Installation Method is also an important consideration. Vinyl plank flooring is typically available in two main installation methods: click-lock and glue-down. Click-lock vinyl planks are designed to interlock with each other, creating a floating floor that does not require adhesive. Glue-down vinyl planks, as the name suggests, require adhesive to be applied to the subfloor. Click-lock vinyl planks are generally easier to install for DIYers, especially over tile, as they do not require the use of adhesives and allow for expansion and contraction of the flooring. However, glue-down vinyl planks may offer greater stability and a more permanent feel.
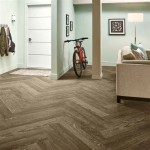
Finally, consider the aesthetic appeal of the vinyl plank flooring. Vinyl plank flooring is available in a wide variety of colors, styles, and patterns, mimicking the look of hardwood, stone, or tile. Choose a style that complements your existing decor and personal preferences. Order samples of different vinyl plank flooring options to see how they look in your space before making a final decision.
The Installation Process
Once the tile surface is properly prepared and the appropriate vinyl plank flooring has been selected, the installation process can begin. This process requires careful attention to detail and adherence to the manufacturer's instructions. Following these steps will help ensure a successful and long-lasting installation.
Acclimation: Before beginning the installation, allow the vinyl plank flooring to acclimate to the room's temperature and humidity for at least 48 hours. This will allow the planks to expand or contract, preventing issues such as buckling or gapping after installation. Store the vinyl planks in the room where they will be installed, laying them flat in their original packaging.
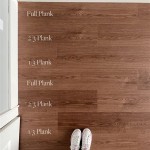
Planning and Layout: Before installing the first plank, plan the layout of the flooring. Determine the direction in which the planks will be laid and consider how the planks will meet at doorways and transitions. Measure the room carefully and calculate how many planks will be needed for each row. It's generally recommended to start with a full plank along the longest wall, allowing for a small expansion gap around the perimeter of the room. Use spacers to maintain this gap.
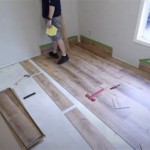
Installing the Planks: For click-lock vinyl plank flooring, the installation process typically involves interlocking the planks together at an angle and then snapping them into place. Follow the manufacturer's instructions carefully regarding the proper interlocking technique. Use a tapping block and rubber mallet to gently tap the planks together, ensuring a tight and secure fit. Avoid using excessive force, as this can damage the planks.
Cutting the Planks: Inevitably, some planks will need to be cut to fit around walls, corners, and other obstacles. Use a utility knife and a straight edge to score the plank along the desired cut line. Then, snap the plank along the score line. For more complex cuts, such as around pipes or doorframes, use a jigsaw or coping saw. Always wear safety glasses when cutting vinyl plank flooring.
Finishing Touches: Once all the planks have been installed, remove the spacers around the perimeter of the room. Install baseboards or quarter-round molding to cover the expansion gap and provide a finished look. Clean the flooring with a damp mop and a mild detergent. Avoid using harsh chemicals or abrasive cleaners, as these can damage the vinyl plank flooring.
Specific Considerations for Glue-Down Installation: If installing glue-down vinyl plank flooring, the process is slightly different. After acclimation and planning, apply adhesive to the prepared tile surface according to the manufacturer's instructions. Use a notched trowel to spread the adhesive evenly. Then, carefully position the vinyl planks onto the adhesive and press them firmly into place. Use a roller to ensure good contact between the planks and the adhesive. Wipe away any excess adhesive immediately with a damp cloth. Allow the adhesive to cure completely before walking on the flooring.
By following these steps carefully, it is possible to achieve a successful installation of vinyl plank flooring over existing tile, providing a durable, attractive, and low-maintenance flooring solution.

Vinyl Plank Wood Directly Over Tile

Should You Install Vinyl Floor Over Tile

How To Install Vinyl Plank Flooring As A Beginner Home Renovation

How To Install Vinyl Plank Flooring As A Beginner Home Renovation

Lvt Flooring Over Existing Tile The Easy Way Vinyl Floor Installation Diy

Can You Lay Hybrid Flooring Over Tiles The Guys

How To Install L And Stick Vinyl Plank Flooring The Nifty Nester

How To Install Vinyl Plank Floors In A Bathroom Over Tile

Can Vinyl Flooring Be Laid Over Laminate Go For Floors

Can You Install Vinyl Plank Over Tile Flooring America
See Also