How to Level a Concrete Floor for Tile Installation
Installing tile over a concrete floor provides a durable and aesthetically pleasing surface. However, a critical prerequisite for a successful and long-lasting tile installation is ensuring the concrete subfloor is perfectly level. Unevenness in the concrete can lead to cracked tiles, poor adhesion, and potential tripping hazards. This article provides a comprehensive guide on evaluating and leveling a concrete floor in preparation for tile installation.
Before initiating any leveling work, a thorough assessment of the concrete floor's condition is paramount. This involves identifying existing imperfections, understanding their severity, and determining the appropriate leveling method. Rushing this crucial step can result in inadequate repairs and ultimately compromise the quality of the finished tile surface.
The tools and materials required for leveling a concrete floor vary depending on the chosen method and the extent of the unevenness. However, some essential items include a level (both spirit and laser levels), a straightedge, a concrete grinder, a self-leveling compound, a concrete patching compound, a mixing bucket, a trowel, a shop vacuum, safety glasses, and a dust mask. Gathering these necessary supplies beforehand allows for a more efficient and streamlined leveling process.
1. Assessing the Concrete Floor's Condition
The initial step involves a meticulous inspection of the concrete floor. This includes cleaning the surface thoroughly to remove any debris, dust, paint, or adhesives that might obscure imperfections. A shop vacuum is ideal for this purpose. Following cleaning, a detailed examination should be conducted to identify any cracks, holes, dips, humps, or other irregularities.
A straightedge, ideally a long metal one, should be used to identify high and low spots. Lay the straightedge across the floor in multiple directions – lengthwise, widthwise, and diagonally. Use a level placed on top of the straightedge to identify any gaps between the straightedge and the concrete surface. These gaps indicate areas that require leveling.
Mark all identified imperfections clearly with a pencil or marker. Note the depth or height of each imperfection. A spirit level can be helpful in determining the severity of dips and humps. For larger areas, a laser level is an invaluable tool. It projects a level line across the entire room, allowing for quick and accurate identification of high and low spots. Measure the distance between the laser line and the floor at various points to quantify the unevenness.
Special attention should be paid to cracks. Minor hairline cracks may only require patching, while larger cracks could indicate structural issues that need professional evaluation before proceeding. Any signs of moisture or water damage should also be addressed, as they can compromise the adhesion of the leveling compound and the tile.
The type of concrete, age, and previous treatments can also affect the leveling process. Older concrete may be more porous and require a primer to ensure proper adhesion. Concrete that has been previously sealed or treated with a coating may need to be mechanically abraded to remove the existing coating and create a suitable bonding surface.
2. Choosing the Right Leveling Method
The appropriate leveling method depends on the severity and nature of the imperfections identified during the assessment phase. Minor imperfections, such as small dips and hairline cracks, can often be addressed with concrete patching compounds. More significant unevenness may require the application of a self-leveling compound, while extremely high spots may necessitate grinding.
Concrete Patching Compound: This is a cement-based material designed to fill small cracks, holes, and shallow dips. It is typically applied with a trowel and smoothed to create a level surface. Concrete patching compounds are suitable for localized repairs and are relatively easy to use. However, they are not recommended for leveling large areas or addressing significant height variations.
Self-Leveling Compound: This is a pourable cement-based mixture that is designed to flow and spread evenly across a surface, creating a level plane. It is suitable for leveling larger areas and addressing more significant unevenness. Self-leveling compounds are available in various formulations, each designed for specific applications and depth ranges. It is crucial to choose a compound that is compatible with the type of concrete and the intended tile installation.
Concrete Grinding: This involves using a power tool with an abrasive grinding wheel to remove high spots and level uneven areas. Concrete grinding is a more aggressive method that is best suited for addressing specific high spots or creating a uniform surface over a large area. It requires skill and caution to avoid damaging the concrete or creating excessive dust. Proper safety precautions, including wearing a dust mask and safety glasses, are essential.
In some cases, a combination of methods may be necessary. For example, grinding down high spots followed by the application of a self-leveling compound to fill in dips can provide the most effective solution.
Prior to using any leveling product, it is imperative to consult the manufacturer's instructions. These instructions will provide specific guidance on mixing ratios, application techniques, drying times, and other important factors that can affect the outcome.
3. Applying the Leveling Compound
Before applying any leveling compound, the concrete floor must be properly prepared. This includes thoroughly cleaning the surface to remove any dust, debris, and loose particles. A shop vacuum is essential for this step. The surface should also be free of grease, oil, and any other contaminants that could interfere with adhesion.
Many self-leveling compounds require the application of a primer. The primer helps to improve adhesion and prevent the compound from drying too quickly. Follow the manufacturer's instructions for applying the primer, ensuring that it is evenly distributed across the surface.
When mixing the self-leveling compound, it is crucial to follow the manufacturer's instructions precisely. Use the correct amount of water and mix thoroughly to achieve a smooth, consistent consistency. Over- or under-watering can affect the compound's flow and leveling properties.
Pour the mixed self-leveling compound onto the floor and allow it to flow and spread evenly. Use a gauge rake or trowel to help distribute the compound and ensure that it covers the entire area to be leveled. Work quickly, as the compound will begin to set relatively quickly.
For larger areas, it may be necessary to pour and spread the compound in sections. Overlap each section slightly to ensure a seamless transition. Use a spiked roller to remove any air bubbles that may have become trapped in the compound. Air bubbles can weaken the compound and create imperfections in the finished surface.
Allow the self-leveling compound to dry completely according to the manufacturer's instructions. The drying time will vary depending on the type of compound, the temperature, and the humidity. Avoid walking on the surface until it is fully cured.
Once the self-leveling compound has dried, inspect the surface for any remaining imperfections. If necessary, apply a second coat of self-leveling compound or use a concrete patching compound to address any localized areas that require further leveling.
After the leveling process is complete, allow the concrete floor to cure for the recommended time period before proceeding with tile installation. This curing period allows the leveling compound to fully harden and develop its maximum strength. Failure to allow adequate curing time can compromise the adhesion of the tile and lead to future problems.
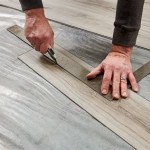
Prior to tile installation, conduct a final inspection of the leveled surface using a straightedge and level. Verify that the floor is indeed level and free of any significant imperfections. Any remaining minor irregularities can be addressed with thin-set mortar during the tile installation process. However, addressing larger imperfections prior to tile installation is crucial for ensuring a professional and long-lasting result.

How To Self Level Tile Grout Joints Before Installing Flooring Wood Vinyl Laminate Diy

How To Level A Concrete Floor Part 1 Preparation

Get Existing Floors Ready For Tile Fine Homebuilding

How To Level Your Floors

Learn How To Level A Floor For Tile Rubi Blog Usa

How To Level A Subfloor Before Laying Tile

Self Leveling Concrete Diy Tips Cost When Not To Use It

18 Tips For Working With Self Leveling Underlayment

How To Level A Subfloor Before Laying Tile

How To Tile Onto Concrete Floors Porcelain Super
See Also