```html
How to Level a Floor for Tile: A Comprehensive Guide
Laying tile can significantly enhance the aesthetic appeal and functionality of a space. However, achieving a professional and durable tile installation hinges on one critical factor: a level subfloor. An uneven floor can lead to cracked tiles, uneven grout lines, and potential safety hazards. This article provides a detailed guide on how to level a floor for tile, covering essential tools, materials, and techniques.
Before embarking on any leveling project, it is imperative to assess the existing floor to determine the extent of the unevenness. This assessment will dictate the most appropriate method for leveling and the necessary materials. Failure to properly assess the floor can result in wasted time, money, and ultimately, a less-than-perfect tile installation.
Assessing the Floor's Level
The first step in leveling a floor is to accurately identify high and low spots. Several tools can be used for this purpose, each offering varying levels of precision and efficiency.
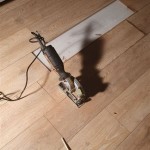
A long straightedge, ideally at least six feet in length, is a fundamental tool. By placing the straightedge on the floor and using a level on top, one can visually identify dips and humps. A flashlight held behind the straightedge can further illuminate any gaps and irregularities.
A self-leveling laser level projects a perfectly horizontal line around the room, providing a precise reference point for identifying unevenness. This tool is particularly useful for larger areas and can significantly expedite the assessment process. It allows for a clear visual representation of the floor's deviation from level.
A simple bubble level can also be used, although it requires more time and effort. By moving the level around the room and noting inconsistencies, one can create a general map of the floor's unevenness. However, this method is less accurate than using a straightedge or laser level.
Once the high and low spots have been identified, it is essential to mark them clearly. Using a pencil or marker, circle the areas that require attention. This visual guide will be invaluable during the leveling process.
It is also crucial to document the severity of the unevenness. Note the depth of the low spots and the height of the high spots. This information will help determine the amount of leveling compound or patching material required. Taking photographs can also be helpful for future reference.
Methods for Leveling a Floor
Several methods can be employed to level a floor for tile, each suited to different degrees of unevenness and subfloor materials. The most common methods include using self-leveling underlayment, patching compound, and cement board underlayment. The selection of the appropriate method depends on the specific characteristics of the floor and the desired final result.
Self-leveling underlayment is a pourable mixture designed to create a perfectly level surface. This method is ideal for floors with widespread unevenness or significant dips. The underlayment flows freely, filling in low spots and creating a smooth, even surface ready for tile installation. It's important to choose a self-leveling underlayment that is specifically designed for use under tile and follows the manufacturer's instructions meticulously. Preparing the subfloor is critical for successful self-leveling underlayment application.
Patching compound is a thicker material used to fill in smaller cracks, holes, and minor dips. This method is suitable for localized imperfections rather than widespread unevenness. Patching compound can be applied with a trowel or putty knife and should be feathered out to blend seamlessly with the surrounding floor. Several applications may be necessary to achieve the desired level.
Cement board underlayment provides a stable and level surface for tile, particularly over wood subfloors. It can be used to address minor unevenness by shimming the cement board as needed. Cement board is also resistant to moisture and provides an excellent bonding surface for tile adhesives. When using cement board, it is essential to follow the manufacturer's recommendations for installation, including proper screw spacing and seam treatment.
For wood subfloors with structural issues such as deflection, reinforcing the joists from below may be required before leveling. Consult with a structural engineer or qualified contractor to assess the subfloor's integrity and determine the appropriate course of action.
Step-by-Step Guide to Applying Self-Leveling Underlayment
Applying self-leveling underlayment is a multi-step process that requires careful planning and execution. The following steps provide a comprehensive guide to ensure a successful application.
Preparation is Key: The first step is to thoroughly clean the subfloor, removing any dirt, debris, paint, or adhesives. A shop vacuum is invaluable for this task. Any loose or crumbling material must be removed to ensure proper adhesion of the underlayment.
Priming the Subfloor: Most self-leveling underlayments require the application of a primer to promote adhesion and prevent the underlayment from drying too quickly. Follow the manufacturer's instructions regarding the type of primer to use and the application method. Allow the primer to dry completely before proceeding to the next step. This is often a critical step that is overlooked.
Creating a Dam: Self-leveling underlayment is liquid and will flow wherever it can. Therefore, it is essential to create a dam around the perimeter of the area to be leveled to prevent the material from escaping. This can be achieved using foam weather stripping, plywood, or other suitable materials. Pay particular attention to sealing any gaps or cracks in the floor.
Mixing the Underlayment: Self-leveling underlayment typically comes in powder form and needs to be mixed with water according to the manufacturer's instructions. Use a large mixing bucket and a powerful drill with a mixing paddle to ensure a smooth, consistent mixture. Avoid adding too much water, as this can weaken the underlayment.
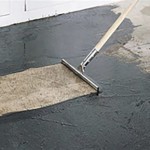
Pouring the Underlayment: Once the underlayment is properly mixed, pour it onto the floor, starting at the lowest point. Use a gauge rake or smoothing tool to spread the material evenly and ensure it covers the entire area. Work quickly, as the underlayment will begin to set relatively quickly.
Removing Air Bubbles: Trapped air bubbles can weaken the underlayment and create imperfections on the surface. Use a spiked roller to remove any air bubbles that may be present. This tool effectively punctures the bubbles and allows the air to escape.
Curing the Underlayment: Allow the underlayment to cure completely according to the manufacturer's instructions. This may take several hours or even days, depending on the product and the ambient temperature. Avoid walking on the underlayment during the curing process.
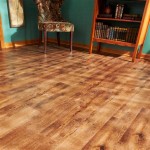
Final Inspection: Once the underlayment has cured, inspect it for any imperfections. If any minor imperfections are present, they can be addressed with patching compound. The floor should now be perfectly level and ready for tile installation.
Proper preparation, careful execution, and adherence to the manufacturer's instructions are paramount to achieving a successful and long-lasting tile installation. Neglecting these aspects can lead to costly repairs and unsatisfactory results.
```
Learn How To Level A Floor For Tile Rubi Blog Usa

How To Level A Floor For Tile Expert Tips And Advice

How To Level Floors For Tile Get It Ready

How To Level A Floor For Tile Angi

How To Level A Subfloor Before Laying Tile

How To Self Level Tile Grout Joints Before Installing Flooring Wood Vinyl Laminate Diy

Get Existing Floors Ready For Tile Fine Homebuilding

How To Level A Subfloor Before Laying Tile

How To Prepare A Subfloor For Tile Installation The Home

How To Tile A Concrete Floor Howtospecialist Build Step By Diy Plans
See Also