```html
How To Level A Plywood Floor For Tile
Installing tile over a plywood subfloor provides a durable and aesthetically pleasing surface. However, a properly leveled plywood subfloor is crucial for a successful and long-lasting tile installation. Inconsistencies in the subfloor can lead to cracked tiles, uneven surfaces, and ultimately, premature failure of the entire tiled area. This article outlines the process of leveling a plywood floor in preparation for tile installation, ensuring a professional and structurally sound result.
Before commencing any leveling work, a thorough inspection of the existing plywood subfloor is paramount. This inspection should identify any areas of deflection, rot, or damage that require repair or replacement. Addressing these issues prior to leveling will prevent future problems and ensure the stability of the tiled surface.
Assessing the Plywood Subfloor
The initial step involves a meticulous examination of the plywood subfloor. Look for signs of water damage, such as discoloration, swelling, or soft spots. These areas indicate potential rot or decay and must be addressed before proceeding. Use a moisture meter to accurately assess the moisture content of the plywood. Elevated moisture levels can compromise the adhesion of leveling compounds and lead to eventual tile failure. The moisture content should typically be below 12% for optimal results.
Walking across the subfloor and paying close attention to any areas of deflection is essential. Significant deflection indicates insufficient joist spacing or weakened plywood, which requires reinforcement. Small undulations or dips can be addressed with leveling compounds, but structural inadequacies must be resolved before proceeding with any surface treatments.
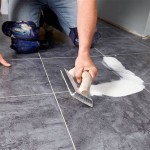
Furthermore, inspect the plywood seams for proper alignment and gaps. Gaps between plywood sheets can create stress points that lead to tile cracking. These gaps should be filled with a suitable patching compound designed for wood subfloors.
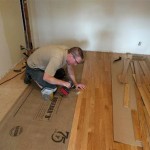
Finally, ensure that the plywood is securely fastened to the floor joists. Loose or missing screws or nails can contribute to movement and instability. Replace any missing fasteners and tighten existing ones to provide a solid and stable base for the tile installation.
Preparing the Plywood Surface
Once the assessment is complete, the next step involves preparing the plywood surface to ensure proper adhesion of the leveling compound. This preparation includes cleaning, sanding, and priming the subfloor.
Begin by thoroughly cleaning the plywood to remove any dirt, dust, debris, or contaminants. Use a shop vacuum to remove loose particles, followed by a damp mop with a mild detergent to clean the surface. Ensure the floor is completely dry before proceeding to the next step.
Sanding the plywood surface is crucial for creating a rough texture that promotes adhesion of the leveling compound. Use a coarse-grit sandpaper (80-100 grit) to lightly sand the entire surface. This process will remove any existing paint, varnish, or other coatings that could interfere with adhesion. After sanding, vacuum the floor again to remove any sanding dust.
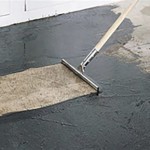
Priming the plywood with a latex-based primer designed for wood subfloors is essential for sealing the surface and improving the bond between the plywood and the leveling compound. Choose a primer that is specifically recommended for use under tile. Apply the primer evenly according to the manufacturer’s instructions, typically using a paint roller or brush. Allow the primer to dry completely before proceeding to the next step. The primer will also help prevent the plywood from absorbing moisture from the leveling compound, which can lead to cracking and shrinkage.
Applying Self-Leveling Compound
Self-leveling compound (SLC) is a cement-based material designed to create a smooth, flat, and level surface over uneven subfloors. Selecting the appropriate SLC is crucial for a successful installation. Choose an SLC that is specifically formulated for use over plywood subfloors and that is compatible with the type of tile being installed.
Before mixing the SLC, determine the maximum depth of the unevenness in the floor. This can be done using a long level or straightedge and measuring the gaps between the level and the subfloor. This measurement will dictate the amount of SLC required and the number of layers, if necessary. It is important to adhere to the manufacturer's recommendations regarding minimum and maximum pour depths to avoid cracking or other problems.
Mixing the SLC according to the manufacturer's instructions is critical. Use a mixing drill with a mixing paddle to ensure the compound is thoroughly combined and free of lumps. Add the recommended amount of water gradually while mixing, and avoid adding too much water, as this can weaken the compound and cause it to crack. The consistency should be similar to pancake batter. Working time is limited, so it is imperative to be prepared and work efficiently.
Pour the mixed SLC onto the prepared plywood subfloor, starting in the deepest areas. Spread the compound evenly using a gauge rake or trowel, ensuring that it flows into all the low spots and covers the entire surface. A gauge rake helps control the thickness of the SLC and ensures a consistent level. Work quickly, as the SLC will begin to harden within a short period of time. Use a spiked roller immediately after pouring the SLC to release any trapped air bubbles. Trapped air can weaken the compound and create imperfections on the surface.
Allow the SLC to dry completely according to the manufacturer's instructions. This may take several hours or even days, depending on the temperature and humidity. Avoid walking on the surface until it is completely dry. Once the SLC is dry, inspect the surface for any remaining imperfections. Small imperfections can be smoothed out with a sanding block or a small amount of patching compound.
In some cases, multiple layers of SLC may be necessary to achieve the desired level. If applying multiple layers, allow each layer to dry completely before applying the next. Lightly sand each layer between applications to create a better bond for the subsequent layer. Follow the manufacturer’s recommendations for maximum layer thickness.
Prior to tile installation, confirm the SLC is properly bonded to the plywood subfloor. A simple tap test can help identify any weak or hollow spots. Remove and reapply SLC where needed. Clean the leveled surface by vacuuming dust and debris to ensure proper thin-set mortar adhesion. The subfloor should be meticulously clean and dust-free before the tile installation process begins.
By carefully following these steps, a plywood subfloor can be effectively leveled to provide a stable and even surface for tile installation, resulting in a durable and aesthetically pleasing tiled floor.
```
How To Prepare A Subfloor For Tile Installation The Home

How To Level A Subfloor Before Laying Tile

How To Level A Plywood Subfloor With And Self Leveling Compound

How To Level A Floor For Tile Expert Tips And Advice

How To Prepare A Subfloor For Tile Installation The Home

How To Prepare A Subfloor For Tile Installation The Home

How To Prepare Subfloor For Tile The Home

How To Level A Plywood Or Osb Subfloor Using Asphalt Shingles Construction Felt

Blog Expert Advice How To Tile Onto Wood Plywood Or Chipboard

How To Prep Wood Subfloor For Luxury Vinyl Plank Flooring Beginners Fix High And Low Spots
See Also