How To Perfectly Finish Your Laminate Flooring With Trim
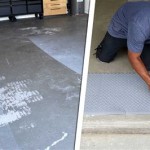
When it comes to flooring, laminate is a popular choice for its durability, affordability, and ease of installation. However, one of the most important steps in the installation process is finishing the edges of the flooring with trim. Trim not only provides a finished look but also protects the edges of the flooring from damage.
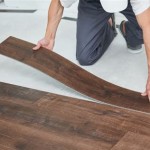
There are a few different types of trim that can be used with laminate flooring, including baseboards, quarter rounds, and T-moldings. The type of trim you choose will depend on the style of your flooring and the overall look you want to achieve. Once you have chosen the trim, you will need to cut it to size and then attach it to the flooring.
Cutting trim to size can be done with a variety of tools, including a miter saw, a circular saw, or a handsaw. If you are using a miter saw, it is important to make sure that the saw is set to the correct angle. The angle will vary depending on the type of trim you are using, but it is typically 45 degrees.
Once you have cut the trim to size, you will need to attach it to the flooring. This can be done with a variety of adhesives, including construction adhesive, liquid nails, or flooring glue. When applying the adhesive, be sure to follow the manufacturer's instructions.
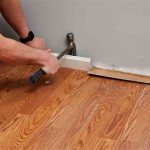
Once the adhesive has dried, you will need to nail or screw the trim into place. The type of nails or screws you use will depend on the type of trim you are using. Once the trim is nailed or screwed into place, you will need to fill in any nail or screw holes with wood filler.
The final step is to caulk the seams between the trim and the flooring. This will help to seal the seams and prevent moisture from getting underneath the flooring. When caulking the seams, be sure to use a caulk that is specifically designed for use with laminate flooring.
Finishing the edges of your laminate flooring with trim is a relatively simple process that can be completed in a few hours. By following these steps, you can achieve a professional-looking finish that will protect your flooring for years to come.
Tips for Finishing Laminate Flooring With Trim
Here are a few tips for finishing laminate flooring with trim:
- Use a miter saw to cut the trim to size. This will ensure that the cuts are clean and precise.
- Apply the adhesive to the back of the trim and then press it into place. Be sure to follow the manufacturer's instructions for the adhesive you are using.
- Once the adhesive has dried, nail or screw the trim into place. The type of nails or screws you use will depend on the type of trim you are using.
- Fill in any nail or screw holes with wood filler.
- Caulk the seams between the trim and the flooring. This will help to seal the seams and prevent moisture from getting underneath the flooring.

Laying Laminate On Corners Edges Transitions Parrys

How To Lay Flooring Part 5 Finishing Touches Maintenance

Guide To Fitting Laminate Up 50 Off Free Samples

How To Lay Flooring Part 5 Finishing Touches Maintenance

How To Edge Laminate Flooring Ehow

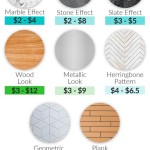
Floor Trim And Molding Guide What You Need To Know Flooring Inc

Laminate Profiles And Skirtings

Flooring Trims Accessories Flooringsupplies Co

How To Install Laminate Flooring Around Doors And Cabinets

Wood Flooring Trim The Finishing Touches On Hardwood Floors T G
See Also