How to Put Plywood on Floor: A Comprehensive Guide
Installing plywood on a floor is a common task that can enhance the structural integrity, durability, and aesthetic appeal of your living space. Whether you're a seasoned DIY enthusiast or a novice homeowner, this step-by-step guide will provide you with all the essential knowledge and tips to ensure a successful installation.
1. Prepare the Floor
Before laying down the plywood, it is crucial to prepare the subfloor. Remove any existing flooring materials, such as carpet or vinyl, and ensure the subfloor is level and free of debris. If necessary, level the floor using a self-leveling compound or a floor leveling system.
2. Install a Moisture Barrier
To prevent moisture damage, lay down a moisture barrier over the subfloor. This can be a plastic sheet or rolled roofing felt. Overlap the seams by at least 6 inches and tape them securely. This barrier will protect the plywood from moisture that may rise from the ground or crawl space.
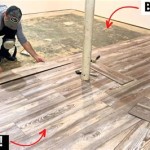
3. Lay Out the Plywood
Start by measuring the area you need to cover and cutting the plywood to size. Use a circular saw or a table saw to ensure straight and accurate cuts. Lay out the plywood sheets with staggered joints, similar to laying bricks. Leave a small gap of 1/8 to 1/4 inch between the sheets for expansion and contraction.
4. Secure the Plywood
Use ring-shank nails or screws to secure the plywood to the subfloor. Drive the fasteners at an angle into the joists or floor framing. Space the fasteners every 6 to 8 inches along the edges and 12 to 16 inches in the field. Countersink the fasteners slightly below the surface of the plywood.
5. Sand the Plywood
Once the plywood is secured, use a power sander or hand sander to smooth out any rough edges or imperfections. This will provide a uniform surface for your final flooring installation.
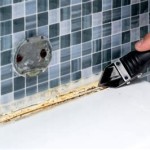
6. Seal the Seams
To prevent moisture and drafts from seeping through the seams, seal them using wood filler or caulk. Apply the sealant along the joints and wipe away any excess. This will create a tight seal and enhance the durability of your plywood floor.
Additional Tips
- Choose plywood with a grade that is suitable for flooring applications.
- Use a square or chalk line to mark the location of the joists and floor framing for precise nail placement.
- Drill pilot holes before inserting the fasteners to prevent splitting the plywood.
- Allow the plywood to acclimate to the room temperature for 24 hours before installation.
- Wear safety glasses and hearing protection during the installation.
Conclusion
By following these steps and adhering to the additional tips, you can successfully install plywood on your floor. This versatile material provides a solid foundation for various flooring options and can significantly improve the strength, longevity, and appearance of your living space. Whether you're planning a carpet or hardwood installation, plywood provides a stable and durable base for years of enjoyment.

Apa Builder Tips Proper Handling And Installation Of Plywood Underlayment Form R340

Sub Floor Installation Tips From Georgia Pacific
.jpg?strip=all "How To Install And Finish Plywood Flooring Ibuildit Ca")
How To Install And Finish Plywood Flooring Ibuildit Ca

5 Wooden Subflooring Installation Mistakes You Must Avoid Kaltimber Timber Merchant Flooring
.jpg?strip=all "How To Install And Finish Plywood Flooring Ibuildit Ca")
How To Install And Finish Plywood Flooring Ibuildit Ca

Plywood Flooring How To Install Floors Alternative Hardwood Part 1

How To Install Plywood Flooring Three Trees

How To Lay A Plywood Floor

How To Install A Plywood Subfloor

How To Install A Plywood Floor North Country Nest
See Also