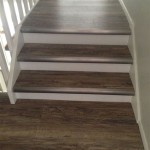
How To Remove Engineered Wood Flooring
Removing engineered wood flooring is a task that can range from relatively simple to moderately challenging, depending on the installation method used. Engineered wood flooring, unlike solid hardwood, is constructed from layers of wood veneer bonded to a core, making it more stable and less susceptible to moisture damage. This characteristic makes it a popular choice for many homes. However, when it comes time to replace or repair the floor, understanding how it was initially installed is crucial for a successful removal process. This article provides a comprehensive guide to removing engineered wood flooring, covering different installation methods and offering step-by-step instructions.
Before embarking on the removal process, careful preparation is essential. This includes gathering the necessary tools and materials, assessing the installation method, and taking safety precautions. Rushing into the project without proper planning can lead to damage to the subfloor or personal injury.
The first step in any flooring removal project is to protect the surrounding environment. Cover furniture with drop cloths to shield them from dust and debris. Seal off doorways with plastic sheeting to contain the mess within the work area. This minimizes the cleanup effort and prevents dust from spreading throughout the house.
Next, gather the required tools. A pry bar, utility knife, hammer, safety glasses, gloves, dust mask, and knee pads are essential. A floor scraper or oscillating multi-tool can also be helpful, especially for glued-down floors. Having the right tools readily available will significantly streamline the removal process.
Before starting the removal, it's crucial to identify the installation method used for the engineered wood flooring. Common methods include: floating (tongue-and-groove), glue-down, and nail-down. The installation method will dictate the appropriate removal technique. Visually inspect the edges of the floor and any exposed areas, such as doorways, to look for signs of glue or nails. Lifting a small section in an inconspicuous area can also help determine how the flooring is attached.
Understanding Different Installation Methods
The method used to install engineered wood flooring significantly affects the removal process. Recognizing the installation method is paramount to choosing the right tools and techniques, minimizing damage, and ensuring a smooth removal.
Floating Installation: This is one of the most common methods for installing engineered wood flooring. In a floating installation, the planks are connected to each other, typically through a tongue-and-groove system, without being directly attached to the subfloor. This method allows the floor to "float" above the subfloor, expanding and contracting with changes in humidity. Floating floors are often easier to remove compared to glued-down or nailed-down floors.
Glue-Down Installation: In this method, the engineered wood flooring is adhered directly to the subfloor using a specialized adhesive. This creates a very stable and secure floor, but it also makes removal more challenging. Glue-down installations often require the use of a floor scraper or oscillating multi-tool to break the adhesive bond. Removing glued-down flooring can be time-consuming and labor-intensive.
Nail-Down Installation: This method involves nailing the engineered wood planks to the subfloor. While less common than floating or glue-down, nail-down installations are still used, particularly in areas where a more secure attachment is desired. Removing nailed-down flooring typically requires prying up the planks and then removing the nails or staples. A nail set and hammer may be needed to drive the nails through the planks from underneath.
Removing Floating Engineered Wood Flooring
Removing floating engineered wood floors is typically the easiest of the three installation methods. Because the planks are not directly attached to the subfloor, the process involves disconnecting the tongue-and-groove joints and lifting the planks.
Begin by removing the baseboards or quarter-round moldings around the perimeter of the room. These moldings cover the expansion gap between the flooring and the wall, and they need to be removed to access the edges of the flooring. Use a pry bar and a utility knife to carefully detach the moldings, taking care not to damage the wall or the moldings themselves if they are to be reused.
Locate a starting point. Typically, this is along a wall where the tongue-and-groove joint is easily accessible. Gently lift the first plank using a pry bar or a putty knife. Be careful not to damage the tongue or groove of the plank, as this will make disconnecting the subsequent planks more difficult.
Once the first plank is lifted, carefully disconnect it from the adjacent plank. The tongue-and-groove joints should separate with gentle pressure. If the planks are tightly connected, use a rubber mallet and a tapping block to gently tap the planks apart. Work your way across the room, disconnecting the planks row by row.
As you remove the planks, inspect them for damage. If any planks are damaged or broken, set them aside. These planks can be used for repairs or replacements in the future. Stack the removed planks in a designated area to keep the workspace organized and prevent tripping hazards.
After removing all the planks, inspect the subfloor for any debris or damage. Clean the subfloor thoroughly with a broom or vacuum to remove any dust, dirt, or remnants of the underlayment. Repair any cracks or unevenness in the subfloor before installing new flooring.
Removing Glued-Down Engineered Wood Flooring
Removing glued-down engineered wood flooring is a more challenging task than removing floating floors. The adhesive bond between the flooring and the subfloor can be very strong, requiring significant effort and specialized tools.
Start by removing the baseboards or quarter-round moldings around the perimeter of the room, as with the floating floor removal. This provides access to the edges of the flooring and allows you to begin the removal process.
Use a utility knife to score the adhesive along the seams between the planks. This helps to weaken the adhesive bond and makes it easier to lift the planks. Make several passes with the utility knife, applying moderate pressure to cut through the adhesive.
Insert a floor scraper or oscillating multi-tool between the flooring and the subfloor. Apply steady pressure to break the adhesive bond. Work slowly and methodically, moving the scraper or multi-tool along the length of the plank. The adhesive may be very strong, so be prepared to use considerable force.
If the planks are difficult to remove, use a heat gun to soften the adhesive. Apply heat to the surface of the plank for a few seconds, then try again with the floor scraper or multi-tool. Be careful not to overheat the wood, as this can damage the plank and make it more difficult to remove.
As you remove the planks, inspect the subfloor for adhesive residue. This residue needs to be removed before installing new flooring. Use a floor scraper or chemical adhesive remover to remove the residue. Follow the instructions on the adhesive remover carefully, and wear appropriate safety gear, such as gloves and a respirator.
After removing the adhesive residue, inspect the subfloor for any damage. Repair any cracks or unevenness before installing new flooring. A self-leveling compound may be necessary to create a smooth and even surface.
Removing Nailed-Down Engineered Wood Flooring
Removing nailed-down engineered wood flooring involves a combination of prying and nail removal. This method can be less messy than glue-down removal, but it still requires careful attention to avoid damaging the subfloor.
Begin by removing the baseboards or quarter-round moldings around the perimeter of the room. This provides access to the edges of the flooring and allows you to begin the removal process.
Locate a starting point, typically along a wall. Use a pry bar to gently lift the first plank. Be careful not to damage the plank or the subfloor. Apply steady pressure, and work slowly and methodically.
Once the plank is lifted, use a nail set and hammer to drive the nails through the plank from underneath. This will allow you to remove the plank without breaking it. If the nails are difficult to remove, use a pair of pliers or a nail puller.
Alternatively, you can use a reciprocating saw with a metal-cutting blade to cut the nails from underneath the plank. This can be faster than using a nail set and hammer, but it also carries a higher risk of damaging the subfloor.
As you remove the planks, inspect the subfloor for any remaining nails or staples. Remove these using pliers or a nail puller. Be sure to remove all the nails and staples to create a smooth and even surface for the new flooring.
After removing all the planks and nails/staples, inspect the subfloor for any damage. Repair any cracks, holes, or unevenness. A wood filler or patching compound can be used to repair minor damage. For more significant damage, it may be necessary to replace sections of the subfloor.
In all the aforementioned methods, safety is paramount. Wearing safety glasses, gloves, and a dust mask is crucial to protect against flying debris, sharp objects, and dust inhalation. Knee pads can also provide comfort and support during prolonged periods of kneeling. Proper ventilation is also important, especially when using adhesive removers or heat guns.
Disposing of the removed flooring and materials responsibly is an important consideration. Check local regulations regarding the disposal of construction waste. Some materials may be recyclable, while others may need to be disposed of at a designated landfill.

How To Remove Hardwood Flooring The Easy Way

How To Remove Glued Wood Flooring And Engineered On Concrete

How To Remove Engineered Hardwood Floor Without Damage

How To Remove Hardwood Flooring The Easy Way

How To Remove Engineered Hardwood Floor Without Damage

Wood Floor Removal Glued Down Jbl Flooring

How To Remove Hardwood Flooring The Easy Way

Engineered Wood Removal

How To Replace Engineered Hardwood Floor Planks Diy Repair

How To Remove Engineered Hardwood Floor Without Damage
See Also