How to Remove a Laminate Floor Board
Removing a laminate floor board can seem like a daunting task, but with the right tools, knowledge, and a bit of patience, it is a manageable project for most homeowners. The need to remove a laminate floor board can arise from various situations, including damage from water, scratches, or dents, or the need to access utilities beneath the flooring. The following guide provides a comprehensive walkthrough of the process, emphasizing safety and proper technique to minimize the risk of damaging surrounding boards. It is important to note that the specific method may vary slightly depending on the type of laminate flooring and its installation method.
Before beginning the removal process, gathering the necessary tools and materials is crucial. Having everything readily available will streamline the task and prevent unnecessary interruptions. The tools typically required include a utility knife, a pry bar, a hammer, a chisel (or a sharp flathead screwdriver), a drill with various sized drill bits, safety glasses, work gloves, and possibly a suction cup tool designed for lifting flooring. Depending on the specific situation, wood glue or construction adhesive may also be needed for re-installation or replacement.
Preparation is key to a successful laminate floor board removal. This involves clearing the area around the damaged board of any furniture or obstructions. Thoroughly cleaning the surface of the affected board and the surrounding boards is also recommended. This step helps to prevent debris from interfering with the removal process and allows for a clearer view of the board's seams. Furthermore, wearing safety glasses and work gloves is essential to protect eyes and hands from potential injury during the removal process.
Identifying the Installation Method
The first step in removing a laminate floor board is to determine how the flooring was originally installed. Laminate flooring is typically installed using one of two primary methods: a click-lock system or a glue-down system. A click-lock system features interlocking edges that snap together, creating a floating floor. Glue-down systems, on the other hand, involve adhering the laminate boards directly to the subfloor with adhesive. Determining the installation method is crucial because it directly influences the removal technique.
To identify the installation method, carefully examine the edges of the laminate boards. If the edges have interlocking tongues and grooves that appear to snap together, it is likely a click-lock system. In this case, the removal process will generally involve disengaging the interlocking mechanism. If the edges are smooth and there is no visible interlocking system, it is highly probable that the flooring is glued down. Removing glued-down laminate requires a different approach, typically involving softening the adhesive and prying up the boards.
Another way to differentiate between the two methods involves tapping on the floor. A floating floor (click-lock) will often sound hollow when tapped, while a glued-down floor will sound more solid and less resonant. Lifting a baseboard in an inconspicuous area can also reveal whether the laminate is installed directly onto the subfloor with adhesive or is floating above a layer of underlayment. Understanding the installation method will save time and prevent damage to the surrounding flooring.
Removing a Laminate Board Installed with a Click-Lock System
Removing a laminate board installed with a click-lock system requires a delicate approach to avoid damaging adjacent boards. The goal is to carefully disconnect the damaged board from the surrounding boards without breaking the interlocking mechanism. This process usually starts with creating an access point.
Begin by using a utility knife to carefully score the damaged board along its edges, close to where it meets the surrounding boards. The scoring helps to weaken the board and prevent splintering when prying it up. In some cases, a circular saw with a shallow blade depth can be used to cut out the center of the damaged board, leaving a border of a few inches. This simplifies the process of disconnecting the edges, providing more room to maneuver.
Next, use a drill to create several pilot holes within the damaged board. These holes provide a starting point for using a pry bar or chisel. Carefully insert the pry bar or chisel into one of the pilot holes and gently pry upwards. The goal is to break the connection between the damaged board and the adjacent boards. Work slowly and deliberately, moving the pry bar or chisel around the perimeter of the board to gradually loosen it. Avoid using excessive force, as this can damage the interlocking mechanism of the surrounding boards.
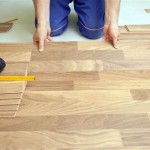
A suction cup tool designed for lifting flooring can be very helpful in this stage. By attaching the suction cup to the damaged board, a stable grip is established, allowing for a controlled and even lifting force. Once the board is partially lifted, use a small block of wood and a hammer to gently tap the adjacent boards away from the damaged board. This helps to disengage the interlocking mechanism. Continue working around the perimeter of the board, disconnecting each side until the board is completely free. If the board is particularly difficult to remove, reapplying heat from a hairdryer to the locking mechanism may help soften the plastic and release the bond.
Once the damaged board is removed, thoroughly clean the area to remove any debris or remnants of the old board. This ensures a clean surface for installing the replacement board. Carefully inspect the surrounding boards for any damage that may have occurred during the removal process. If any damage is found, address it appropriately before proceeding with the installation of the replacement board.
Removing a Laminate Board Installed with a Glue-Down System
Removing a laminate board that has been glued down to the subfloor is a more challenging process than removing one installed with a click-lock system. The adhesive creates a strong bond that needs to be broken before the board can be removed. This often requires softening the adhesive with heat or solvents and using a combination of prying and scraping.
The first step is to soften the adhesive bond. This can be achieved in several ways. A heat gun or hairdryer can be used to apply heat to the surface of the damaged board, focusing on the edges. The heat will soften the adhesive, making it easier to pry up the board. Be careful not to overheat the laminate, as this can damage the finish or the subfloor. Another option is to use a solvent specifically designed for dissolving construction adhesive. Apply the solvent to the edges of the board, allowing it to penetrate and weaken the adhesive bond. Always follow the manufacturer's instructions and wear appropriate safety gear when using solvents.
Once the adhesive has been softened, carefully use a chisel or a sharp flathead screwdriver to pry up the edges of the board. Start at one corner and gently work your way around the perimeter, applying steady pressure. A hammer can be used to gently tap the chisel or screwdriver to help break the adhesive bond. Be patient and avoid using excessive force, as this can damage the subfloor. If the board is proving difficult to remove, reapply heat or solvent and continue prying.
As the board is lifted, use a scraper or a putty knife to remove any remaining adhesive from the subfloor. This is an important step to ensure a smooth and even surface for installing the replacement board. If the adhesive is particularly stubborn, a specialized adhesive remover or a floor scraper may be needed. Take care not to damage the subfloor during this process.
Once the damaged board is removed and the subfloor is clean and smooth, inspect the subfloor for any damage. If any damage is found, such as cracks or unevenness, it should be repaired before installing the replacement board. This may involve patching the subfloor with a leveling compound or replacing damaged sections of the subfloor.
After removing the damaged board, regardless of installation method, it's crucial to prepare the area for the replacement. Clean any debris and ensure the subfloor is level, dry, and free of any remnants of adhesive. With these steps taken, the area is ready for the new laminate board.

How To Remove Laminate Flooring The Home

How To Remove Laminate Flooring

Replace A Damaged Board In Laminate Floor Rw Supply Design

How To Replace Lock Vinyl Flooring

How To Remove Laminate Flooring Lcf Ltd

How To Remove Floor Boards With S Wikihow

How To Install Laminate Flooring On Your Own Diy Hq Longwood Fl

How To Repair Laminate Flooring The Home

How To Repair Laminate Flooring The Home

How To Remove Laminate Flooring Bunnings
See Also