How to Remove Laminate Flooring in the Middle
Removing laminate flooring from the middle of a room can be a daunting task, but it's achievable with the right tools and careful planning. Whether you're replacing damaged planks, transitioning to a different flooring type, or simply wanting to revamp your space, this process requires precision and patience. The goal is to extract the desired planks without damaging those that remain in place, ensuring a seamless transition to the new flooring. This article will guide you through the process step-by-step, offering tips and techniques to ensure a successful removal.
Preparing for Removal
Before embarking on the removal process, gather the necessary tools and supplies. You'll need a pry bar, hammer, utility knife, safety glasses, work gloves, and a dust mask for protection. Additionally, consider having a drop cloth or tarp to catch debris and protect surrounding areas.
Begin by clearing the area where you plan to remove the laminate planks. Move any furniture, appliances, or other obstacles that might hinder your work. If the laminate flooring is in a room with multiple layers, identify the subfloor beneath it. This could be plywood, concrete, or another type of material. Understanding the subfloor's composition will help you determine the best removal method.
If replacing the planks with new ones, measure the affected area to ensure you have enough replacement planks. It's also a good idea to consult the installation instructions for your new laminate flooring to ensure proper compatibility with the existing subfloor.
Starting the Removal Process
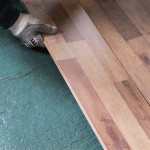
The key to removing laminate flooring in the middle without damaging the surrounding planks is to locate the seams between the planks. Start by locating the plank you want to remove. Once you've found it, use the utility knife to carefully score the seam where you want to start the removal process. This helps create a weak point for the pry bar to leverage.
Position the pry bar along the scored seam, with the flat side of the bar against the exposed side of the plank. Gently tap the pry bar with the hammer. The goal is to lift the plank just enough to create a small gap between it and the surrounding planks.
Once you've created this gap, slide the pry bar into the opening and gently pry up the laminate plank. Be careful not to leverage too much force, as this can damage the surrounding planks.
Techniques for Removing the Plank
Depending on the design of your laminate flooring and the way it was originally installed, there might be different techniques for removing the plank.
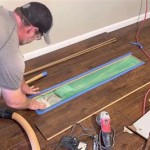
For laminate flooring with a tongue and groove system, you'll need to carefully work the pry bar between the groove and the tongue of the adjacent plank. This can require some finesse to avoid damaging the adjacent plank's tongue.
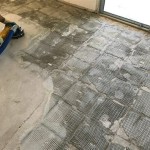
If the laminate flooring is glued down, you'll need to use a scraper or chisel to break the adhesive bond between the planks and the subfloor. Start at one edge of the plank and work your way across the entire length of the plank.
Tips for Avoiding Damage
To ensure a clean removal process, consider the following tips:
- Work slowly and carefully. Applying gradual force minimizes the risk of damaging the remaining planks.
- Use a block of wood as a buffer. Place a block of wood under the pry bar’s head when prying to distribute the force evenly and protect the subfloor from damage.
- Don't pry from the edges. Always pry from the center of the plank to avoid damaging the sides.
- Use a chisel for stubborn planks. If the plank is particularly stubborn, you can use a chisel to break the adhesives. But be careful not to damage the subfloor.
- Protect the surrounding planks. Use a piece of wood or a tarp to shield the remaining planks from the pry bar.
Safety Precautions
Remember to prioritize safety throughout the process. Always wear safety glasses and work gloves to protect your eyes and hands. Use a dust mask to avoid inhaling dust and debris. If you're working with glue, ensure the area is well-ventilated to avoid exposure to harmful fumes. If you're using a chisel, ensure the area is clear of any obstructions and avoid striking your fingers with the hammer.
Removing laminate flooring in the middle of a room requires patience and precision. By following these steps and using the correct techniques, you can successfully remove planks without causing any damage to the remaining floor. Remember to prioritize safety and take your time to ensure a smooth and efficient process.

How To Remove Laminate Flooring

How To Replace A Damaged Laminate Board That S In The Middle Of Floor

How To Replace Lock Vinyl Flooring

How To Replace A Vinyl Plank With Tongue And Groove Locking System

How To Effectively Remove Laminate Flooring Commercial Suppliers Supplies

Avoid Costly Mistakes Repairing Vinyl Plank Flooring Made Easy

How Do I Remove Laminate Flooring Factory Direct

How Can I Replace A Damaged Laminate Flooring Plank

How To Replace Warped Water Damaged Laminate Floor Boards

How To Remove A Single Piece Of Hardwood Flooring The Art Doing Stuff
See Also