How To Remove Laminate Flooring Without Breaking The Tiles
Laminate flooring is a popular choice for homeowners due to its durability, affordability, and ease of installation. However, there may come a time when you need to remove the laminate flooring, either for renovation, repairs, or to replace it with a new flooring option. While laminate flooring is relatively easy to install, removing it without damaging the tiles can be a challenge. This article will guide you through the process of removing laminate flooring, emphasizing techniques to minimize breakage.
Prepare for Removal
Before you begin removing your laminate flooring, taking some preliminary steps will make the process smoother and safer.
- Clear the room: Remove all furniture, appliances, and other objects from the room where you'll be removing the laminate flooring. This will give you ample space to work and prevent damage to your belongings.
- Disconnect utilities: If any electrical outlets or plumbing fixtures are located in the area you'll be working on, disconnect them to avoid electrical shocks or water damage.
- Gather your tools: You'll need a few basic tools for this project, including a pry bar, hammer, utility knife, safety glasses, gloves, and a dust mask.
- Protect your floors: If you're removing the laminate flooring from a room that will be left exposed, cover the subfloor with drop cloths to protect it from scratches and debris.
Start at the Edge
Identifying the starting point for removal is crucial. Typically, laminate flooring is installed in a "floating" manner, which means it's not glued or nailed to the subfloor. This allows for some movement, making it essential to start at the edge of the room and work your way inward.
- Locate the starting point: Examine the edges of your laminate flooring to find a section where you can start prying up the tiles. Look for gaps or seams between the flooring and the wall, as these will provide you with an entry point.
- Insert the pry bar: Carefully insert the pry bar between the flooring and the wall, angling it slightly upward.
- Gently pry up the tile: Apply even pressure to the pry bar to lift the edge of the laminate tile.
Remove the Laminate Tiles
Once you've successfully pried up the first tile, you can begin removing the rest. One of the most important steps is to work
carefully
andmethodically
.- Remove the next tile: Use the pry bar to lift up the next tile, working your way towards the center of the room.
- Break the tongue and groove: Laminate flooring is typically installed using a tongue-and-groove system, locking the tiles together. To separate the tiles, you may need to break the tongue and groove connection. Use the pry bar to gently pry up the tongue of the tile, breaking the connection.
- Remove the remaining tiles: Continue working your way across the room, removing each tile carefully.
Handling Difficult Areas
You may encounter areas where the laminate flooring is more challenging to remove. Here are some steps to handle these obstacles:
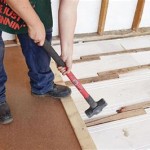
- Tightly secured tiles: If you encounter a tile that is particularly difficult to remove, try using a hammer and chisel to break the tongue and groove connection.
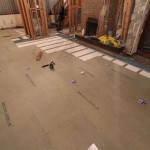
- Exposed subfloor: Once you've removed all the laminate tiles, you may need to remove the underlayment, which serves as a cushion between the laminate flooring and the subfloor. This can be done using a utility knife or a scraper.
Safety Precautions
Removing laminate flooring can be a dusty and potentially messy process. Protect yourself and your surroundings by following these safety precautions.
- Wear appropriate safety gear: Always wear safety glasses to protect your eyes from flying debris and a dust mask to avoid inhaling dust.
- Be careful with sharp tools: Use the pry bar and other tools with caution.
- Dispose of flooring properly: Once you've removed the laminate flooring, dispose of it properly according to your local waste management guidelines.
Key Points
Remember, removing laminate flooring without breaking the tiles requires patience, caution, and attention to detail. Here are the key points to keep in mind:
1. Start at the Edge
Always begin removing laminate flooring from the edge of the room, working your way inward. The floating nature of the installation makes this crucial for preventing accidental damage to the flooring.
2. Work Carefully and Methodically
Take your time and systematically remove each tile. Be deliberate in your movements, using the pry bar to carefully separate the tiles while minimizing force.
3. Observe Safety Precautions
Protecting yourself from dust, debris, and injuries is paramount. Wear appropriate safety gear and exercise caution when using tools.

How To Remove Laminate Flooring In 6 Easy Steps

How To Remove Laminate Flooring Budget Dumpster

How To Remove Laminate Flooring

Dismantling Home Laminate Flooring In Singapore When To Remove And How Replace It

How To Remove Tongue And Groove Flooring Without Damage Hint It S Counter Intuitive

How To Remove Self Adhesive Vinyl Floor Planks L And Stick Pvc Tiles

Diy Guide Step By Tutorial For Removing Vinyl Tile Flooring That S Glued Down Lx Hausys

How To Remove Vinyl Flooring The Home

How To Remove Laminate Flooring In 6 Easy Steps

How To Remove Laminate Flooring The Home
See Also