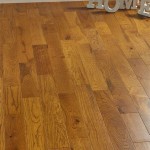
How To Remove One Hardwood Floor Board
Removing a single hardwood floorboard can seem daunting, but with the right tools and techniques, it can be accomplished successfully. This process is often necessary for repairs due to water damage, pet stains, or deep scratches. This guide provides a step-by-step approach to removing a single board while minimizing damage to surrounding planks.
Finding the Damaged Board and Gathering Tools
Begin by identifying the damaged board needing removal. Once located, gather the necessary tools for the job. Careful preparation minimizes the risk of errors and ensures a smoother process.
- Circular Saw
- Drill
- Pry Bar
- Hammer
- Chisel
- Vacuum
- Safety Glasses
- Dust Mask
- Pencil
Preparing the Work Area
Before starting the removal process, it's crucial to prepare the work area. This involves clearing the space and ensuring adequate lighting. These preparations will help prevent accidents and improve the accuracy of the work.
- Clear furniture and obstacles from the work area.
- Ensure adequate lighting to clearly see the work area.
- Protect adjacent floorboards with masking tape or cardboard.
Cutting the Damaged Board
Cutting the board into smaller sections makes it easier to remove and minimizes the risk of damaging surrounding planks. Precision is key in this step to avoid creating further damage.
- Set the circular saw blade depth slightly deeper than the floorboard thickness.
- Mark cut lines along the length of the damaged board, dividing it into several sections.
- Carefully guide the circular saw along the marked lines, cutting through the board.
- Avoid cutting into the subfloor.
Drilling Pilot Holes
Drilling pilot holes within the cut sections helps to prevent the wood from splitting during the removal process. This step is particularly important for older or more brittle hardwood floors.
- Within each cut section, drill several pilot holes using a drill bit slightly smaller than the diameter of your chisel.
- Space the pilot holes evenly across the width of the board.
- Ensure the holes are deep enough to penetrate the board without damaging the subfloor.
Removing the Board Sections
With the board cut and pilot holes drilled, the individual sections can be removed. Careful use of a chisel and pry bar will minimize damage to the surrounding floor.
- Insert the chisel into one of the pilot holes and gently tap with a hammer to loosen the section.
- Once loosened, carefully pry up the section with a pry bar.
- Repeat this process for the remaining sections of the damaged board.
- Remove any remaining nails or staples from the subfloor.
Cleaning the Area
Once the damaged board is removed, thoroughly clean the exposed subfloor. This prepares the area for the installation of a new board and prevents future issues.
- Vacuum the area to remove any debris or dust.
- Inspect the subfloor for any damage or unevenness.
- Address any subfloor issues before installing the new board.
Choosing a Replacement Board
Selecting the correct replacement board is essential for a seamless repair. Matching the existing floor's species, finish, and thickness ensures a consistent look.
- If possible, take a sample of the existing flooring to a flooring supplier for accurate matching.
- Consider the age of the existing floor, as wood can change color over time.
- If an exact match isn't available, choose a board that blends in as closely as possible.
Preparing the Replacement Board
Before installation, the replacement board should be prepared to ensure a proper fit. This may involve cutting it to size or lightly sanding the edges.
- Measure the space where the new board will be installed.
- Cut the replacement board to the appropriate length and width.
- Slightly sand the edges of the replacement board to ensure a smooth fit.
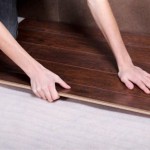
Installing the New Board
The final step is installing the new board. Proper installation techniques ensure a secure and flush fit, completing the repair seamlessly.
- Apply wood adhesive to the subfloor where the new board will be placed.
- Carefully insert the new board into the space, ensuring it's flush with the surrounding boards.
- Use a hammer and tapping block to gently secure the new board in place.
- Wipe away any excess adhesive immediately.
- Allow the adhesive to dry completely before walking on the repaired area.

How To Remove A Single Piece Of Hardwood Flooring The Art Doing Stuff

How To Remove A Single Piece Of Hardwood Flooring The Art Doing Stuff

How To Remove A Single Piece Of Hardwood Flooring The Art Doing Stuff

How To Remove A Single Piece Of Hardwood Flooring The Art Doing Stuff

Removing Replacing A Damaged Hardwood Flooring Board

How To Replace A Damaged Hardwood Floor Board Diy Family Handyman

How To Remove Floor Boards With S Wikihow

How To Remove A Single Piece Of Hardwood Flooring The Art Doing Stuff

Home Improvement How To Remove Hardwood Flooring The Best Way

How To Replace A Damaged Hardwood Floor Board Diy Family Handyman
See Also