How to Repair a Laminate Floor Plank
Laminate flooring offers an attractive and durable surface for homes and businesses. However, damage can occur from impacts, scratches, or moisture. Repairing a damaged plank often proves more economical and less disruptive than replacing the entire floor. Several effective techniques can be employed, depending on the severity and type of damage.
Assessing the Damage
Before undertaking any repairs, accurately assessing the damage is crucial. This assessment dictates the most appropriate repair method. Consider the location and size of the damage, as well as the type of damage. Is it a chip, a scratch, a stain, or warping due to moisture? A thorough assessment prevents unnecessary work and ensures the chosen repair is effective.
Repairing Minor Scratches and Chips
Superficial scratches and minor chips often respond well to cosmetic treatments. Specialized laminate repair kits, available at most home improvement stores, contain putty and markers designed to blend seamlessly with the existing flooring. These kits provide a cost-effective solution for minor imperfections, restoring the floor's aesthetic appeal.
Replacing a Damaged Plank
Damage beyond minor scratches or chips, such as deep gouges, cracks, or extensive water damage, typically requires plank replacement. While seemingly daunting, replacing a single plank is achievable with the right tools and approach. This method preserves the integrity of the surrounding flooring while addressing the localized damage effectively.
Tools and Materials for Plank Replacement
Gathering the necessary tools and materials beforehand streamlines the repair process. Essential items include a circular saw, a jigsaw, a pull bar, a tapping block, a hammer, safety glasses, and a replacement plank. Having these items readily available ensures a smooth and efficient repair.
Steps for Plank Replacement: Cutting Out the Damaged Plank
Replacing a plank involves several key steps. Begin by scoring the damaged plank with a circular saw, creating cut lines within the damaged area. These cuts should be deep enough to penetrate the laminate layer but avoid damaging the subfloor. A jigsaw is then used to carefully remove the damaged sections.
Steps for Plank Replacement: Removing the Damaged Plank
Once the damaged sections are cut, carefully pry out the remnants of the damaged plank. A pull bar and hammer can assist in removing the plank without disturbing the surrounding planks. Take care to remove any remaining adhesive or underlayment.
Steps for Plank Replacement: Preparing the New Plank
Prepare the replacement plank by cutting it to size and removing the bottom lip on the long side and the tongue on the short side. This allows the new plank to fit into the existing flooring. Dry-fit the plank to ensure a proper fit before applying adhesive.
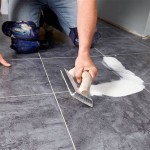
Steps for Plank Replacement: Installing the New Plank
Apply a thin layer of laminate flooring adhesive to the edges of the surrounding planks. Carefully insert the new plank, ensuring proper alignment. Use a tapping block and hammer to gently tap the new plank into place, ensuring a tight fit with the surrounding planks.
Steps for Plank Replacement: Finishing Touches
Once the new plank is securely in place, clean any excess adhesive and allow the adhesive to cure according to the manufacturer's instructions. Avoid walking on the repaired area until the adhesive has fully set. Inspect the repair to ensure a seamless integration with the existing flooring.
Dealing with Water Damage
Water damage presents a unique challenge, often leading to warping or buckling. Address the source of the water intrusion before attempting any repairs. Allow the affected area to dry completely. Minor warping may resolve itself once dry. However, significant warping or buckling typically necessitates plank replacement, following the previously outlined steps.
Preventing Future Damage
Preventing future damage extends the life of the laminate flooring. Use protective mats under furniture legs and avoid dragging heavy objects across the floor. Promptly clean up spills to prevent moisture damage. Implementing these preventative measures safeguards the flooring investment, maintaining its appearance and functionality.
Repairing Separated Planks
Sometimes, laminate planks can separate, creating unsightly gaps. These gaps can often be repaired using wood glue or specialized laminate seam repair adhesive. Carefully apply the adhesive to the exposed tongue and groove, then re-join the planks. Use clamps or weights to hold the planks together until the adhesive dries fully. This restores the integrity of the floor surface and prevents further separation.

Laminate Floor Repair Diy Family Handyman

How To Repair Laminate Flooring The Home

How To Repair Laminate Flooring Foreman Snags

How To Replace Lock Vinyl Flooring

How To Repair Laminate Flooring With Water Damage Dry Force

How To Repair Laminate Flooring The Home

How To Replace Damaged Flooring Plank Diy

How To Repair Damaged Laminate Floor Checkatrade

3 Ways To Repair Laminate Flooring Wikihow

How To Repair Laminate Flooring With Water Damage Dry Force
See Also