How to Repair Damaged Floor Boards
Damaged floorboards can detract significantly from the aesthetic appeal and structural integrity of a building. Addressing these damages promptly and effectively is crucial to prevent further deterioration and maintain the value of the property. Repairing floorboards can range from simple fixes for minor scratches to more involved procedures for issues like rot, cracks, or splintering. The extent of the damage and the type of flooring material will dictate the appropriate repair methods and materials.
This article provides a comprehensive guide on how to repair various types of damage commonly found in floorboards, equipping the reader with the knowledge to assess the situation, select the right tools and materials, and execute the repair effectively.
Identifying the Type of Damage and Assessing its Extent
Before commencing any repair work, a thorough assessment of the damage is necessary. This involves identifying the specific type of damage and determining its severity. Common types of floorboard damage include:
Scratches and Scuffs: These are usually superficial and affect only the surface finish. They can be caused by furniture movement, pet claws, or general wear and tear.
Dents and Gouges: These damages penetrate deeper than scratches, impacting the wood itself. They can result from dropped objects or heavy impacts.
Splintering: This occurs when the wood fibers separate, creating sharp or uneven edges. It is often caused by age, dryness, or impact.
Cracks: These can range from hairline fractures to significant splits in the wood. They can be caused by changes in humidity, structural issues, or excessive weight.
Rot: This is a severe form of damage caused by fungal growth, typically due to moisture exposure. Rotted wood becomes soft, spongy, and often discolored.
Water Stains: Discoloration caused by prolonged exposure to water. This can sometimes be superficial but may indicate underlying rot.
The assessment should also consider the extent of the damage. Minor scratches and small dents may require simple touch-up repairs, while more extensive damage, such as widespread rot or large cracks, may necessitate board replacement. Understanding the scale of the problem is vital in determining the appropriate course of action and the required resources.
Tools and Materials Required for Floorboard Repair
Having the right tools and materials is essential for successful floorboard repair. The specific items needed will depend on the type of damage being addressed, but the following list provides a general overview:
Safety Gear: Safety glasses, gloves, and a dust mask are crucial for protecting oneself from potential hazards such as wood splinters, dust, and chemical fumes.
Cleaning Supplies: A vacuum cleaner, broom, and damp cloth are needed to clean the work area and remove debris.
Wood Fillers: These are available in various types, including epoxy-based fillers, latex-based fillers, and colored wood putty. The choice will depend on the size and type of damage and the desired finish.
Wood Glue: High-quality wood glue is necessary for bonding loose pieces of wood or filling cracks.
Sandpaper: Various grits of sandpaper are required for smoothing the repaired areas and blending them with the surrounding surface. Typical grits include 80, 120, and 220.
Putty Knife or Spatula: These are used for applying and smoothing wood fillers.
Scraper: A scraper is useful for removing loose paint or varnish and for leveling uneven surfaces.
Chisel: A chisel is needed for removing rotted wood or shaping replacement pieces.
Hammer: A hammer is used for driving in nails or tapping replacement boards into place.
Drill: A drill with various drill bits is needed for pre-drilling holes for screws or for removing damaged wood.
Screws: Wood screws are used to secure replacement boards or to reinforce repaired areas.
Wood Stain and Finish: Matching stain and finish are essential for blending the repaired area with the surrounding flooring. Consider the existing finish – polyurethane, varnish, or oil-based products are typical.
Paintbrush or Applicator: A paintbrush or applicator is needed for applying stain and finish.
Measuring Tape: Needed for accurate measurements when cutting replacement boards.
Saw: A handsaw, circular saw, or jigsaw can be used for cutting replacement boards to size.
Moisture Meter: Helpful for determining the moisture content of the wood to assess the extent of rot and to ensure that replacement wood is properly acclimated.
Step-by-Step Repair Techniques for Different Types of Damage
Once the damage has been assessed and the necessary tools and materials have been gathered, the actual repair process can begin. The following sections outline specific repair techniques for common types of floorboard damage:
Repairing Scratches and Scuffs:
1. Clean the affected area thoroughly to remove dirt and debris.
2. For minor scratches, a touch-up marker designed for wood finishes can often suffice. Choose a color that closely matches the existing finish and apply it carefully to the scratch.
3. For deeper scratches, use fine-grit sandpaper (220 grit or higher) to lightly sand the area, blending the edges of the scratch with the surrounding surface.
4. Apply a matching wood stain to the sanded area using a small brush or cloth. Allow the stain to dry completely.
5. Apply a coat of clear finish (e.g., polyurethane or varnish) to protect the repaired area and blend it with the surrounding finish.
Repairing Dents and Gouges:
1. Clean the damaged area thoroughly.
2. If the dent is shallow, try steaming it. Place a damp cloth over the dent and apply a hot iron to the cloth for a few seconds. The steam may help to raise the dent.
3. For deeper dents and gouges, use wood filler to fill the void. Apply the filler with a putty knife, overfilling the area slightly.
4. Allow the filler to dry completely according to the manufacturer's instructions.
5. Sand the filled area smooth, starting with medium-grit sandpaper (120 grit) and finishing with fine-grit sandpaper (220 grit).
6. Apply wood stain and finish to match the surrounding area.
Repairing Splintering:
1. Carefully remove any loose or broken splinters using a chisel or utility knife.
2. Apply wood glue to the exposed wood fibers.
3. Clamp the splintered area together until the glue dries completely.
4. If the splintering is severe, use wood filler to fill any remaining gaps or imperfections.
5. Sand the repaired area smooth and apply stain and finish to match the surrounding area.
Repairing Cracks:
1. Clean the crack thoroughly, removing any debris or loose material.
2. If the crack is narrow, use wood glue to fill it. Inject the glue into the crack using a syringe or applicator.
3. For wider cracks, use wood filler to fill the void. Apply the filler in layers, allowing each layer to dry completely before applying the next.
4. Once the filler is dry, sand the repaired area smooth.
5. Apply wood stain and finish to match the surrounding area.
Repairing Rot:
1. The first step in addressing rotted floorboards is to identify and eliminate the source of moisture that is causing the rot. This may involve repairing leaks, improving ventilation, or addressing drainage issues.
2. Use a chisel to carefully remove all of the rotted wood. It is important to remove all traces of the rot to prevent it from spreading.
3. Apply a wood preservative to the remaining wood to kill any remaining fungal spores and prevent future rot.
4. If the rot has significantly weakened the floorboard, it may need to be replaced entirely. Cut a replacement board to the same size and shape as the damaged board.
5. Apply wood glue to the edges of the replacement board and secure it in place using screws or nails.
6. Sand the repaired area smooth and apply stain and finish to match the surrounding area.
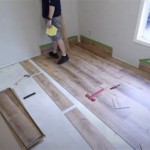
Board Replacement:
1. Use a circular saw to carefully cut along the length of the damaged board down the center. Aim to avoid any joists below.
2. Use a chisel and hammer to remove the remaining pieces of the board. Be careful not to damage the surrounding boards or joists.
3. Use a pry bar to lift out any nails or staples that are holding the board in place.
4. Measure the space where the old board was and cut a new board to fit.
5. Apply construction adhesive to the joists below the new board.
6. Carefully place the new board into the space and secure it with nails or screws. Countersink the nails or screws.
7. Use wood fill to hide the nail holes. Sand the patch flush with the surrounding floor. Apply stain and finish to match the surrounding area.
These repair techniques offer a comprehensive guide to addressing common floorboard damages. By carefully assessing the damage and following the appropriate steps, individuals can effectively restore their floorboards and maintain the integrity and beauty of their floors.

How To Replace Damaged Floor Boards

How To Repair Floorboards Ideas Advice B Q

How To Replace A Damaged Hardwood Floor Board Diy Family Handyman

How To Replace A Damaged Hardwood Floor Board Diy Family Handyman

Removing Replacing A Damaged Hardwood Flooring Board

How To Replace A Damaged Hardwood Floor Board Diy Family Handyman

How Do You Repair A Damaged Wooden Floor Parquet Flooring Best In Singapore

Replace Damaged Board Floor Sheathing Fine Homebuilding

A Little Hardwood Floor Repair The Space Between

How To Repair Floorboards Ideas Advice B Q
See Also
