How to Replace a Single Laminate Floor Plank
Damaged laminate flooring planks detract from the overall aesthetic of a room and can pose a tripping hazard. Fortunately, replacing a single plank, rather than the entire floor, is often a viable and cost-effective solution. This process requires patience and precision but can be accomplished with common tools and a methodical approach.
Tools and Materials Needed
Gathering the necessary tools and materials beforehand streamlines the replacement process. The following items are typically required:
- Replacement laminate plank
- Circular saw with a fine-tooth blade
- Oscillating multi-tool
- Hammer
- Pull bar
- Safety glasses
- Dust mask
- Wood glue (optional)
- Putty knife
- Measuring tape
- Pencil
Preparing the Damaged Plank for Removal
The first step involves carefully cutting the damaged plank to prevent damage to surrounding planks. This requires precision and the correct tools.
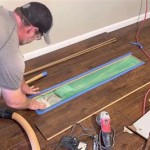
- Wearing safety glasses and a dust mask, score the damaged plank's surface along its length and width using a circular saw fitted with a fine-tooth blade. Set the blade depth to only slightly deeper than the laminate thickness to avoid damaging the subfloor.
- These cuts create sections within the damaged plank, making it easier to remove without affecting adjacent planks.
Removing the Damaged Plank
Once the damaged plank is scored, the individual sections can be removed. Utilizing an oscillating multi-tool with a suitable blade is essential for this process.
- Carefully insert the oscillating multi-tool blade into one of the scored lines.
- Use the oscillating action to cut through the remaining laminate thickness and any underlying underlayment.
- Gently pry up each section of the damaged plank using a putty knife or small pry bar. Work slowly and methodically to avoid damaging surrounding planks.
- Remove any remaining underlayment or adhesive residue from the subfloor using a putty knife or scraper. Ensure the surface is clean and level for the new plank.
Preparing the Replacement Plank
The replacement plank requires some modification before installation. This involves cutting the appropriate tongue and groove edges.
- Measure the dimensions of the area where the damaged plank was removed. Ensure the replacement plank matches these dimensions.
- Using a circular saw or hand saw, carefully cut off the bottom lip (tongue) of the long edge and one short edge of the replacement plank. This allows the plank to slide into place.
- Test fit the replacement plank to ensure a snug fit. Minor adjustments may be necessary.
Installing the Replacement Plank
Installing the prepared replacement plank requires careful alignment and securing.
- Apply a small amount of wood glue to the exposed tongue and groove edges of the surrounding planks (optional). This provides additional stability.
- Angle the replacement plank and slide the cut edges into the corresponding grooves of the adjacent planks. Ensure the top surface is flush with the surrounding flooring.
- Use a tapping block and hammer to gently tap the replacement plank into its final position. The tapping block protects the plank's edge from damage.
- If gaps exist, use a pull bar to tightly join the replacement plank to the surrounding planks.
Finishing the Repair
Once the replacement plank is securely in place, a few final steps ensure a seamless finish.
- Clean the area around the newly installed plank, removing any dust or debris.
- If wood glue was used, remove any excess glue with a damp cloth.
- Allow the area to dry completely before subjecting it to heavy traffic.
Addressing Common Issues
Several challenges might arise during the replacement process. Understanding these potential issues and their solutions can streamline the repair.
- Tight fit: If the replacement plank is too tight to fit, lightly sand the cut edges to achieve a better fit. Avoid over-sanding, which may create instability.
- Chipped edges: Exercise extreme care when handling the replacement plank to avoid chipping. If chipping occurs, wood filler can address minor imperfections. For significant damage, a new replacement plank might be required.
- Uneven surface: Ensure the subfloor is level before installing the replacement plank. Any unevenness can result in instability and future damage.
Alternative Removal Methods
While cutting the plank is the preferred method for removal, alternative methods exist for specific situations.
- Prying up from the edge: If the damaged plank is located along the edge of the room or next to a threshold, it might be possible to carefully pry it up using a pry bar and pull bar without cutting. Work slowly and apply even pressure to avoid damaging adjacent planks.
- Using a plunger: In some cases, a specialized flooring plunger can be used to pull up a damaged plank. This method is generally less effective than cutting and requires a specific type of plunger designed for laminate flooring.

How To Replace Lock Vinyl Flooring

How To Replace A Damaged Laminate Board That S In The Middle Of Floor

How To Do A Laminate Board Replacement On Floor Step By

Avoid Costly Mistakes Repairing Vinyl Plank Flooring Made Easy

How To Remove A Single Piece Of Hardwood Flooring The Art Doing Stuff

How To Replace A Vinyl Plank With Tongue And Groove Locking System

Boen Repair Tips How To Replace A Single Hardwood Flooring Board

How To Replace Damaged Floor Boards

Removing Replacing A Damaged Hardwood Flooring Board

How To Repair Laminate Flooring With Water Damage Dry Force
See Also