How To Replace An Engineered Hardwood Floor Plank
Damaged engineered hardwood planks detract from the overall aesthetic of a floor and can worsen if left unattended. Fortunately, individual planks can often be replaced without requiring a full floor renovation. This article outlines the process of replacing a single engineered hardwood plank, providing a step-by-step guide for homeowners looking to undertake this repair.
Tools and Materials
Gathering the necessary tools and materials beforehand streamlines the replacement process. The following items are typically required:
- Circular saw with a fine-tooth blade
- Oscillating multi-tool
- Hammer
- Pry bar
- Chisel
- Vacuum
- Wood glue
- Safety glasses
- Dust mask
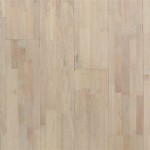
- Replacement plank
- Wood flooring adhesive (if required)
Preparing the Damaged Plank for Removal
Proper preparation is crucial for cleanly removing the damaged plank without affecting surrounding planks. This involves cutting the plank into smaller, more manageable sections.
- Set the circular saw blade depth slightly deeper than the thickness of the flooring.
- Score the damaged plank lengthwise, creating several parallel cuts. Avoid cutting into the subfloor.
- Use the oscillating multi-tool to cut along the ends of the damaged plank, separating it from adjacent planks.
Removing the Damaged Plank
With the plank scored and separated, the removal process can begin. Careful execution prevents damage to surrounding planks.
- Using a chisel and hammer, carefully break apart and remove the cut sections of the plank.
- A pry bar can be used to lift stubborn sections, but exercise caution to avoid damaging the tongue and groove of adjacent planks.
- Thoroughly clean the area of any remaining debris and adhesive residue using a vacuum.
Preparing the Replacement Plank
Before installing the new plank, it needs to be prepared to fit seamlessly into the existing flooring. This involves removing portions of the plank to allow for proper installation.
- Measure and mark the replacement plank to match the dimensions of the removed plank.
- Using a circular saw or table saw, carefully cut the bottom portion of the groove edge of the replacement plank. This will allow it to slide into place.
- Dry fit the plank to ensure a proper fit. Minor adjustments can be made with a utility knife or sandpaper.
Installing the Replacement Plank
Once the replacement plank is prepared, it's ready for installation. Ensure a tight and secure fit for stability and longevity.
- Apply wood glue to the edges of the surrounding planks where the new plank will be inserted. If the original flooring used adhesive, apply adhesive to the subfloor as well.
- Carefully angle the replacement plank into the opening, ensuring the tongue fits snugly into the groove of the adjacent plank.
- Gently tap the replacement plank into place with a rubber mallet or hammer and a wood block to avoid damaging the surface.
- Remove any excess glue immediately with a damp cloth.
Finishing Touches
After the replacement plank is installed, some finishing touches are required to ensure a seamless and level finish.
- Place a heavy object, such as books or weights, on top of the newly installed plank for several hours to ensure a strong bond with the adhesive.
- Inspect the area for any gaps or unevenness. Minor gaps can be filled with wood filler that matches the flooring color.
- Once the filler is dry, lightly sand the area to create a smooth, even surface.
Addressing Floating Floors
Replacing planks in floating engineered hardwood floors differs slightly from glued-down installations. The process largely remains the same, except adhesive is not used.
- Focus on carefully removing the damaged plank without disturbing the interlocking mechanism of surrounding planks.
- The replacement plank should also be prepared by removing the bottom groove to allow for insertion.
- Use a tapping block and hammer to carefully connect the new plank with the surrounding planks, ensuring a tight fit.
Safety Precautions
Prioritizing safety throughout the process is paramount. The following precautions minimize the risk of injury:
- Always wear safety glasses and a dust mask when cutting or sanding wood.
- Use caution when operating power tools and follow manufacturer instructions.
- Ensure adequate ventilation in the work area.

How To Replace Engineered Hardwood Floor Planks Diy Repair

How I Fit Engineered Oak Wood Flooring

Can I Install Engineered Hardwood Flooring Over Existing Floors Lv Toronto

How To Install Lock Engineered Hardwood Flooring

How To Install Lock Engineered Hardwood Flooring

Engineered Wood Flooring Project Step By Guide To Laying An Floor

How To Install Lock Engineered Hardwood Flooring

How To Lay Engineered Wood Flooring A Diy Guide For Everyone

Removing Replacing A Damaged Hardwood Flooring Board

How To Install An Engineered Hardwood Floor
See Also