How To Replace a Floating Floor Board
Damage to a floating floor, whether from scratches, dents, or water damage, can detract from the overall aesthetic of a room. Fortunately, the click-lock system of floating floors allows for individual board replacement without needing to redo the entire floor. This article details the process of replacing a damaged floating floor board.
Preparation is Key
Before beginning the replacement process, gather the necessary tools and materials. This preparation ensures a smooth and efficient repair.
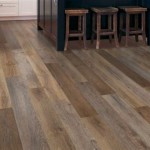
- Replacement Board: Acquire a matching replacement board. Leftover pieces from the initial installation are ideal. If unavailable, purchase a new board ensuring it matches the existing floor's color, texture, and thickness.
- Pull Bar: A pull bar is essential for removing the damaged board and fitting the new one into place. This specialized tool prevents damage to surrounding boards.
- Tapping Block: A tapping block protects the edges of the new board during installation, ensuring a secure fit without marring the surface.
- Utility Knife/Circular Saw: These tools are needed to score and remove the damaged board.
- Safety Glasses: Protecting the eyes from debris is crucial during the cutting process.
- Measuring Tape: Accurate measurements are essential for cutting the replacement board to the correct size.
- Pencil/Marker: Marking the cut lines on the replacement board ensures precision.
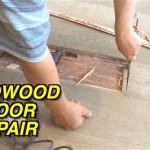
Removing the Damaged Board
Removing the damaged board involves a careful process to minimize disruption to the surrounding flooring.
- Score the Board: Using a utility knife or circular saw, score the damaged plank along its length and width, creating several sections. This scoring helps to prevent splintering and makes removal easier.
- Remove the Sections: Carefully pry up and remove each scored section of the damaged board. A putty knife can be useful for this step.
- Clean the Area: Once the damaged board is removed, clean the exposed subfloor, removing any debris or adhesive residue. This creates a smooth surface for the new board.
Preparing the Replacement Board
Preparing the replacement board correctly ensures a seamless fit and minimizes the risk of future issues.
- Measure and Cut: Measure the space created by the removed board. Cut the replacement board to the same dimensions, ensuring a precise fit.
- Remove the Tongue and Groove: On the appropriate edges of the replacement board, carefully remove the tongue and groove edges. This allows the board to fit into the existing floor.
- Apply Adhesive (If Necessary): Depending on the type of floating floor, a small amount of adhesive may be necessary along the cut edges of the replacement board. Check the manufacturer's instructions for specific recommendations.
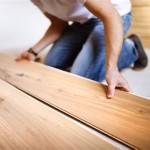
Installing the Replacement Board
Installing the new board requires precision and the proper use of installation tools.
- Angle and Insert: Angle the replacement board slightly and insert the edge with the remaining tongue into the groove of the adjacent board.
- Lower and Click: Lower the replacement board and press down firmly until it clicks into place. The tapping block can be used to gently tap the board down without damaging the surface.
- Secure the Board: Use the pull bar to ensure the replacement board is fully engaged with the surrounding boards. Place the pull bar against the edge of the new board and gently tap it with a hammer to pull it tight against the adjacent boards. This creates a seamless and secure fit.
- Clean Up: Remove any excess adhesive and clean the surrounding area. Allow the adhesive (if used) to dry according to the manufacturer's instructions.
Post-Installation Considerations
After the replacement board is installed, a few final steps ensure the repair's longevity and prevent future issues.
- Inspect the Area: Carefully inspect the replaced board and the surrounding area to ensure a proper and secure fit. Check for any gaps or unevenness.
- Avoid Heavy Traffic: If adhesive was used, avoid heavy traffic on the repaired area until the adhesive is fully cured.
- Regular Maintenance: Following regular maintenance procedures for the entire floor helps prevent future damage and extends the life of the flooring.
Replacing a single board in a floating floor is achievable with the right tools and a careful approach. This detailed process allows for cost-effective repair, maintaining the integrity and aesthetic of the floor without requiring a full replacement.

How To Replace Lock Vinyl Flooring

How To Replace A Damaged Laminate Board That S In The Middle Of Floor

How To Replace Floating Floor Boards Bunnings Work Community

How To Replace A Damaged Hardwood Floor Board Diy Family Handyman

How To Replace Warped Water Damaged Laminate Floor Boards

How To Replace Floating Floor Boards Bunnings Work Community

Replace A Damaged Board In Laminate Floor Rw Supply Design

How To Fix A De Laminated Board Without Removing The

How To Replace A Floorboard Fine Homebuilding

How To Replace A Damaged Hardwood Floor Board Diy Family Handyman
See Also