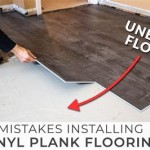
How to Replace a Damaged Laminate Floor Plank
Laminate flooring, prized for its durability and aesthetic appeal, can occasionally sustain damage. Whether from moisture, impact, or wear and tear, a single damaged plank can detract from the overall appearance of the floor. Fortunately, replacing a damaged laminate plank is often a manageable DIY project, restoring the integrity and visual harmony of the flooring. This article provides a comprehensive guide to this process.
Identifying the Damage and Determining the Replacement Method
Before embarking on the replacement process, a thorough assessment of the damage is crucial. The type and extent of the damage will dictate the appropriate replacement method. Minor surface scratches might be addressed with repair kits, while significant damage, such as swelling, cracks, or chips, necessitates full plank replacement.
Two primary methods exist for replacing laminate planks: the direct replacement method and the perimeter removal method. The direct replacement method, suitable for planks located away from the room's edges, involves carefully cutting and removing the damaged plank without disturbing surrounding planks. The perimeter removal method, required for planks located near walls or other fixed structures, entails disassembling the flooring back to the damaged plank, plank by plank.
The feasibility of each method depends on the locking mechanism of the laminate flooring. Some flooring systems permit easier disassembly than others. If unsure, consulting the manufacturer's instructions or seeking advice from a flooring professional is recommended.
Gathering the Necessary Tools and Materials
A successful laminate plank replacement relies on having the correct tools and materials at hand. This preparation minimizes disruptions and ensures a clean, professional-looking result. Essential tools and materials include:
*Replacement Laminate Plank:
Obtaining a matching replacement plank is paramount. Ideally, this involves using leftover planks from the original installation. If not available, attempt to source a matching plank from the same manufacturer and style. If an exact match is unattainable, a close substitute can be used in an inconspicuous area. *Safety Glasses:
Eye protection is crucial when working with cutting tools and creating dust. *Work Gloves:
Gloves protect hands from splinters and sharp edges. *Tape Measure:
Used for precise measurements when cutting the replacement plank. *Pencil:
Marking the cutting lines accurately on the replacement plank. *Utility Knife:
Used for scoring the damaged plank and for trimming any excess adhesive. *Chisel:
A sharp chisel assists in removing the damaged plank, especially when dealing with glued planks. *Hammer:
Lightly tapping the chisel to remove the damaged plank and to lock the new plank in place. Avoid heavy hammering to prevent damage to surrounding planks. *Circular Saw or Oscillating Multi-Tool:
These tools are used for making precise cuts when removing the damaged plank and fitting the replacement. An oscillating multi-tool with a plunge-cutting blade is particularly effective for cutting the damaged plank in place. *Pry Bar:
A small pry bar can be helpful for gently lifting the damaged plank in conjunction with a chisel. *Tapping Block and Pull Bar:
These tools facilitate the proper locking of the new plank into the existing floor. The tapping block protects the plank edge when tapping, and the pull bar is used to engage the locking mechanism on wall-side planks. *Wood Glue (if needed):
Some installations require a small amount of wood glue to secure the replacement plank. Consult the manufacturer's instructions. *Vacuum Cleaner:
Essential for cleaning debris and dust created during the removal and installation process. *Damp Cloth:
For cleaning the subfloor and the surface of the newly installed plank.Step-by-Step Guide to Replacing a Laminate Plank
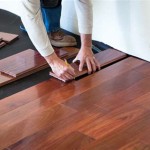
The following steps detail the process of replacing a damaged laminate plank, assuming the direct replacement method is applicable. If the perimeter removal method is required, the initial steps will involve carefully disassembling the floor, working backward from the wall or fixed obstruction to the damaged plank. Reassembly will occur after the replacement plank is installed.
1.Prepare the Damaged Plank:
Carefully score the surface of the damaged plank with a utility knife, creating a grid pattern. This makes the plank easier to break and remove in smaller pieces, minimizing the risk of damage to surrounding planks. Focus on cutting through the wear layer of the laminate. 2.Cut Along the Plank's Center:
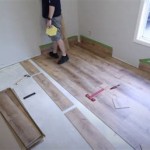
Using a circular saw or oscillating multi-tool, carefully cut along the center of the plank, lengthwise. Set the saw blade depth to the thickness of the laminate plank to avoid cutting into the subfloor. 3.Remove the Plank Sections:
Using a chisel and hammer, carefully remove the sections of the cut plank. Work from the center outwards, prying up the pieces. Be gentle to avoid damaging the tongue and groove of the adjacent planks. A pry bar can be used to assist in lifting the plank sections. 4.Clean the Subfloor:
Thoroughly clean the subfloor beneath the removed plank. Remove any debris, dust, or adhesive residue. Ensure the subfloor is level and dry before proceeding. A vacuum cleaner is ideal for this step. 5.Prepare the Replacement Plank:
Measure the dimensions of the removed plank and carefully transfer these measurements to the replacement plank. If using the direct replacement method, the locking mechanism on the replacement plank will need to be removed on the sides that will connect to the existing floor. This can be done using a utility knife, carefully scoring and snapping off the tongue and groove. However, some newer flooring technologies are designed with removal of the locking mechanisms unnecessary. 6.Dry Fit the Replacement Plank:
Before applying any adhesive, dry fit the replacement plank to ensure a proper fit. Make any necessary adjustments using a utility knife or sander. The plank should sit flush with the surrounding planks. 7.Apply Adhesive (if required):
If the manufacturer recommends adhesive, apply a thin bead of wood glue to the edges of the replacement plank that will contact the adjacent planks. Avoid applying excessive glue, which can squeeze out and create a mess. This step might not be required by all laminate flooring systems. 8.Position the Replacement Plank:
Carefully position the replacement plank into the opening. Align the edges with the adjacent planks and gently press down to secure it in place. 9.Tap the Plank into Place:
Using a tapping block and hammer, gently tap the edges of the replacement plank to fully engage the locking mechanism. The plank should sit flush with the surrounding floor. If using a pull bar, use it to pull the edge of the plank tight against the adjacent plank, especially when working near walls. 10.Clean Up Excess Adhesive:
Immediately wipe away any excess adhesive that squeezes out with a damp cloth. Dried adhesive can be difficult to remove. 11.Allow to Cure/Set:
Allow the adhesive (if used) to cure according to the manufacturer's instructions. Avoid walking on the replaced plank during the curing period. 12.Reassemble (if necessary):
If the perimeter removal method was used, carefully reassemble the flooring, working from the replaced plank outwards towards the wall or fixed obstruction. Ensure each plank is properly locked into place.Preventing Future Damage
While laminate flooring is durable, preventive measures can minimize the risk of future damage. These measures include:
*Using floor protectors:
Place felt pads or other protective coverings under furniture legs to prevent scratches and dents. *Promptly cleaning spills:
Wipe up spills immediately to prevent moisture from seeping into the seams and causing swelling. *Using entrance mats:
Place mats at entrances to trap dirt and debris that can scratch the floor. *Maintaining proper humidity levels:
Excessive humidity can cause laminate flooring to swell. Consider using a dehumidifier in humid climates. *Avoiding abrasive cleaners:
Use cleaning products specifically designed for laminate flooring to avoid damaging the finish.By following these steps and taking appropriate precautions, replacing a damaged laminate plank can be accomplished successfully, restoring the appearance and extending the life of the floor.

Laminate Floor Repair Diy Family Handyman

How To Replace Lock Vinyl Flooring

How To Replace Damaged Flooring Plank Diy

Replace A Damaged Board In Laminate Floor Rw Supply Design

Replace A Damaged Board In Laminate Floor Rw Supply Design

How To Install Laminate Flooring For Beginners

How To Repair Damaged Laminate Floor Checkatrade

How To Replace Warped Water Damaged Laminate Floor Boards

How To Repair Laminate Flooring Foreman Snags

How To Replace Laminate Flooring Episode 7 Howtospecialist Build Step By Diy Plans
See Also