How To Replace Laminate Floor Tiles
Laminate flooring offers an attractive, durable, and cost-effective alternative to hardwood. However, individual tiles can become damaged over time, requiring replacement. This guide provides a comprehensive walkthrough of the process, enabling homeowners to tackle this task confidently and effectively.
Preparation is Key: Before beginning, gather the necessary tools and materials. These typically include a utility knife, pry bar, tapping block, rubber mallet, measuring tape, safety glasses, replacement tiles, and potentially a small amount of laminate flooring adhesive, depending on the click-lock system of the existing floor.
Locating the Damaged Tile: Carefully inspect the damaged tile and its surrounding area. The replacement process requires accessing the damaged tile from the nearest wall or edge of the flooring. If the damaged tile is in the center of the room, a more involved process of disassembling the floor to that point will be necessary.
Disassembling From the Wall: Begin removing the baseboard or quarter-round molding along the wall closest to the damaged tile. This provides access to the edge of the flooring. Using a pry bar, gently lift the first row of planks nearest the wall. Work slowly and carefully to avoid damaging adjacent planks. Continue removing rows, working towards the damaged tile, numbering or labeling each plank as it's removed to ensure proper reassembly.
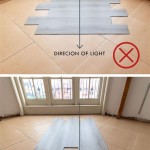
Dealing with Click-Lock Systems: Most laminate flooring utilizes a click-lock system. These systems interlock, creating a floating floor. Understanding how the system works is crucial for successful removal and replacement. Generally, the planks are angled slightly and clicked together. Use the pry bar to carefully disengage the locking mechanism. Consult the manufacturer's instructions for specific guidance on your flooring type.
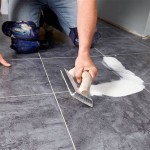
Removing the Damaged Tile: Once the surrounding planks are removed, the damaged tile can be carefully lifted and removed. If adhesive was used during the original installation, a utility knife might be required to separate the tile from the underlayment or subfloor. Take care not to damage the surrounding tiles or the underlayment.
Preparing the Replacement Tile: If the replacement tile is new, it will likely have a tongue-and-groove locking system. Depending on the position of the replacement tile, you may need to trim the edges of the tongue or groove to facilitate installation. A utility knife and straight edge are useful for achieving clean, precise cuts. Dry-fit the replacement tile to ensure accurate measurements.
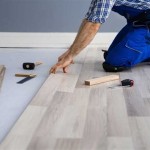
Installing the Replacement Tile: Apply a small amount of laminate flooring adhesive to the edges of the replacement tile if your original installation required it. Carefully align the replacement tile, inserting the tongue into the groove of the adjoining plank. Use the tapping block and rubber mallet to gently tap the tile into place, ensuring a secure connection. Avoid striking the tile directly with the mallet, as this can cause damage.
Reassembling the Floor: Once the replacement tile is securely in place, begin reassembling the floor, working backward from the damaged tile towards the wall. Use the numbers or labels assigned earlier to ensure correct placement. Engage the click-lock mechanisms firmly, tapping gently with the rubber mallet and tapping block as needed. Ensure all planks are flush and level.
Reinstalling Baseboards/Molding: After the floor is fully reassembled, reinstall the baseboards or quarter-round molding. Use finishing nails to secure the molding, taking care not to damage the newly installed flooring. Fill nail holes with wood filler and paint or stain to match the existing molding.
Post-Installation Cleanup: Thoroughly clean the area, removing any dust, debris, or excess adhesive. Vacuum or sweep the floor, then use a damp mop suitable for laminate flooring to remove any remaining residue.
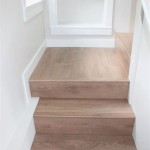
Addressing Specific Challenges: While the above steps outline the general process, certain challenges may arise. For instance, if the damaged tile is located in a doorway, the door jamb might require trimming to accommodate the new flooring. Similarly, if the damaged tile is near a complex transition piece, such as a transition to another flooring material, extra care should be taken during removal and reinstallation.
Underlayment Considerations: If the existing underlayment was damaged during the removal process, it should be repaired or replaced before installing the new tile. This ensures proper cushioning and sound absorption.
Seeking Professional Assistance: While replacing individual laminate floor tiles is often manageable for DIYers, complex situations or extensive damage might require professional flooring installation services. Consulting a professional can ensure a seamless and long-lasting repair.

How To Install Laminate Flooring For Beginners

Removing Ceramic Tile Installing Wood Laminate

Flooring Install Tiles On Top Of Laminate Floor In Kitchen Home Improvement Stack Exchange

Removing Ceramic Tile Installing Wood Laminate

How To Install Vinyl Plank Tiles In A Bathroom

How To Install Laminate Over A Tile Floor 2025 Today S Homeowner

Flooring Install Tiles On Top Of Laminate Floor In Kitchen Home Improvement Stack Exchange

Installing Luxury Vinyl Over Existing Tiles Choices Flooring

Installing Laminate Tile Flooring Diy Instructions

Can You Put Laminate Flooring Over Tile Twenty Oak
See Also