How To Replace One Hardwood Floor Board
Replacing a single damaged hardwood floor board, while requiring patience and precision, is a manageable DIY project that can save significant costs compared to professional refinishing. This article provides a step-by-step guide for replacing one hardwood floor board, outlining the necessary tools, materials, and procedures.
Tools and Materials Required
Gathering the correct tools and materials beforehand streamlines the replacement process. The following items are essential:
- Circular saw
- Oscillating multi-tool
- Hammer
- Pry bar
- Chisel
- Wood glue
- Replacement hardwood board
- Safety glasses
- Dust mask
- Gloves
- Nail set
- Finishing nails
- Wood putty
- Sandpaper
- Vacuum
Preparing the Damaged Board for Removal
Careful preparation prevents damage to surrounding boards. The following steps outline the process:
- Using a circular saw, set the blade depth slightly deeper than the flooring thickness.
- Make two parallel cuts along the length of the damaged board, staying approximately ½ inch from each edge.
- Make perpendicular cuts across the ends of the damaged board, connecting the parallel cuts.
- This isolates the damaged section, minimizing stress on adjacent boards during removal.
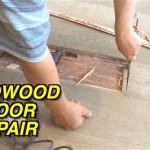
Removing the Damaged Board
Removing the damaged segments requires precision to avoid further damage. Follow these steps:
- Using an oscillating multi-tool, cut through the remaining connections between the scored sections and the surrounding flooring.
- Carefully pry up the cut sections of the damaged board using a pry bar and chisel.
- Remove any remaining nails or staples securing the tongue and groove edges of the board.
- Clean the exposed subfloor, removing any debris or adhesive residue.
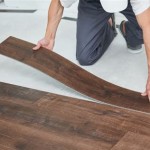
Preparing the Replacement Board
The replacement board needs adjustments to fit seamlessly. Follow these instructions:
- Cut the replacement board to the same length as the removed board.
- Carefully remove the bottom lip of the groove on the long edges of the replacement board using a table saw or hand plane. This allows the new board to slide into place.
- Test fit the replacement board to ensure a snug fit. Minor adjustments may be necessary.
Installing the Replacement Board
Installing the replacement board requires careful alignment and securing. Follow these steps:
- Apply a thin layer of wood glue to the subfloor and the tongue edges of the replacement board.
- Carefully insert the replacement board into the open space, aligning the tongue with the groove of the adjacent boards.
- Gently tap the board into place using a hammer and a scrap piece of wood to protect the surface.
- Secure the replacement board by driving finishing nails at an angle through the tongue and into the subfloor. Use a nail set to countersink the nails.
Finishing the Repair
The final steps create a smooth, uniform surface. Observe the following:
- Fill the nail holes with wood putty, allowing it to dry completely.
- Sand the repaired area lightly with fine-grit sandpaper to blend it with the surrounding floor.
- Vacuum the area to remove dust and debris.
- Apply a matching finish to the repaired area to blend with the existing floor. Multiple coats may be necessary.
Important Considerations
Several key factors contribute to a successful repair:
- Accurately matching the replacement board to the existing flooring in terms of species, width, and thickness is crucial.
- Take safety precautions by wearing safety glasses, a dust mask, and gloves throughout the process.
- Consult local building codes for specific requirements regarding flooring installations and repairs.
- For extensive damage or complex installations, consulting a qualified flooring professional is recommended.

Removing Replacing A Damaged Hardwood Flooring Board

How To Remove A Single Piece Of Hardwood Flooring The Art Doing Stuff

Replacing A Hardwood Flooring Board

How To Replace Damaged Floor Boards

How To Replace A Damaged Laminate Board That S In The Middle Of Floor

How To Replace Lock Vinyl Flooring

How To Replace A Flooring Board Rw Supply Design

How To Repair Floorboards Ideas Advice B Q

How To Do A Laminate Board Replacement On Floor Step By

How To Remove A Single Piece Of Hardwood Flooring
See Also