How To Replace a Single Laminate Floor Board
Damaged laminate flooring can detract from a room's aesthetics and potentially lead to further issues if left unaddressed. Fortunately, replacing a single damaged board, rather than the entire floor, is often a viable and cost-effective solution. This process, while requiring some patience and precision, can be accomplished with common tools and careful execution.
Before beginning, gather the necessary tools and materials. These typically include a utility knife, a circular saw set to the depth of the laminate plank, safety glasses, a pry bar, a hammer, a pull bar, wood glue, a measuring tape, a pencil, and a replacement laminate board. Having all necessary items readily available will streamline the process and prevent interruptions.
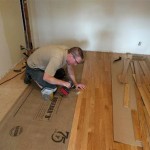
The damaged board must be carefully cut out to avoid affecting surrounding planks. Begin by scoring the surface of the damaged board with a utility knife. Scoring multiple times along the length and width of the board helps prevent chipping and splintering during the removal process. This step is crucial for maintaining the integrity of the adjacent boards.
After scoring, a circular saw, set to a depth slightly deeper than the laminate plank's thickness, should be used to cut out the majority of the damaged board. It is essential to perform this step with precision to avoid damaging the subfloor. The cuts should be confined to the damaged plank, leaving the surrounding boards untouched. Safety glasses should be worn throughout this process to protect the eyes from debris.
Once the central portion of the damaged plank is removed, the remaining edges and pieces need to be extracted. A pry bar and hammer can be used to carefully lift and remove these remaining sections. Extreme care should be taken during this stage to avoid damaging the tongue and groove system of the adjacent boards. The pull bar can be particularly useful for removing stubborn pieces close to the wall.
With the damaged board removed, the area should be cleaned of any debris and remnants of the old adhesive. This will ensure a clean and level surface for the new board. A vacuum cleaner or a damp cloth can be used to achieve this. The cleaner the surface, the better the adhesion of the new board.
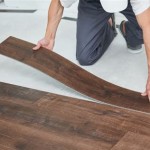
Preparing the replacement board is the next critical step. The replacement board will likely have its tongue-and-groove edges still intact. These edges, which normally interlock with adjacent boards, must be removed on the sides that will butt against cut edges. A utility knife or a saw can be used to carefully remove these edges, ensuring a snug fit against the existing flooring. Measurements should be taken to ensure the replacement board will fit precisely within the space.
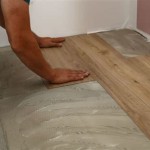
Applying adhesive is crucial for a secure and lasting bond. Wood glue should be applied to the exposed tongue and groove sections of the surrounding boards. The amount of glue should be sufficient to create a strong bond but not so excessive as to cause overflow once the new board is in place. The replacement board can then be carefully inserted into the open space, ensuring a tight fit with the surrounding boards.
Once the new board is positioned, it should be gently tapped into place using a hammer and a scrap piece of wood to protect the surface of the new laminate. This will guarantee a flush and even surface with the surrounding flooring. Excess glue should be wiped away immediately with a damp cloth.
Weight should be applied to the newly installed board to ensure a firm bond with the adhesive. Heavy objects, like books or weights, can be placed on top of the board for several hours while the glue dries. This will prevent the board from shifting or lifting during the curing process. Consult the glue manufacturer's instructions for the recommended drying time.
After the glue has fully dried, the area can be cleaned and inspected. Ensure the new board sits flush with the surrounding flooring and there are no gaps or unevenness. With proper execution, the replaced board will blend seamlessly with the existing laminate, restoring the floor's appearance and functionality.
Replacing a single laminate floorboard can be a challenging yet rewarding DIY project. By following these steps meticulously and exercising patience and precision, homeowners can often successfully repair minor damage, saving the cost of professional intervention and extending the lifespan of their laminate flooring.

Laminate Floor Repair Diy Family Handyman

How To Replace Lock Vinyl Flooring

How To Replace A Damaged Laminate Board That S In The Middle Of Floor

How To Replace Laminate Flooring Episode 7 Howtospecialist Build Step By Diy Plans

How To Remove A Single Piece Of Hardwood Flooring The Art Doing Stuff

Avoid Costly Mistakes Repairing Vinyl Plank Flooring Made Easy

How To Replace A Vinyl Plank With Tongue And Groove Locking System

How To Replace Damaged Flooring Plank Diy

How To Remove A Single Piece Of Hardwood Flooring The Art Doing Stuff

How To Remove A Single Piece Of Hardwood Flooring The Art Doing Stuff
See Also