How To Replace Warped Water Damaged Laminate Floor Boards
Water damage can wreak havoc on laminate flooring, often causing boards to warp and buckle. This not only compromises the floor's aesthetic appeal but also its structural integrity. Fortunately, replacing individual damaged boards is often possible, avoiding the need for a complete floor replacement. This article provides a step-by-step guide to replacing warped water-damaged laminate floor boards.
Assessing the Damage and Gathering Supplies
The first step involves assessing the extent of the damage. Thoroughly inspect the affected area to determine how many boards require replacement. It's also important to identify the underlying cause of the water damage and address it before replacing the boards. A leaking pipe, for example, needs repair before any flooring work commences to prevent recurrence.
Once the damage assessment is complete, gather the necessary tools and materials. These typically include:
- Replacement laminate boards: Ensure these match the existing flooring precisely. Consider purchasing a few extra boards to account for potential breakage during the process.
- Pull bar: This specialized tool is essential for removing the damaged boards.
- Tapping block: This protects the edges of the boards during installation.
- Hammer: A rubber mallet is preferable to minimize damage.
- Utility knife or laminate cutter: This is necessary for scoring and cutting the boards.
- Measuring tape: Accurate measurements are crucial for cutting the replacement boards correctly.
- Safety glasses and work gloves: These protect against splinters and other potential hazards.
- Vacuum: This is used to clean the area before installing the new boards.
- Optional: Moisture meter to check the subfloor for excess moisture.
Removing the Damaged Boards
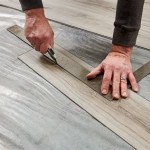
Begin the removal process by removing the baseboard or quarter round that runs along the wall closest to the damaged boards. This provides access to the edge of the flooring. Next, insert the pull bar between the wall and the damaged board. Gently pry up the edge of the board until it disengages from the adjacent board. Repeat this process along the length of the damaged board until it can be lifted free.
For boards situated in the middle of the floor, the process is slightly different. Using a utility knife or laminate cutter, score a line down the center of the damaged board. Be careful not to cut too deep, as this could damage the subfloor. Then, carefully break the board along the scored line and remove the pieces using the pull bar. This technique minimizes disruption to surrounding boards.
Once the damaged boards are removed, thoroughly inspect the subfloor for any signs of moisture or damage. If the subfloor is damp, allow it to dry completely before proceeding with the replacement. A moisture meter can be helpful in determining the moisture content of the subfloor. Addressing any subfloor issues is crucial to prevent future problems with the new flooring.
Installing the Replacement Boards
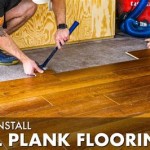
Before installing the replacement boards, ensure they are cut to the correct size. Measure the space left by the removed boards carefully and transfer these measurements to the new boards. Use a utility knife or laminate cutter to score and cut the boards along the marked lines. Precise cutting ensures a snug fit and minimizes gaps.
Start by installing the board furthest from the wall. Apply a small amount of laminate flooring adhesive to the tongue and groove of the replacement board, if required by your specific flooring type. Angle the board slightly and insert the tongue into the groove of the adjacent board. Gently lower the board into place, ensuring it sits flush with the surrounding boards. Use a tapping block and rubber mallet to gently tap the board into place, avoiding damage to the edges.
Repeat this process for each replacement board, working your way towards the wall. For the final board, you may need to trim its width to fit the remaining space. Once the final board is in place, reinstall the baseboard or quarter round. This completes the installation process.
Post-Installation Considerations
After replacing the damaged boards, avoid heavy traffic on the repaired area for at least 24 hours to allow the adhesive, if used, to fully cure. Regular cleaning with a damp mop and appropriate laminate floor cleaner will help maintain the appearance and longevity of the floor. Avoid using excessive water, as this could reintroduce moisture and potentially damage the newly installed boards or the surrounding flooring.
Replacing warped water-damaged laminate floor boards can be a manageable DIY project with the right tools, materials, and approach. Following these steps can restore the appearance and functionality of the floor without the expense of a complete replacement.

How To Replace Warped Water Damaged Laminate Floor Boards

How To Prevent Repair Water Damage Laminate Flooring Claude Browns

How Do I Camouflage Water Damaged Laminate Flooring Hometalk

How To Fix A Laminate Floor That Got Wet Simple Guide

A Guide To Repairing Swollen Laminate Flooring Mersey

Water Damaged Floor Repair And Replacement 50floor

How To Repair Laminate Flooring Water Damaged Floorboards

How To Repair Laminate Flooring The Home

How To Replace Warped Water Damaged Laminate Floor Boards

How To Repair Laminate Flooring The Home
See Also