How To Safely Remove Laminate Flooring
Removing laminate flooring can be a daunting task, but with the right approach, it can be done efficiently and safely. Laminate flooring is a popular choice for its durability, affordability, and ease of installation. However, when it comes time for a renovation or replacement, removing the flooring can be challenging. This comprehensive guide will provide you with detailed instructions on how to safely remove laminate flooring, ensuring a smooth and successful process.
1. Preparation and Safety Precautions
Before embarking on the laminate flooring removal process, it's crucial to take necessary safety precautions and prepare the work area. This includes:
- Clear the Room: Remove all furniture, appliances, and personal belongings from the room where the laminate flooring is located. This will provide ample space for working and prevent damage to these items during the removal process.
- Safety Gear: Wear protective gear such as safety glasses, gloves, and a dust mask to shield yourself from debris and potential hazards. The removal process can create dust and small particles, so it's essential to protect your eyes, hands, and respiratory system.
- Power Off Appliances: Disconnect any electrical outlets or appliances in the room to prevent accidental shocks during the removal process. Be cautious when working near electrical wiring and ensure all power sources are safely disconnected.
- Prepare the Workspace: Clear any obstacles or trip hazards from the work area. Ensure you have adequate lighting and consider placing a drop cloth to protect the underlying subfloor from scratches or damage.
By taking these preparatory steps, you can create a safe and efficient environment for removing the laminate flooring.
2. Tools and Materials
To successfully remove laminate flooring, gather the following essential tools and materials:
- Pry Bar: A pry bar is a crucial tool for lifting and separating laminate planks. Choose a pry bar with a sturdy blade and a comfortable grip.
- Hammer: A hammer is used in conjunction with the pry bar for applying additional force when needed. Select a hammer with a claw for extracting nails and a comfortable grip.
- Utility Knife: A utility knife is useful for cutting through the laminate planks and their adhesive. Ensure you have sharp blades and a comfortable grip for precision cuts.
- Circular Saw with a Fine-Toothed Blade: A circular saw helps cut through the laminate flooring, especially when dealing with larger areas or obstacles. Use a fine-toothed blade to prevent chipping or splitting of the planks.
- Safety Glasses: Safety glasses are essential to protect your eyes from flying debris and dust particles. Always wear them when working with power tools.
- Gloves: Protective gloves are vital for safeguarding your hands from cuts, splinters, and potential chemical exposure from adhesives used to secure the laminate flooring.
- Dust Mask: A dust mask is crucial to prevent inhaling fine dust particles generated during the removal process. Choose a mask that provides adequate protection for your respiratory system.
- Drop Cloth: A drop cloth protects the underlying subfloor from scratches and debris. Additionally, it can help control dust and minimize cleanup after the removal project is complete.
- Waste Bins or Bags: You will need containers to dispose of the removed laminate flooring planks, adhesive remnants, and other debris.
Having all these tools readily available will ensure a smooth and efficient removal process.
3. Removal Process
Follow these steps to safely remove laminate flooring:
- Locate the Starting Point: Begin at the edge of the room or an inconspicuous area. Look for a plank that is not attached to any other flooring material or obstacles. This will allow you to easily pry it up as the starting point.
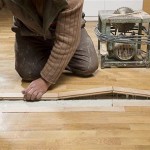
- Pry Up the First Plank: Place the pry bar underneath the edge of the starting plank, angling it upward. Gently apply leverage with the pry bar to lift the plank free from the subfloor. Be cautious not to damage the underlying subfloor.
- Remove the T-Molding: If there are any T-moldings or trim pieces along the edges, carefully remove them using a pry bar or a utility knife. Gently pull the T-molding away from the laminate flooring, taking care not to damage the subfloor or surrounding walls.
- Remove Adhesives: Once the planks are lifted, use a scraper to carefully remove any adhesive residue from the subfloor. Be patient and persistent, as some adhesives may be stubborn. Avoid scratching or damaging the subfloor during this process.
- Remove Staples or Nails: Examine the subfloor for any staples or nails used to secure the laminate flooring. Use a hammer with a claw to carefully remove these fasteners. Be cautious not to damage the subfloor or neighboring planks.
- Repeat the Process: Follow the steps above to remove the remaining laminate planks, working your way across the floor. Continue lifting and removing the planks carefully, separating them from the subfloor and removing any adhesive residue. Remember to work methodically to avoid damage to the subfloor.
- Dispose of Debris: Dispose of the removed laminate planks, adhesive scraps, and other debris properly. Consult local regulations for appropriate disposal methods and consider recycling options if available.
By following these steps, you can safely remove laminate flooring, leaving the subfloor ready for your next flooring project.

How Do I Remove Laminate Flooring Factory Direct

The Easiest Way To Remove Laminate Flooring

How To Remove Laminate Flooring The Home

10 Steps To Remove Laminate Flooring Home Improvement

How To Remove Laminate Flooring Bob Vila

How To Remove Laminate Flooring

Things To Know About Removing Overlay Laminate Flooring

How To Remove Laminate Flooring The Home

How To Remove Laminate Flooring Lcf Ltd

How To Remove Laminate Flooring Budget Dumpster
See Also