Essential Aspects of Installing Tile on a Concrete Basement Floor in Revit
Installing tile on a concrete basement floor using Revit architecture software requires careful planning and execution to ensure a durable and aesthetically pleasing finish. Here are the essential aspects to consider:
1. Floor Preparation:
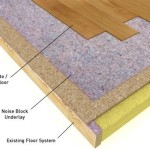
Begin by ensuring the concrete floor is level, flat, and free of any cracks or debris. Use a self-leveling compound or screed to smooth out any unevenness. Allow the floor to dry completely before proceeding.
2. Choose Appropriate Tile:
Select tiles designed for flooring applications in basements, which typically experience moisture. Consider porcelain or ceramic tiles with a water absorption rate below 0.5%. Opt for tiles with a slip-resistant surface to enhance safety.
3. Create Revit Model:
Start Revit and create a new project. Import the floor plan into the project. Define the floor as a concrete slab and specify its thickness. Create a new floor type to represent the tile flooring.
4. Define Tile Pattern:
Load the tile family into Revit and assign it to the floor type. Use the "Tile by Pattern" tool to define the desired tile layout, spacing, and grout lines. Specify the tile size and the offset distance between tiles.
5. Add Grout and Sealant:
Create a separate family for the grout. Assign the grout family to the "Grout" parameter in the floor type. Specify the grout width and color. Add a sealant family to protect the grout from moisture and stains.
6. Create Construction Documents:
Generate construction documents such as floor plans, elevations, and sections. Label the tile flooring and include details on the tile pattern, grout size, and sealant application. This documentation will guide the installation process.
7. Installation:
Apply a thin-set mortar to the prepared concrete floor using a notched trowel. Carefully lay the tiles according to the Revit model and the defined pattern. Use spacers to maintain consistent grout lines. Press the tiles firmly to ensure adhesion.
8. Grouting and Sealing:
Once the tiles are set, apply the grout using a grout float. Press the grout into the joints and remove excess. Allow the grout to dry and cure according to the manufacturer's instructions. Apply a sealant to protect the grout and the tile surface.
9. Final Inspection:
Inspect the installed tile flooring for any unevenness, missing tiles, or damaged grout. Make necessary adjustments and ensure the floor is level, clean, and aesthetically pleasing. Proper installation and maintenance will ensure the longevity and durability of your tiled concrete basement floor.

Adding Finish Floors To Each Room Tutorial Revit Architecture

Creating Basement Floors And Footings In Revit

Solved Revit Workflow For Flooring Autodesk Community

Autodesk Revit 2024 Creating A Concrete Basement

Need Help With Changing Ground Floor Elevation Autodesk Community

Atuodesk Revit 2024 Separating Floor Types

Excavate A Floor With Modified Sub Elements Revit Forum

Revit 2024 5 Structural Concrete Slab Floor And Custom Timber

Revit Create A Basement Level Walls And Stairs

The Best Way To Find Radiant Floor Heating Revit Resources
See Also