Installing Glue Down Vinyl Plank Flooring: A Step-by-Step Guide
Vinyl plank flooring is a popular choice for homeowners and businesses alike due to its durability, water resistance, and ease of maintenance. Glue down vinyl plank flooring is a type of vinyl flooring that is installed using adhesive, which creates a strong and permanent bond with the subfloor. Installing glue down vinyl plank flooring is a relatively simple process, but it is important to follow the manufacturer's instructions carefully to ensure a professional-looking and long-lasting installation. ### Materials and Tools You'll Need * Glue down vinyl plank flooring * Adhesive * Trowel * Utility knife * Measuring tape * Level * Chalk line * Safety glasses * Gloves ### Step-by-Step Instructions 1.Prepare the Subfloor
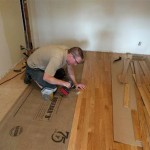
The subfloor must be clean, level, and dry before installing the vinyl plank flooring. Remove any existing flooring, baseboards, and moldings. Repair any holes or cracks in the subfloor and level it using a self-leveling compound if necessary. 2.Lay Out the Planks
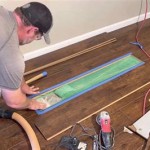
Start by laying out the planks in the room to determine the best layout. Allow for a 1/4-inch expansion gap around the perimeter of the room. Use a chalk line to mark the outline of the room on the subfloor. 3.Apply the Adhesive
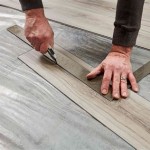
Using a trowel, apply the adhesive to the subfloor in the area where you will be installing the first row of planks. Spread the adhesive evenly, following the manufacturer's instructions. 4.Install the First Row of Planks
Place the first plank along the chalk line, aligning it with the wall. Press the plank firmly into the adhesive to create a good bond. Continue installing the remaining planks in the first row, staggering the joints by at least 6 inches. 5.Continue Installing the Planks
Continue installing the planks row by row, applying adhesive to the subfloor as you go. Use the level to ensure that each row is level. Stagger the joints as you go to create a strong and durable installation. 6.Trim the Planks
Once you reach the end of a row, use a utility knife to trim the last plank to fit. Measure the distance from the wall to the end of the last plank and mark the plank. Score the plank along the mark using a utility knife and snap it to the desired length. 7.Install the Baseboards and Moldings
Once all of the planks are installed, you can install the baseboards and moldings to finish the installation. Use a nail gun or a hammer and nails to secure the baseboards and moldings to the wall. ### Tips for Success * Use a high-quality adhesive that is specifically designed for vinyl plank flooring. * Allow the adhesive to dry completely before walking on the floor. * Use a level to ensure that each row of planks is level. * Stagger the joints of the planks by at least 6 inches. * Allow for a 1/4-inch expansion gap around the perimeter of the room. * Wear safety glasses and gloves when installing vinyl plank flooring. ### Conclusion Installing glue down vinyl plank flooring is a relatively simple process that can be completed in a few hours. By following the manufacturer's instructions carefully and using the tips provided in this guide, you can achieve a professional-looking and long-lasting installation.
Ivc Lvt Igrip Glue Down Installation With Trowel Full

Post Nbl Express Eco Flooring

Diy How To Install Glue Down Vinyl Plank Flooring

How To Repair Luxury Vinyl Plank Flooring The Palette Muse

Laying Vinyl Planks The Right Way Expert Guide By Fantastic Handyman

Understanding Luxury Vinyl Installation Floating Vs Glue Down

Diy How To Install Glue Down Vinyl Plank Flooring

Glue Down Vs Floating Lvp Which Is Better Whole Cabinet Supply

How To Install L And Stick Vinyl Plank Flooring The Nifty Nester

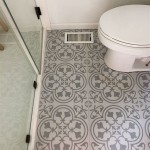
How To Install Vinyl Plank Flooring In A Bathroom Fixthisbuildthat
See Also