Installing Glue-Down Vinyl Plank Flooring Over Concrete Floors
Installing glue-down vinyl plank flooring over concrete floors is a popular choice for homeowners seeking a durable, stylish, and relatively affordable flooring solution. Unlike floating vinyl planks, which rely on a click-lock system, glue-down vinyl planks are permanently adhered to the subfloor, offering a more secure and stable installation. However, the process requires careful preparation and meticulous execution to ensure a successful outcome.
Preparing the Concrete Subfloor
The success of any flooring installation starts with a properly prepared subfloor. Concrete floors require special attention to achieve a level, smooth, and clean surface for the vinyl planks. Here are the essential steps to prepare the concrete subfloor for glue-down vinyl plank installation:
- Remove Existing Flooring: If the concrete floor has existing flooring, such as carpet, tile, or other vinyl, it must be removed completely. This ensures a clean and even surface for the new planks.
- Clean and Repair Cracks: Thoroughly clean the concrete floor with a degreaser and a stiff-bristled brush. Remove any debris, dirt, or dust. Fill any cracks or imperfections in the concrete with a concrete patching compound and allow it to cure completely.
- Level the Floor: Uneven concrete floors can lead to uneven plank installation and potential problems with the flooring's longevity. For significant unevenness, a self-leveling compound can be used to create a smooth and level surface. For minor imperfections, a thin layer of leveling compound or a floor leveling screed may suffice.
- Prime the Concrete: Applying a concrete primer to the prepared surface enhances adhesion between the glue and the concrete, leading to a stronger bond and preventing the vinyl planks from delaminating.
Choosing the Right Glue and Tools
Selecting the appropriate adhesive and tools is crucial for a successful glue-down vinyl plank installation. There are various types of adhesives available, each with its own properties and characteristics. When choosing an adhesive, consider factors like adhesion strength, drying time, and compatibility with the vinyl plank material.
Here are some key tools you'll need for the installation:
- Notched Trowel: This specialized tool evenly distributes the adhesive onto the concrete floor. Different trowel sizes and notch patterns are available, depending on the type of vinyl plank and the adhesive used.
- Utility Knife: A sharp utility knife is essential for trimming and cutting the vinyl planks to size and shape.
- Measuring Tape: An accurate measuring tape is vital for determining the required plank lengths and ensuring proper spacing.
- Tapping Block and Hammer: These tools help to firmly seat the vinyl planks into place and create a tight bond with the adhesive.
- Level: A level is used to ensure that the planks are installed at the correct elevation and create a uniform floor.
- Safety Gear: Protective eyewear, gloves, and a respirator should be worn during the installation process to minimize dust and chemical exposure.
Installing the Glue-Down Vinyl Planks
Once the subfloor is prepared, and the tools are gathered, the installation process can begin. Follow these steps for a successful glue-down vinyl plank installation:
- Apply the Adhesive: Using the notched trowel, apply a thin and even layer of adhesive to the concrete floor. The trowel size and notch pattern should be chosen based on the manufacturer's recommendations for the specific vinyl planks and adhesive used.
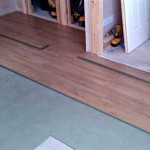
- Install the First Row: Begin laying the vinyl planks from the wall opposite the entrance. Start with a full plank, ensuring it's aligned with the wall. Use a tapping block and hammer to gently tap the plank into place, creating a tight bond with the adhesive.
- Install Subsequent Rows: Install the subsequent rows of planks, ensuring that the planks are butted up tightly against each other and maintaining consistent spacing between the planks and the walls. Use spacers to ensure appropriate spacing between the planks and the walls and allow for expansion and contraction.
- Cut Planks and Trim Edges: When encountering walls, doors, or other obstacles, measure the required length of the plank and cut it using a utility knife. Use a straight edge or a cutting guide to ensure precise cuts. Trim the edges of the planks to fit the space and shape of the room.
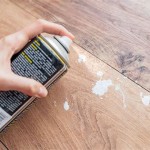
- Clean Up Excess Adhesive: After installation, any excess adhesive should be cleaned up promptly using a damp cloth or a specialized adhesive remover. Allow the adhesive to cure completely according to the manufacturer's instructions before applying pressure or moving furniture onto the new flooring.
Installing glue-down vinyl plank flooring over concrete floors requires careful planning, preparation, and meticulous installation. By following these steps, you can achieve a beautiful, durable, and long-lasting flooring solution for your home.

How To Install Glue Down Vinyl Plank Flooring Bathroom Concrete Floor

How To Prepare A Concrete Floor For Vinyl Flooring Parrys

How To Install Glue Down Vinyl Plank

Lvp Flooring Installation Over Concrete Subfloor Full Instructional Builds By Maz Flooret

How To Install A Glue Down Floor Diy Flooring

How To Install Gluedown Flooring

Lvp Flooring Installation How To Install Luxury Vinyl Plank In A Basement Diy

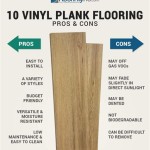
Pros Cons Of Glue Down Flooring Installation Floorset

How To Install Glue Down Vinyl Plank

Easy Ways To Install Vinyl Plank Flooring On Concrete
See Also