A Comprehensive Guide to Installing Laminate Flooring on Concrete
Laminate flooring is a popular choice due to its durability, affordability, and ease of installation. If you're considering installing laminate flooring on concrete, it's essential to understand the process to ensure a successful outcome. This guide will walk you through the necessary steps, from preparing the concrete to installing the final planks.
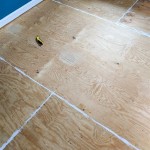
Preparing the Concrete
Before installing laminate flooring on concrete, thorough preparation is crucial to prevent future problems. The concrete must be level, dry, and free of any debris or imperfections. Start by cleaning the concrete with a vacuum and broom to remove any dirt or dust. Use a level to check for any uneven areas, which can be leveled with a self-leveling compound.
Installing an Underlayment
An underlayment plays a vital role in the performance of laminate flooring. It provides cushioning, insulation, and soundproofing. Choose an underlayment specifically designed for laminate flooring and concrete subfloors. Follow the manufacturer's instructions for rolling out and installing the underlayment.
Planning the Layout
Before you start installing the laminate flooring, take the time to plan the layout. Determine the direction you want the planks to run and make sure you have enough material to complete the project. Consider the placement of doors and other obstacles to minimize cuts and waste.
Installing the First Row
Start by installing the first row of laminate flooring along a straight wall. Measure and cut the first plank to fit snugly against the wall, leaving an expansion gap of 1/4 inch around the perimeter of the room. Lock the first and second planks together and continue adding planks until you reach the end of the row.
Continuing the Installation
Once the first row is installed, continue installing the remaining rows in the same manner. Stagger the end joints of the planks for a more stable installation. Use a tapping block and a hammer to gently tap the planks together, making sure they are locked securely. Cut planks as necessary to fit around obstacles or at the end of rows.
Expansion Gaps
Expansion gaps are essential to allow for the expansion and contraction of laminate flooring due to changes in temperature and humidity. Leave a 1/4 inch expansion gap around the perimeter of the room, and also around any fixed objects such as columns or cabinets.
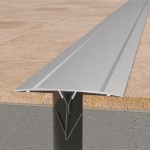
Moldings and Transitions
Moldings and transitions are used to finish the installation and provide a clean and polished look. Install baseboards and quarter-round molding along the walls to cover the expansion gap and transitionmoldings at doorways and between different flooring surfaces.
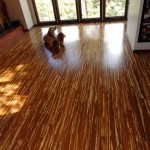
Finishing Touches
Once the laminate flooring is installed, give it a thorough cleaning to remove any debris or dust. Vacuum and mop the floor using cleaning products specifically designed for laminate flooring. Enjoy your new, beautiful laminate flooring!

Installing Laminate Flooring Over Concrete The Ultimate Guide Aa Floors

Installing Wood Flooring Over Concrete Diy

How To Lay Laminate Flooring On Concrete Howtospecialist Build Step By Diy Plans Laying Installing

Laminate Flooring On Concrete Basement Floors Expert Installation Guide Csg Renovation

How To Install Laminate Flooring Over Concrete

How To Install Vinyl Or Laminate Floors In A Basement Over Concrete Slab

Laminate Flooring Over Concrete Diy Install Home Pros

How To Install Laminate Flooring On Concrete Floors And Slab

How To Lay Flooring On Concrete Factory Direct

How To Install Laminate Flooring On Concrete Making Maanita
See Also