Installing Lifeproof Vinyl Plank Flooring on Concrete Slabs
Installing Lifeproof vinyl plank flooring on concrete slabs is a rewarding home improvement project that can enhance the aesthetics and functionality of your living space. By following these essential steps and considerations, you can achieve a professional-looking and durable floor that will withstand the test of time.
1. Prepare the Concrete Slab
The concrete slab must be level, smooth, and free of cracks or imperfections. Use a level to check for any unevenness. If necessary, level the slab using a self-leveling compound. Remove all debris, dust, and moisture from the surface.
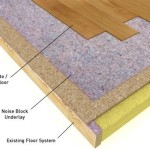
2. Install a Vapor Barrier
A vapor barrier prevents moisture from rising up from the concrete slab and damaging the flooring. Roll out a 6-mil polyethylene vapor barrier over the entire slab, overlapping the edges by 6 inches. Tape the seams with vapor barrier tape.
3. Determine the Flooring Layout
Measure the room and determine the starting point for the first row of planks. Plan the layout to minimize the amount of cutting required. Use chalk lines or a laser level to mark the starting point and any necessary cuts.
4. Install the First Row of Planks
Start by locking the first two planks together at the starting point. Place a spacer against the wall to maintain a consistent gap. Continue locking planks together, tapping them into place with a tapping block or hammer. Use a utility knife to trim the planks to fit around obstacles.
5. Continue Installing the Planks
For each subsequent row, stagger the joints by at least 6 inches. Apply pressure to the planks to ensure they are fully locked together. Remove any excess adhesive that may squeeze out from the seams.
6. Cut and Fit Planks Around Obstacles
When encountering obstacles such as walls, doorways, or pipes, measure and mark the necessary cuts on the planks. Use a jigsaw or utility knife to make precision cuts. Dry-fit the cut planks before gluing them into place.
7. Install Trim and Moldings
Once the flooring is installed, add trim and moldings to cover the expansion gaps around the perimeter of the room. Use quarter-round molding or shoe molding to hide the gap between the flooring and the wall. Baseboards can be added to provide a finished look.
Additional Considerations
- Use a high-quality flooring adhesive: This will ensure a strong bond between the planks and the concrete slab.
- Allow for expansion: Vinyl flooring expands and contracts with changes in temperature and humidity. Leave a 1/4-inch gap around the perimeter of the room to allow for expansion.
- Acclimate the flooring: Before installation, allow the flooring to acclimate to the temperature and humidity of the room for at least 24 hours.
- Clean the flooring regularly: Use a soft broom or mop to clean the flooring. Avoid using abrasive cleaners or harsh chemicals.

Tips For Installing Vinyl Plank Over Concrete Floors Lemon Thistle

How To Install Lifeproof Flooring The Home

Lvp Flooring Installation How To Install Luxury Vinyl Plank In A Basement Diy

How To Prepare A Concrete Floor For Vinyl Flooring Parrys

How To Install Vinyl Plank Flooring Lifeproof Lvp

Why We Chose Lifeproof Vinyl Flooring And How To Install It

How To Install Lifeproof Flooring The Home

Installing Vinyl Plank Flooring How To Fixthisbuildthat

Why We Chose Lifeproof Vinyl Flooring And How To Install It

How To Install Lifeproof Vinyl Flooring
See Also