Installing Lifeproof Vinyl Plank Flooring On Concrete Slabs Without Subfloor
Installing Lifeproof vinyl plank flooring on concrete slabs offers a waterproof, durable, and aesthetically pleasing flooring solution. However, it's crucial to follow the correct procedure to ensure a successful installation. This comprehensive guide will outline essential aspects to consider when installing Lifeproof vinyl plank flooring directly on concrete slabs.
Prerequisites
* Ensure the concrete slab is level, dry, and free of debris. * Install an underlayment (not required but recommended) to provide a moisture barrier and enhance sound absorption. * Gather necessary tools such as a utility knife, tape measure, chalk line, and spacer blocks.Step 1: Acclimation
* Allow the Lifeproof vinyl planks to acclimate to the room temperature and humidity for 24-48 hours before installation. * Store them flat and unopened in the room where they will be installed.Step 2: Layout Planning
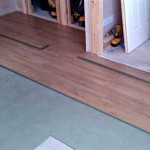
* Determine the starting point and layout pattern. * Use a chalk line to mark the perpendicular lines that will serve as guidelines for the planks.Step 3: Underlayment Installation (Optional)
* If using an underlayment, roll it out over the concrete slab. * Overlap the seams by 4-6 inches and secure them with tape.Step 4: First Row Installation
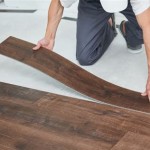
* Start with a full plank at the designated starting point. * Use spacer blocks to maintain a consistent gap between the planks and the walls. * Lock the planks together using the manufacturer's recommended interlocking mechanism.Step 5: Continue Plank Installation
* Stagger the seams of subsequent rows by at least 6 inches. * Measure and cut planks as needed to fit around obstacles.Step 6: Last Row Installation
* If the last row needs to be cut, ensure it's at least 2 inches wide. * Use a pry bar or tapping block to gently tap the planks into place.Step 7: Trimming Around Obstacles
* Use a utility knife or oscillating tool to cut around baseboards, door frames, and other obstacles. * Ensure a tight fit to prevent moisture penetration.Step 8: Final Inspection and Touch-Ups
* Inspect the entire floor to ensure proper alignment, locking, and no gaps. * Use a damp cloth to remove any excess glue or debris.Tips for Success
* Follow the manufacturer's instructions carefully. * Use the proper tools and materials. * Allow ample time for acclimation and installation. * Take your time and make sure each plank is installed correctly. * Seal the perimeter of the flooring with a moisture-resistant sealant. * Protect the flooring from heavy furniture or foot traffic during the first 24 hours. By adhering to these essential aspects, you can confidently install Lifeproof vinyl plank flooring on concrete slabs without subfloor. This durable and stylish flooring solution will enhance the aesthetics and value of your space for years to come.
Why We Chose Lifeproof Vinyl Flooring And How To Install It

How To Install Vinyl Plank Flooring Lifeproof Lvp

Lvp Flooring Installation How To Install Luxury Vinyl Plank In A Basement Diy

Tips For Installing Vinyl Plank Over Concrete Floors Lemon Thistle

How To Install Lifeproof Vinyl Flooring

Installing Lifeproof Vinyl Plank Flooring Our Diy Guide Exquisitely Unremarkable

Why We Chose Lifeproof Vinyl Flooring And How To Install It

Installing Vinyl Plank Flooring For Beginners Anika S Diy Life

Why We Chose Lifeproof Vinyl Flooring And How To Install It

Installing Vinyl Plank Flooring Lifeproof Waterproof Rigid Core Sustain My Craft Habit
See Also