Here's an article fitting your criteria:
Installing TrafficMaster Vinyl Flooring: A Comprehensive Guide
TrafficMaster vinyl flooring, known for its durability and affordability, represents a popular choice for homeowners seeking a cost-effective flooring solution. Its ease of installation, coupled with its resistance to water and wear, makes it suitable for various areas within a home, including kitchens, bathrooms, and basements. This article provides a comprehensive guide to installing TrafficMaster vinyl flooring, ensuring a professional and long-lasting result.
Before commencing the installation process, careful planning and preparation are paramount. This involves accurately measuring the room, acclimating the flooring materials, and preparing the subfloor. Neglecting these initial steps can lead to installation errors and compromise the integrity of the finished floor.
Accurate Room Measurement and Material Calculation
The first step involves accurately measuring the length and width of the room. Multiply these dimensions to calculate the room's square footage. Add an additional 5-10% to this figure to account for waste due to cuts and pattern matching, particularly when dealing with patterned vinyl. This added percentage ensures sufficient material to complete the project without running short. It is always preferable to have a surplus than to face a shortage mid-installation.
Once the total square footage is determined, consult the TrafficMaster vinyl flooring product specifications to ascertain the square footage covered by each package. Divide the total square footage of the room (including the waste allowance) by the square footage per package. Round this result upwards to the nearest whole number to determine the required number of packages. This calculation ensures that sufficient material is purchased to complete the flooring project successfully.
Properly documenting these measurements and calculations is crucial. Keep a record of the room dimensions, calculated square footage, and the resulting number of flooring packages needed. This record will serve as a reference during the purchasing process and can prevent errors in material procurement.
Subfloor Preparation: The Foundation for Success
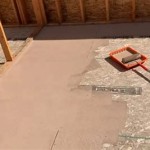
The subfloor provides the foundation for the vinyl flooring, and its condition directly affects the final appearance and longevity of the installation. A smooth, level, and clean subfloor is essential for preventing imperfections and ensuring proper adhesion. Common subfloor materials include plywood, concrete, and existing resilient flooring.
If the subfloor is uneven, it must be leveled before proceeding. Minor imperfections can be addressed with self-leveling compound. Follow the manufacturer's instructions for mixing and applying the compound, ensuring proper drying time before laying the vinyl flooring. Larger imperfections may require additional modifications, such as patching or sanding.
Cleanliness is equally critical. Sweep and vacuum the subfloor thoroughly to remove dust, debris, and any loose particles. These contaminants can interfere with adhesion and create bumps beneath the vinyl flooring. If the subfloor is particularly dirty, a mild detergent solution can be used, followed by thorough rinsing and drying.
Inspect the subfloor for signs of moisture. High moisture levels can lead to mold growth and adhesive failure. Use a moisture meter to assess the moisture content of the subfloor. If the moisture level exceeds the manufacturer's recommended threshold, address the underlying moisture issue before installing the vinyl flooring. This may involve installing a moisture barrier or addressing plumbing leaks.
Repair any damage to the subfloor before proceeding. Fill cracks, holes, or gouges with patching compound. Ensure that all fasteners, such as nails or screws, are securely in place and countersunk to prevent them from protruding through the vinyl flooring. A properly prepared subfloor is critical to a successful and long-lasting vinyl flooring installation.
Acclimation of Flooring Materials
TrafficMaster vinyl flooring, like many flooring materials, requires acclimation to the room's temperature and humidity levels before installation. Acclimation allows the vinyl to expand or contract, reducing the likelihood of gaps or buckling after installation. The recommended acclimation period is typically 48 to 72 hours, but it's essential to consult the manufacturer's instructions for specific guidance.
During the acclimation period, store the vinyl flooring packages in the room where they will be installed. Ensure that the room is maintained at a consistent temperature and humidity level. Avoid storing the packages in direct sunlight or near heating or cooling vents, as this can cause uneven acclimation.
Open the packages slightly to allow for air circulation around the vinyl flooring planks or tiles. This promotes even acclimation and prevents moisture buildup within the packages. Stacking the packages loosely rather than tightly packed can also enhance air circulation.
Following the recommended acclimation period is crucial for ensuring a stable and properly installed vinyl floor. Failure to acclimate the materials can lead to installation problems and compromise the floor's performance and appearance over time.
Installation Techniques for TrafficMaster Vinyl Flooring
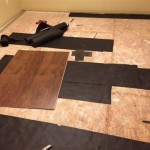
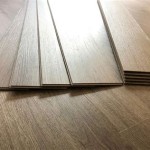
TrafficMaster vinyl flooring is often available in different formats, including planks, tiles, and sheet vinyl. The specific installation techniques will vary depending on the chosen format. However, some general guidelines apply to all types of TrafficMaster vinyl flooring.
Before beginning the installation, establish a straight starting line. Use a chalk line to mark a reference line along the longest wall of the room. This line will serve as a guide for aligning the first row of vinyl planks or tiles.
Apply adhesive according to the manufacturer's instructions. Use the recommended type of adhesive and apply it evenly to the subfloor using a notched trowel. Avoid applying adhesive to too large an area at once, as it can dry out before the vinyl flooring is installed. Work in manageable sections to ensure proper adhesion.
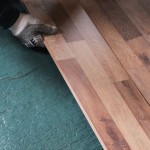
Carefully position the vinyl planks or tiles onto the adhesive, aligning them with the chalk line. Press firmly to ensure good contact with the adhesive. Use a rolling pin or floor roller to further secure the vinyl flooring and remove any air pockets beneath the surface.
Maintain consistent spacing between the vinyl planks or tiles. Use spacers to create uniform gaps, which will accommodate expansion and contraction. Remove the spacers after the adhesive has cured.
When cutting vinyl flooring to fit around obstacles or along walls, use a utility knife with a sharp blade. Measure and mark the cut line accurately. Score the vinyl with the utility knife and then snap it along the score line. A straight edge can be used as a guide for making straight cuts.
Overlap the seams slightly when installing sheet vinyl and then use a seam roller to create a smooth and seamless joint. Apply seam sealer to the joint to prevent water penetration and ensure a durable bond.
After the installation is complete, allow the adhesive to cure fully before placing furniture or heavy objects on the floor. Follow the manufacturer's recommended curing time. Regularly clean the vinyl floor with a damp mop and mild detergent to maintain its appearance and longevity.
For click-lock vinyl plank flooring, the process involves interlocking the planks together without adhesive. Start at one wall and work your way across the room, ensuring each plank is securely locked into the adjacent plank. Use a tapping block and hammer to gently tap the planks together for a tight fit.
When installing TrafficMaster vinyl flooring over existing resilient flooring, ensure that the existing floor is clean, level, and securely bonded to the subfloor. Remove any loose or damaged areas. If the existing floor has a cushioned backing, it may be necessary to install an underlayment to provide a stable and uniform surface for the new vinyl flooring.
Consider the room's layout and traffic patterns when determining the direction of the vinyl flooring. Running the planks or tiles parallel to the longest wall can visually lengthen the room. In high-traffic areas, it may be preferable to install the flooring perpendicular to the direction of traffic to minimize wear.
Proper ventilation is essential during the installation process, especially when using adhesives. Open windows and doors to allow for adequate air circulation. Wear appropriate personal protective equipment, such as gloves and eye protection, to prevent skin and eye irritation.
Careful attention to detail and adherence to the manufacturer's instructions are crucial for a successful TrafficMaster vinyl flooring installation. By following these guidelines and taking the time to prepare the subfloor properly, homeowners can achieve a beautiful and durable floor that will last for years to come.

Trafficmaster Ceramica 12 X 24 Vinyl Tile Floor Installation

Home Traffic Master 5g Installation

Trafficmaster Floor Installation Budget Friendly Home Remodeling

Installing Trafficmaster Allure In 4 Simple Steps All About Flooring

Easiest Flooring To Install By Yourself Traffic Master Gripstrip

Trafficmaster Allure Vinyl Plank Flooring Installation

Allure By Traffic Master Flooring Install

Trafficmaster Dove Maple 4 Mil X 6 In W 36 L Grip Strip Water Resistant Luxury Vinyl Plank Flooring 24 Sqft Case 87514 The Home

Trafficmaster Allure Ultra Resilient Flooring Installation Review

Installing Allure Trafficmaster Resilient Vinyl Flooring Basement Floor Installation Plank