Installing Vinyl Plank Flooring in the Bathroom: A Comprehensive Guide
Vinyl plank flooring has become a popular choice for bathrooms due to its durability, water resistance, and stylish appearance. However, installing it in a bathroom requires careful planning and execution to ensure a successful outcome. Here's a comprehensive guide to help you navigate the essential aspects of installing vinyl plank flooring in your bathroom:
1. Determine the Subfloor Condition
The subfloor must be flat, level, and free of moisture. If necessary, use a leveling compound to smooth out any irregularities. It's crucial to ensure the subfloor is stable and well-supported to prevent the vinyl planks from shifting or buckling.
2. Choose the Right Vinyl Planks
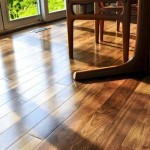
Select vinyl planks specifically designed for bathroom use. Look for planks with a moisture-resistant core and an anti-slip surface for safety. Consider the thickness, style, color, and texture that best complements your bathroom décor.
3. Acclimate the Vinyl Planks
Before installation, allow the vinyl planks to acclimate to the bathroom environment for 24-48 hours. This helps them adjust to the temperature and humidity levels, reducing the risk of expansion or contraction after installation.
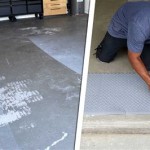
4. Install an Underlayment
An underlayment provides a moisture barrier, sound insulation, and extra cushioning under the vinyl planks. Use an underlayment specifically designed for vinyl flooring, such as a polyethylene foam or cork underlayment.
5. Plan the Layout
Start by dry-fitting the vinyl planks in the bathroom to determine the best layout. Consider the room's shape, fixtures, and plumbing to ensure the planks flow seamlessly and minimize cuts.
6. Cut the Vinyl Planks
Use a sharp utility knife or vinyl flooring cutter to cut the planks to the desired sizes. Measure carefully and make precise cuts to ensure a clean and professional finish. For more complex cuts, such as around toilets or fixtures, consider using a jigsaw.
7. Install the First Row
Apply a thin bead of construction adhesive along the perimeter of the room and around any fixtures. Start by installing the first row of planks along the longest wall, using spacers to maintain even gaps.
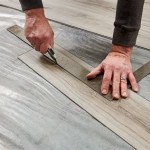
8. Continue Installing the Planks
Lock the subsequent rows of planks into place using the patented locking systems. Tap gently with a rubber mallet to secure the joints and ensure a tight fit. Stagger the end joints of each row to enhance the structural integrity.
9. Trim Around Obstacles
When encountering obstacles like toilets or vanity cabinets, measure and cut the planks to fit around them precisely. Use an oscillating tool or a jigsaw for more intricate cuts.
10. Seal the Perimeter
Once the vinyl planks are installed, caulk the perimeter of the room and around any fixtures with a bathroom-grade caulk. This seals any gaps and prevents moisture from seeping underneath the flooring.
Additional Tips:
- Use a level to ensure the planks are flat and even throughout the installation.
- Clean the subfloor thoroughly before laying the underlayment and vinyl planks.
- Allow the adhesive to dry completely before walking on the newly installed flooring.
- For heavy appliances or fixtures, consider using furniture pads to distribute the weight and prevent damage to the planks.
- Regularly clean and maintain the vinyl plank flooring using a damp mop and a cleaner specifically designed for vinyl flooring.

How To Install Vinyl Plank Flooring In A Bathroom Fixthisbuildthat

How To Install Vinyl Plank Flooring In A Bathroom

Dos And Don Ts For Installing Vinyl Plank Floors In The Bathroom Advice Homeowners

Vinyl Planks In Bathrooms Residential Inspiration Flooring

How To Install Vinyl Plank Flooring In A Bathroom Fixthisbuildthat

How To Install Vinyl Plank Flooring In A Bathroom

Installing Vinyl Plank Flooring Lifeproof Waterproof Rigid Core Sustain My Craft Habit

Installing Vinyl Plank Flooring Lifeproof Waterproof Rigid Core Sustain My Craft Habit

How To Install Vinyl Plank Flooring In A Bathroom Fixthisbuildthat

How To Install Vinyl Plank Flooring In A Bathroom Fixthisbuildthat
See Also