Installing Vinyl Plank Flooring On Concrete Basement Floor: A Step-by-Step Guide
Are you looking to upgrade your basement floor with stylish and durable vinyl plank flooring? Installing vinyl plank flooring on a concrete basement floor is a relatively straightforward process that can be completed by most DIYers with the right tools and materials. Here's a comprehensive guide to help you through each step of the process:
1. Preparing the Concrete Surface
The first step is to prepare the concrete surface for the vinyl flooring. Ensure the surface is clean, level, and dry. Check for any cracks, holes, or uneven areas in the concrete. If necessary, fill in the cracks and holes with a concrete patch kit or self-leveling compound. Allow ample time for the repairs to cure before proceeding.
2. Installing an Underlayment
An underlayment provides a cushion and moisture barrier between the concrete floor and the vinyl planks. Roll out the underlayment over the entire floor surface, ensuring it fits snugly and overlaps the edges slightly. Use a utility knife to trim any excess underlayment around the perimeter of the room.
3. Planning the Layout
Before installing the vinyl planks, plan the layout to minimize waste and ensure the planks align properly. Determine the center point of the room and start from there, working your way outward. Use spacers to maintain equal gaps between the planks and the walls.
4. Installing the First Row
Start by installing the first row of planks along one of the longest walls in the room. Apply a small bead of adhesive to the back of each plank and press it firmly into place. Ensure the planks are straight and level, using a level or straightedge to check. Continue installing the planks in the first row, staggering the joints for added strength.
5. Installing the Remaining Rows
Once the first row is complete, continue installing the remaining rows by aligning the planks with the previous row and tapping them into place. Use a tapping block or a soft-face hammer to gently tap the planks together, ensuring they are flush and secure. Remove any excess adhesive that may squeeze out between the planks.
6. Cutting and Fitting the Planks
You will likely need to cut the planks to fit around obstacles such as walls, doorways, or pipes. Use a sharp utility knife or a circular saw with a fine-tooth blade to make precise cuts. Measure and mark the cut lines carefully before cutting the planks.
7. Finishing Touches
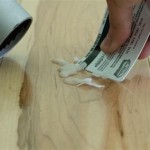
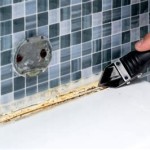
Once all the planks are installed, apply a thin bead of caulk around the perimeter of the room, where the flooring meets the walls. This will seal any gaps and prevent moisture from penetrating. Allow the caulk to dry completely before using the floor.
Congratulations! You have now successfully installed vinyl plank flooring on your concrete basement floor. Enjoy the beauty and durability of your new flooring for years to come.

How To Install Vinyl Plank Over Concrete Orc Week 4 5 The Happy Housie

Tips For Installing Vinyl Plank Over Concrete Floors Lemon Thistle

Lvp Flooring Installation How To Install Luxury Vinyl Plank In A Basement Diy

Lvp Flooring Installation How To Install Luxury Vinyl Plank In A Basement Diy

How To Install Vinyl Plank Over Concrete Orc Week 4 5 The Happy Housie

Laminate Flooring On Concrete Basement Floors Expert Installation Guide Csg Renovation

How To Install Vinyl Or Laminate Floors In A Basement Over Concrete Slab

How To Install Vinyl Plank Over Concrete Orc Week 4 5 The Happy Housie

Tips For Installing Vinyl Plank Over Concrete Floors Lemon Thistle

Vinyl Plank Flooring On Uneven Concrete
See Also