Installing Vinyl Plank Flooring On Concrete Floor
Vinyl plank flooring has gained immense popularity due to its durability, affordability, and ease of installation. It offers a stylish and practical alternative to traditional flooring options, especially for concrete floors. Installing vinyl plank flooring on concrete is a relatively straightforward process that can be accomplished by homeowners with some basic DIY skills. The process typically involves preparing the concrete subfloor, laying down an underlayment, and securing the vinyl planks.
1. Preparing the Concrete Subfloor
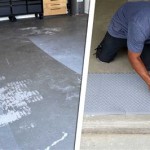
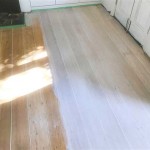
Before installing vinyl plank flooring, it is crucial to ensure that the concrete subfloor is level, clean, and free from any imperfections. This step is essential for achieving a smooth and even installation, preventing unevenness and potential buckling in the flooring.
Start by assessing the levelness of the concrete floor using a level. Any significant unevenness needs to be addressed. Small imperfections can be corrected using a self-leveling compound, while larger discrepancies might require concrete patching or resurfacing.
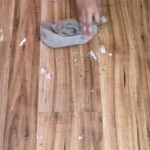
Next, thoroughly clean the concrete subfloor using a shop vacuum and a damp mop to remove dirt, debris, and any existing coatings. Ensure the floor is completely dry before proceeding to the next step. Any cracks or gaps in the concrete should be repaired using a suitable patching compound.
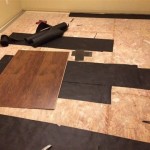
2. Installing an Underlayment
Installing an underlayment is a crucial step in the vinyl plank flooring installation process. It serves various purposes, including providing cushioning, insulation, and a moisture barrier. The type of underlayment used will depend on factors like your budget, the condition of your concrete floor, and the desired insulation level.
Common types of underlayment include:
- Foam underlayment: This is a popular choice due to its affordability, easy installation, and cushioning properties. It provides sound insulation and reduces footfall noise.
- Cork underlayment: Cork is a natural material that offers excellent sound absorption, insulation, and cushioning. It is durable and resilient, making it an ideal option for high-traffic areas.
- Rubber underlayment: Rubber underlayment is known for its excellent moisture resistance and sound insulation. It is often used in basements or areas prone to moisture.
- Felt paper: Felt paper is a cheaper option that provides basic moisture protection and sound insulation.
The underlayment is typically rolled out over the concrete subfloor, and its seams are taped together using a moisture-resistant tape. Ensure that the underlayment is cut to fit the dimensions of the room and that the edges are secured to the walls using staples or tack strips.
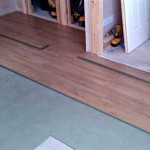
3. Installing the Vinyl Plank Flooring
Once the underlayment is installed, it's time to install the vinyl plank flooring. Vinyl planks are typically click-lock or glue-down, and the installation process will vary depending on the chosen method.
Click-Lock Installation
Click-lock vinyl plank flooring is known for its ease of installation. The planks are designed to interlock together, creating a seamless and secure floor. Start installation from one corner of the room and work your way across. Each plank is clicked into place with the previous one, ensuring a tight fit. The planks should be laid perpendicular to the direction of the room's longest wall to prevent the floor from appearing narrower.
To ensure a proper fit, use a tapping block and hammer to firmly tap the planks together. It is important to maintain a consistent gap between the planks and the wall to allow for expansion and contraction due to temperature fluctuations. Use spacers to maintain a uniform gap along the walls.
Glue-Down Installation
Glue-down vinyl plank flooring requires a special adhesive that is applied to the back of each plank before it is pressed onto the underlayment. Start installation from a corner of the room, ensuring the first row of planks is aligned with the wall. Spread the adhesive in a thin layer on the underlayment, ensuring even coverage. Apply the planks to the adhesive, pressing firmly to ensure a secure bond.
Use a rolling pin to further secure the planks and ensure a seamless finish. Consider adding a moisture barrier under the glue-down planks, especially if the floor is prone to moisture.
Regardless of the installation method, it is advisable to use a utility knife to trim the planks to fit around obstacles or irregular shapes. Ensure the planks are cut precisely to create a clean and professional finish.
Remember to allow the adhesive to dry completely before applying any furniture or heavy objects. Follow the manufacturer's instructions for proper drying times and care instructions for the specific product you are using.

Lvp Flooring Installation How To Install Luxury Vinyl Plank In A Basement Diy

Tips For Installing Vinyl Plank Over Concrete Floors Lemon Thistle

Lvp Flooring Installation Over Concrete Subfloor Full Instructional Builds By Maz Flooret

How To Install Vinyl Plank Flooring Lifeproof Over Concrete

Easy Ways To Install Vinyl Plank Flooring On Concrete

Installing Vinyl Plank Flooring On Concrete Floor In Dallas Fort Worth Tx All American

Tips For Installing Vinyl Plank Over Concrete Floors Lemon Thistle

How To Install Vinyl Flooring On Concrete Floor Ers

Tips And Tricks For Installing Vinyl Plank Over Concrete Floors Riverbend Interiors

Vinyl Plank Flooring On Uneven Concrete
See Also