Installing Vinyl Plank Flooring On Shower Walls
Vinyl plank flooring offers a cost-effective and aesthetically pleasing alternative to traditional bathroom wall materials. However, installing vinyl plank flooring in a shower environment presents unique challenges due to constant moisture exposure. This article explores the essential factors to consider and the steps necessary for a successful installation of vinyl plank flooring on shower walls.
1. Waterproofing Considerations
The most critical aspect of installing vinyl planks in a shower is ensuring complete waterproofing. Standard vinyl plank flooring, even the water-resistant varieties, is not designed for direct and constant water contact. Therefore, a robust waterproofing system must be implemented before installing the planks. This typically involves applying a waterproof membrane to the substrate, ensuring all seams and corners are thoroughly sealed.
Several waterproofing membrane options are available, including liquid-applied membranes, sheet membranes, and cement-based waterproofing systems. The chosen method should be compatible with the substrate and provide a seamless barrier against moisture intrusion. Careful consideration of local building codes and manufacturer recommendations is essential.
2. Substrate Preparation
Proper substrate preparation is crucial for successful vinyl plank installation. The substrate must be clean, dry, and level. Any existing imperfections, such as cracks or uneven areas, should be repaired before proceeding. For optimal adhesion, a primer specifically designed for use with the chosen waterproofing membrane may be necessary.
Common shower substrates include cement board, greenboard, and plywood. Each substrate requires specific preparation techniques. For instance, cement board should be taped and mudded at the seams, while plywood requires a moisture-resistant sealant.
3. Vinyl Plank Selection
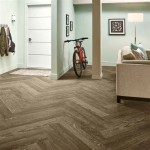
While technically any vinyl plank can be used with proper waterproofing, selecting planks specifically designed for wet areas is advisable. These planks typically feature enhanced water resistance and may include antimicrobial properties to inhibit mold and mildew growth. Additionally, consider the plank's thickness and wear layer for increased durability in a high-traffic area like a shower.
Texture can also play a role in safety. Slicker planks might pose a slipping hazard when wet. Textured or embossed planks offer improved grip and can contribute to a safer shower environment.
4. Adhesive Selection
The adhesive used to secure the vinyl planks is another vital consideration. A high-quality, waterproof adhesive specifically designed for vinyl plank flooring in wet areas is essential. Standard flooring adhesives may not provide adequate bonding in the constantly damp environment of a shower, potentially leading to plank detachment and water damage.
Consult the vinyl plank manufacturer's recommendations for compatible adhesives. Applying the adhesive according to the manufacturer's instructions is crucial for ensuring a strong and lasting bond.
5. Installation Techniques
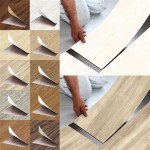
The installation process for vinyl planks on shower walls generally follows the same principles as floor installation, with some key modifications. Begin by laying out the planks, ensuring a consistent pattern and minimizing cuts. Apply the adhesive to the back of each plank evenly, ensuring complete coverage. Firmly press each plank onto the waterproofed substrate, removing any excess adhesive immediately. Maintaining even spacing between planks is essential for a professional finish. Spacers can assist in ensuring consistent grout lines.
Cutting vinyl planks for corners and edges requires precision. A utility knife or a fine-tooth saw designed for vinyl flooring can be used. Always measure twice and cut once to avoid costly mistakes. Properly sealing all cut edges with a waterproof sealant is crucial to prevent moisture from seeping under the planks.
6. Sealing and Finishing
Once the planks are installed, applying a waterproof sealant to all seams and edges is crucial for long-term performance. This provides an additional layer of protection against water intrusion. The sealant should be compatible with the vinyl planks and the adhesive used. Allow sufficient drying time before exposing the shower to water.
Consider incorporating additional sealing measures, such as applying a silicone sealant around the perimeter of the shower and at any transitions between the vinyl planks and other materials. This will further enhance the waterproofing of the installation.
7. Ventilation and Maintenance
Proper ventilation is essential for maintaining the longevity of vinyl plank shower walls. Adequate ventilation helps prevent moisture buildup, which can lead to mold and mildew growth. Ensure the bathroom has a functioning exhaust fan and use it regularly, particularly after showering. Regular cleaning with mild soap and water will help keep the vinyl planks looking their best and prevent the buildup of soap scum and grime.
Avoid using abrasive cleaners or harsh chemicals, which can damage the surface of the vinyl planks. Regularly inspect the sealant for any signs of wear or damage and reapply as needed to maintain the integrity of the waterproofing system.

Installing Waterproof Vinyl Flooring On Shower Walls Bathroom Design Inspiration Wall

Can Vinyl Flooring Be Used On Walls And Shower In Singapore Property

How To Install Vinyl Plank Flooring In A Bathroom Fixthisbuildthat

Vinyl Floor Tiles Above Tub Surround Update

Vinyl Flooring On Shower Walls 100 Waterproof Rescuing An Old House

Installed Vinyl Plank Flooring On My Bathroom Wall Love The Texture Color Walls

How To Install Vinyl Plank Flooring In A Bathroom Fixthisbuildthat

Vinyl Flooring On Shower Walls 100 Waterproof Rescuing An Old House

Can You Use Vinyl Flooring On Bathroom Walls Answered W Tips

Systems For Installing Lvt In Wet Environments Mapei
See Also