Installing Vinyl Plank Flooring On Shower Walls And Floor
Vinyl plank flooring offers a compelling combination of affordability, durability, and aesthetic appeal, making it a popular choice for various home improvement projects. While traditionally used for flooring, its water-resistant properties have led to increasing interest in its application in wet areas like shower walls and floors. However, installing vinyl plank in a shower requires careful consideration and a meticulous approach to ensure long-lasting performance and prevent water damage.
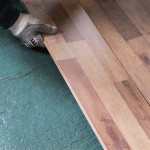
Substrate Preparation
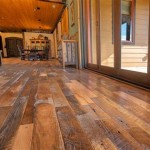
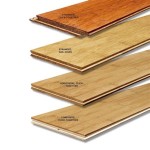
Proper substrate preparation is crucial for successful vinyl plank installation in a shower. The existing surface must be completely level, clean, and free of any imperfections. Uneven surfaces can cause the vinyl planks to flex, leading to weak points and potential cracking. Any existing tile, grout, or other materials should be removed, and the underlying surface should be thoroughly cleaned and dried. For concrete subfloors, a self-leveling compound may be required to create a perfectly flat surface. In the case of wall installations, cement backer board provides a stable and waterproof base for the planks.
Waterproofing
While vinyl plank is water-resistant, it's not entirely waterproof. Water can seep through the seams and edges, potentially damaging the subfloor and promoting mold growth. Therefore, thorough waterproofing is essential. This involves applying a waterproof membrane to the entire shower area, including the walls and floor, before installing the vinyl planks. The membrane should extend up the walls to a height sufficient to protect against splashing. Liquid waterproofing membranes are a common choice for shower installations, offering seamless coverage and easy application. All seams and corners must be carefully sealed to prevent water intrusion.
Adhesive Selection
The adhesive used for installing vinyl plank in a shower is critical for ensuring a strong bond and preventing water damage. Standard flooring adhesives may not be suitable for wet environments. A high-quality, waterproof construction adhesive specifically designed for use with vinyl plank in wet areas is recommended. This type of adhesive provides superior bonding strength and resistance to moisture, ensuring the planks remain securely in place even with regular exposure to water and humidity. It is essential to follow the manufacturer's instructions regarding adhesive application and drying times.
Installation Techniques
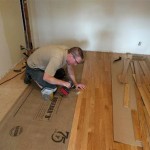
Installing vinyl plank in a shower requires a careful and methodical approach. For wall installations, it is crucial to ensure proper alignment and spacing between the planks. Start at the bottom and work upwards, ensuring each plank is level and firmly pressed into the adhesive. Spacers can be used to maintain consistent gaps between the planks, allowing for expansion and contraction due to temperature and humidity changes. For floor installations, a similar approach is followed, starting from a corner and working outwards. Care should be taken to ensure tight seams and a consistent pattern. Cutting planks to fit around corners and fixtures requires precision and the use of appropriate cutting tools.
Edge and Seam Sealing
Even with a waterproof membrane and adhesive, water can still potentially penetrate the seams and edges of the vinyl plank flooring. Therefore, sealing all seams and edges is a crucial step in ensuring a truly waterproof installation. A high-quality silicone sealant designed for use in wet areas is recommended. The sealant should be applied carefully to all seams and edges, ensuring complete coverage and a watertight seal. This final step helps prevent water from seeping beneath the planks, protecting the subfloor from damage and inhibiting mold growth.
Ventilation
Adequate ventilation is crucial for the longevity of any shower installation, including those using vinyl plank. Proper ventilation helps to remove excess moisture, preventing the growth of mold and mildew. Ensuring adequate airflow within the shower area can be achieved through the use of an exhaust fan, which should be vented to the exterior of the building. Regularly running the exhaust fan during and after showering will help to remove moisture-laden air, maintaining a dry environment and preventing potential problems associated with dampness.
Maintenance
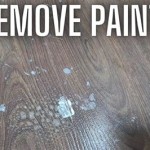
While vinyl plank is relatively low-maintenance, regular cleaning is essential to maintain its appearance and prevent the buildup of soap scum and mildew. A mild cleaning solution and a soft cloth or sponge are recommended for cleaning. Avoid using abrasive cleaners or scouring pads, as these can damage the surface of the vinyl. Promptly wiping up spills and ensuring adequate ventilation will further help to maintain a clean and dry shower environment, extending the lifespan of the vinyl plank installation.

Installing Waterproof Vinyl Flooring On Shower Walls

How To Install Vinyl Plank Flooring In A Bathroom Fixthisbuildthat

How To Install Vinyl Plank Tiles In A Bathroom

How To Install Procore Plus Luxury Vinyl Plank Lvp Flooring

How To Install Vinyl Plank Flooring In A Bathroom Fixthisbuildthat

How To Install Vinyl Plank Flooring Diy Friendly Tile Tutorials

How To Install Vinyl Plank Floors In A Bathroom Over Tile

Luxury Vinyl Flooring Is A Great Choice For Chic Bathrooms

Dos And Don Ts For Installing Vinyl Plank Floors In The Bathroom Advice Homeowners

How To Install Vinyl Plank Tiles In A Bathroom
See Also