Installing Vinyl Plank Flooring On Walls
Vinyl plank flooring, renowned for its durability and water resistance, is traditionally used for flooring applications. However, its versatility extends beyond floors, offering a stylish and practical wall covering option. Installing vinyl plank flooring on walls can create a unique aesthetic, whether aiming for a rustic, modern, or industrial look. This article provides a comprehensive guide to installing vinyl plank flooring on walls, covering the necessary tools, preparation steps, and installation techniques.
Essential Tools and Materials
Before embarking on the installation process, gathering the necessary tools and materials is crucial for a smooth and efficient workflow. These include the vinyl plank flooring itself, a measuring tape, a level, a pencil, a utility knife or scoring tool, construction adhesive, a notched trowel for adhesive application (if required by the specific product), spacers, a jigsaw or miter saw for cutting planks, safety glasses, and gloves.
Selecting the right adhesive is crucial for long-lasting adhesion. Consult the vinyl plank manufacturer's recommendations for compatible adhesives. Some planks may come with a self-adhesive backing, eliminating the need for separate adhesive application.
Wall Preparation
Proper wall preparation is paramount for a successful installation. The wall surface must be clean, dry, and level. Remove any existing wallpaper, loose paint, or debris. Patch any holes or imperfections with spackle and sand smooth. For walls with significant imperfections, consider installing a backer board for a more even surface.
Clean the wall thoroughly with a suitable cleaning solution to remove dust, grease, or dirt. Allow the wall to dry completely before proceeding with the installation. Primer application can improve adhesion, especially on porous surfaces. Consult the adhesive manufacturer's recommendations regarding primer compatibility.
Installation Process
The installation process typically begins with determining the layout. Dry fitting the planks before applying adhesive is recommended to ensure proper fit and alignment. Start from the bottom of the wall and work upwards, using spacers to maintain consistent gaps between planks and the wall. This gap allows for expansion and contraction due to temperature and humidity fluctuations, preventing buckling.
Apply adhesive to the wall or the back of the planks according to the manufacturer's instructions. Firmly press each plank against the wall, ensuring proper contact with the adhesive. Use a damp cloth to remove any excess adhesive immediately.
Cutting planks to fit around corners, outlets, or other obstacles can be accomplished using a jigsaw or miter saw. Accurate measurements and careful cutting are essential for a professional finish.
Dealing with Corners and Obstacles
Navigating corners and obstacles requires careful planning and precise cutting. Inside corners can be handled by overlapping planks or by mitering the edges at a 45-degree angle. Outside corners can be mitered or covered with corner trim pieces for a cleaner finish.
Electrical outlets and other wall fixtures require precise cuts in the planks. Measure the location of the fixture and transfer the measurements to the plank. Use a jigsaw to carefully cut out the necessary opening.
Considerations for Different Wall Types
Different wall types may require specific considerations during installation. For concrete or masonry walls, ensure proper surface preparation and use an appropriate adhesive recommended for these surfaces. For walls with existing paneling, ensure the paneling is securely attached and provides a stable base for the vinyl planks.
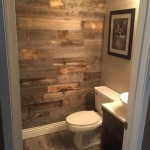
In bathrooms or other high-moisture areas, consider using waterproof vinyl planks and a waterproof adhesive to prevent moisture damage. Ensure proper ventilation in these areas to minimize moisture buildup.
Maintenance and Care
Maintaining the appearance and longevity of vinyl plank walls is relatively simple. Regular cleaning with a damp mop or cloth and a mild cleaning solution is typically sufficient. Avoid using abrasive cleaners or harsh chemicals that can damage the surface of the vinyl planks. Promptly address any spills to prevent staining or water damage.

How To Install Vinyl Plank Flooring Step By Our Aesthetic Abode

How To Install Laminate Flooring On Walls 7 Easy Steps Inc

Can You Install Vinyl Flooring On Walls L Antic Colonial

Diy Wood Accent Wall Using Vinyl Planks Love Renovations

How To Install Waterproof Vinyl Plank Flooring Four Generations One Roof

How To Install Laminate Flooring On Walls 7 Easy Steps Inc

Tips On Installing Vinyl Flooring Walls Ll Lumber Liquidators

Diy L And Stick Vinyl Plank Accent Wall Flooring On Walls Wood Planks

The Wall How To Install Vinyl Flooring On A Lowe S

How To Install Vinyl Plank Flooring As A Beginner Home Renovation
See Also