Essential Aspects of Installing Wood Flooring on Concrete
Installing wood flooring on concrete may seem like a daunting task, but with the proper planning and execution, it can be a rewarding DIY project. Here are the crucial aspects to consider for a successful installation:
1. Moisture Control
Concrete subfloors are notorious for moisture issues. Excess moisture can lead to buckling, warping, and mold growth in your flooring. Before installation, ensure the concrete is properly sealed and any moisture problems are resolved. Use a moisture meter to check the moisture content of the concrete, which should be below 2.5%.
2. Vapor Barrier
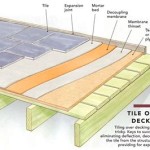
A vapor barrier is essential to prevent moisture from seeping into the wood flooring from the concrete. Polythene sheeting or a vapor-resistant underlayment provides an effective barrier. Lay the sheeting overlap joints and tape them securely.
3. Leveling the Subfloor
A level subfloor is crucial for a smooth flooring surface. If the concrete has any unevenness or slopes, it should be leveled using a self-leveling compound. Ensure the subfloor is completely dry before proceeding with the installation.
4. Expansion Gaps
Wood flooring naturally expands and contracts with changes in temperature and humidity. To accommodate this movement and prevent buckling, leave an expansion gap of 1/4 to 1/2 inch around the perimeter of the room and any fixed objects like walls or cabinets.
5. Underlayment
An underlayment provides a buffer between the concrete and the wood flooring. It helps reduce noise, insulates against cold, and absorbs minor subfloor imperfections. Choose an underlayment with a moisture barrier to further protect against moisture.
6. Acclimation
Before installing the wood flooring, acclimate it in the room where it will be installed for at least 24 to 72 hours. This allows the wood to adjust to the temperature and humidity levels, reducing the risk of expansion or contraction issues after installation.
7. Gluing or Nailing
There are two main methods for installing wood flooring on concrete: gluing or nailing. Gluing provides a more secure bond, while nailing is faster and easier. Use a polyurethane-based adhesive specifically designed for wood flooring on concrete. For nailing, use a flooring nailer with 1 1/2-inch nails.
8. Finishing Touches
Once the flooring is installed, you can add finishing touches to enhance its beauty and durability. Sanding and refinishing can correct any imperfections and create a smooth surface. You can stain the flooring to match your desired color or apply a protective finish such as polyurethane or wax to seal and protect it.
Tips for Success
* Use quality materials and follow the manufacturer's instructions carefully. * Allow ample time for acclimation and drying. * Ensure the subfloor is level, dry, and free of defects. * Leave proper expansion gaps around the perimeter. * Use a moisture barrier to protect against moisture. * Trim doors and moldings as necessary to accommodate the new flooring height.
Guide How To Install Hardwoods On A Concrete Subfloor
How To Install Wood Floors On Concrete Quora

Q A Solid Wood Floors Over Concrete Slabs Jlc

How Do I Install A Hardwood Floor On Concrete Slab The Carpet Guys

Ask Fred How Do I Install Wood Floor Below Grade Schedule

How To Install A Barn Board Floor Over Concrete Tutorial Diy Passion

Installing Engineered Hardwood On Concrete Twenty Oak

How To Install Solid Wood Flooring On Concrete And Oak Specialists Suppliers Nexus

Installing Engineered Hardwood On Concrete Twenty Oak

Installing Hardwood Floors On Concrete Subfloors
See Also
