Is Laminate Flooring Easy to Remove and Install?
Laminate flooring has become a popular choice for homeowners due to its durability, affordability, and ease of maintenance. But what about its installation and removal? Is it a DIY project or is it best left to professionals? In short, laminate flooring can be both easy to remove and install, depending on factors such as the type of installation, the age of the flooring, and the homeowner's experience with DIY projects.
Removal: A Relatively Simple Process
Removing laminate flooring is generally considered a straightforward process, even for beginners. Most laminate floors are installed using a click-lock system, which makes them easier to dismantle than older glued-down options. Here's a step-by-step guide to removing laminate flooring:
- Clear the room: Remove all furniture and belongings from the area where you will be removing the flooring.
- Locate the starting point: Identify a plank near a wall or in a corner where you can start removing the flooring. This plank usually has a small gap or a break in the flooring pattern.
- Pry up the plank: Use a pry bar or a utility knife to gently lift the first plank. If the flooring is stuck, you may need to use a mallet or a rubber hammer to gently tap the pry bar.
- Disconnect the planks: Once the first plank is loose, the click-lock system should allow you to disconnect the rest of the planks by gently pulling them apart.
- Remove the moldings: Remove any baseboards or moldings that are attached to the laminate flooring. This will make it easier to remove the flooring completely.
- Dispose of the flooring: Dispose of the laminate flooring properly according to your local regulations. Some cities or regions may have specific recycling programs for laminate flooring.
It's important to note that removing laminate flooring can be more challenging if it was installed over an existing subfloor, if the planks are glued down, or if the flooring has been damaged. In such cases, it may be necessary to cut the planks with a saw or use a specialized tool to loosen them.
Installation: A DIY-Friendly Project
Installing laminate flooring is also considered a relatively easy DIY project, especially with click-lock systems. Here's a step-by-step guide to installing laminate flooring:
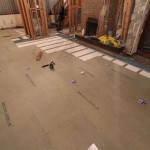
- Prepare the subfloor: Ensure the subfloor is level, dry, and free of any debris or irregularities. You may need to use a leveling compound or underlayment to smooth out the surface.
- Lay down the underlayment: Install an underlayment to provide cushioning and soundproofing. This will also help to protect the laminate flooring from moisture.
- Measure and cut the planks: Measure the room and cut the planks to size using a jigsaw or a utility knife. Leave a small gap between the walls and the flooring for expansion and contraction.
- Install the first row: Start laying the planks in the corner of the room, making sure they are aligned with the wall. Use a spacer to maintain the expansion gap. Secure the first row to the underlayment using a tapping block and mallet.
- Connect the planks: Connect the remaining planks using the click-lock system. Make sure the planks are flush and aligned. Use a tapping block to gently tap the edges of the planks into place.
- Trim the last row: Cut the last row of planks to size and install them using the same method as the first row.
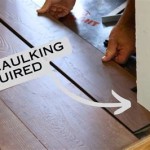
- Install the moldings: Install the baseboards or moldings around the perimeter of the room to cover the expansion gap and finish the installation.
It's essential to follow the manufacturer's instructions carefully during installation. Using proper tools and techniques will ensure a successful and professional-looking finish. However, if you are unsure about any aspect of the installation process, it's always best to consult with a professional.
Key Considerations for Laminate Flooring Removal and Installation
Type of Installation
The type of installation used for your laminate flooring will greatly impact the ease of removal and installation. Click-lock installations, which are popular nowadays, are much easier to remove and install compared to glued-down installations. Glue-down installations require specialized tools and techniques for removal and may damage the subfloor.
Age of the Flooring
Older laminate flooring may be more difficult to remove due to issues with the adhesive used or age-related wear and tear. It's worth considering whether the flooring is worth salvaging or if it's better to replace it entirely.
Experience Level
While laminate flooring is considered a relatively easy DIY project, some experience with home improvement is helpful. If you are unsure about any step of the process or lack confidence in your ability to tackle the project, it's best to hire a professional contractor.
Ultimately, the decision of whether to remove and install laminate flooring yourself depends on several factors. It's important to consider the type of installation, the age of the flooring, and your own experience and comfort level with DIY projects. If you have doubts or encounter difficulties, don't hesitate to seek professional assistance.

How To Install Laminate Flooring For Beginners

How To Remove Laminate Flooring In 6 Easy Steps

Our Step By Guide For Laying Laminate Flooring

How To Remove Laminate Flooring

How To Install Laminate Flooring On Your Own Diy Hq Longwood Fl

How To Install Laminate Flooring On Your Own Diy Hq Longwood Fl

How Long Does It Take To Lay Laminate Flooring My Local Toolbox

Common Mistakes When Laying Laminate Flooring Next Day Floors

How To Remove Laminate Flooring The Home

How To Lay Laminate Flooring Easy Follow Installation Guide
See Also