Laying Laminate Flooring: A Step-by-Step Guide
Laminate flooring is a popular choice for homeowners due to its durability, affordability, and ease of installation. If you're considering installing laminate flooring in your home, follow this step-by-step guide to ensure a professional-looking finish.
Materials and Tools:
- Laminate flooring
- Underlayment
- Moisture barrier
- Hammer or tapping block
- Pull bar
- Spacer blocks
- Tape measure
- Jigsaw
- Utility knife
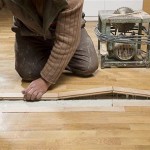
Step 1: Preparation
Before installing the laminate flooring, prepare the subfloor by removing old flooring and debris. Ensure the subfloor is flat, level, and dry. If necessary, install a moisture barrier to protect against moisture damage.
Step 2: Acclimation
Before installing the laminate flooring, allow it to acclimate to the room temperature for at least 24 hours. This will prevent the flooring from expanding or contracting after installation.
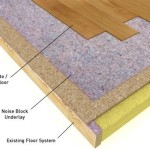
Step 3: Laying the Underlayment
Roll out the underlayment over the subfloor, ensuring the seams overlap by several inches. The underlayment provides cushioning and helps level the floor.
Step 4: Starting the First Row
Start laying the laminate flooring in a corner of the room, using spacer blocks to maintain a consistent gap between the wall and the flooring. Align the tongue and groove edges of the planks and tap them together using a hammer or tapping block.
Step 5: Installing Remaining Rows
Continue laying the laminate flooring row by row, aligning the planks and tapping them together. Use a pull bar to tighten the joints and ensure a snug fit. Remember to offset the end joints between rows to prevent a staggered appearance.
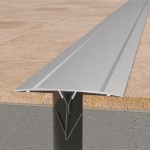
Step 6: Cuts and Transitions
Use a jigsaw or utility knife to cut planks for corners or around obstacles. For transitions between rooms or different flooring types, use appropriate transition pieces to ensure a smooth connection.
Step 7: Finishing Touches
Once all the laminate flooring is installed, remove the spacer blocks and install baseboards, moldings, or quarter rounds to cover the expansion gaps and complete the installation.
Tips:
- Plan the layout carefully to minimize cuts and waste.
- Use a tapping block instead of a hammer to prevent damage to the planks.
- Maintain a consistent expansion gap around the perimeter of the flooring.
- Clean up any sawdust or debris regularly to prevent scratching the laminate surface.
- Consult the manufacturer's instructions for specific installation recommendations.
Conclusion:
Laying laminate flooring is a manageable task that can enhance the appearance of your home. By following these step-by-step instructions, you can achieve a professional-looking installation that will last for years to come.

Laminate Flooring Installation A Step By Guide

How To Install Laminate Flooring Step By Guide

How To Lay Laminate Flooring Installation Guide Step By

How To Install Laminate Flooring On Staircase Step By Guide

The Ultimate Guide To Installing Laminate Flooring Parrys

Guide To Fitting Laminate Up 50 Off Free Samples

How To Install Laminate Flooring Easy Step By Beginners Guide

How To Install Laminate Flooring Diy Tips And Tricks

How To Install Laminate Flooring Guide 2024

How To Install Laminate Flooring
See Also