Laying Vinyl Plank Flooring on Uneven Concrete Floors: A Step-by-Step Guide
Installing vinyl plank flooring on uneven concrete floors requires meticulous preparation and attention to detail. Here's a comprehensive guide to ensure a smooth and successful installation:
1. Assess the Unevenness
Thoroughly inspect the concrete floor to determine the extent of unevenness. Use a straightedge or level to measure the dips and rises. If the unevenness exceeds 3/16-inch over a 10-foot span, it will need to be leveled.
2. Leveling the Floor
For minor unevenness, a self-leveling compound can be applied. Follow the manufacturer's instructions for mixing and pouring the compound to create a smooth, level surface.
For more significant unevenness, a leveling underlayment may be necessary. This involves installing a layer of plywood or fiberboard over the concrete and securing it with screws or nails. The underlayment should be thick enough to compensate for the unevenness.
3. Moisture Barrier
Install a moisture barrier on top of the leveled floor. This will prevent moisture from seeping up from the concrete and damaging the vinyl flooring.
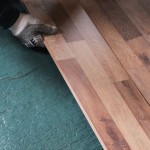
4. Underlayment
An underlayment provides cushioning and sound insulation. Choose an underlayment specifically designed for vinyl plank flooring and follow the manufacturer's instructions for installation.
5. Acclimate the Vinyl Planks
Allow the vinyl planks to acclimate to the room's temperature and humidity for at least 24 hours before installation. This will prevent the planks from buckling or warping after installation.
6. Layout and Trim
Plan the layout of the flooring, starting from the center of the room. Use a spacer to maintain even gaps between the planks. Trim the planks as needed to fit around obstacles such as walls, doors, and cabinets.
7. Installation
Start by spreading adhesive on the prepared floor. Follow the manufacturer's instructions for the specific adhesive being used. Place the vinyl planks in place and firmly press them down to secure them. Use a tapping block or roller to ensure a strong bond.
8. Expansion Gaps
Leave expansion gaps around the perimeter of the room and around obstacles to allow the flooring to expand and contract naturally. These gaps can be covered with baseboards or molding.
9. Finishing Touches
Once the vinyl planks are installed, clean the surface to remove any dirt or debris. Install baseboards or molding to cover the expansion gaps and give the room a finished appearance.

Vinyl Plank Flooring On Uneven Concrete

Vinyl Plank Flooring On Uneven Concrete

10 Beginner Mistakes Installing Vinyl Plank Flooring

Should We Be Concerned About Vinyl Plank Installed Over Uneven Floors

How Can I Prepare Uneven Concrete Basement Floor For Vinyl Planks Home Improvement Stack Exchange

How To Prepare A Concrete Floor For Vinyl Flooring Parrys

10 Beginner Mistakes Installing Vinyl Plank Flooring Fixthisbuildthat

Concrete Subfloor Preparation For The Vinyl Floor Installation How To Diy Mryoucandoityourself

Easy Ways To Install Vinyl Plank Flooring On Concrete

Installing Vinyl Plank Flooring On Concrete Floor In Dallas Fort Worth Tx All American
See Also