Mastering the Art of Vinyl Plank Flooring Installation
Transforming your space with the elegant allure of vinyl plank flooring is an attainable feat with careful planning and meticulous execution. Embark on this journey by familiarizing yourself with essential aspects of vinyl plank flooring installation, empowering you to achieve a flawless, long-lasting result.
1. Preparation is Paramount
A well-prepared subfloor forms the foundation for a successful installation. Ensure the subfloor is level, dry, and free of debris or imperfections. Level any uneven areas using self-leveling compound or plywood underlayment. Remove any existing flooring or carpeting to create a smooth, clean surface.
2. Planning for Perfection
Before commencing installation, meticulously plan the layout to minimize waste and ensure a cohesive appearance. Measure the room accurately and determine the starting point. Draw a chalk line as a guide for the first row of planks.
3. Acclimating to the Environment
Vinyl planks need time to acclimate to the temperature and humidity of your home. Open the boxes and allow the planks to rest in the room for at least 24 hours before installation. This step helps prevent buckling or gaps caused by expansion or contraction after installation.
4. Adhesive or Floating?
Choose the installation method that best suits your needs and subfloor type. Adhesive installation provides a secure bond, ideal for high-traffic areas or over radiant heating systems. Floating installations allow the planks to float above the subfloor, making them easy to remove and replace if necessary.
5. Laying the Foundation
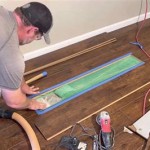
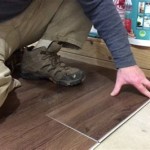
Begin laying the planks from the starting point, ensuring the tongue and groove edges interlock securely. Tap the planks together using a tapping block and hammer, ensuring a snug fit. For the last row, you may need to cut the planks to fit using a sharp utility knife.
6. Finishing Touches
Once all the planks are installed, trim any excess around the edges using a multi-tool or oscillating saw. Install wall base or quarter-round trim to conceal the gap between the flooring and the wall, providing a polished finish.
7. Maintenance and Care
Regular maintenance is crucial to preserve the beauty and longevity of your vinyl plank flooring. Sweep or vacuum frequently to remove dirt and debris. Use a damp mop for deep cleaning, avoiding harsh chemicals or abrasive cleaners. Periodically apply a vinyl flooring cleaner to maintain its shine.
Conclusion
With meticulous planning, careful preparation, and precision execution, installing vinyl plank flooring can be a rewarding experience. By adhering to these essential aspects, you can create a stunning, durable floor that will enhance the beauty and functionality of your home for years to come.

Choosing Which Direction To Lay Vinyl Plank Flooring Install Today Reallyfloors America S Est Hardwood

Choosing Which Direction To Lay Vinyl Plank Flooring Install Today Reallyfloors America S Est Hardwood

Master The Art Of Matching Wood Flooring Floor Color Guide Reallyfloors America S Est Hardwood

Choosing Which Direction To Lay Vinyl Plank Flooring Install Today Reallyfloors America S Est Hardwood

Vinyl Flooring Around Floor Drain Installation Tips And Tricks 1 800 Remodel

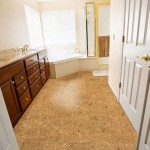
Dos And Don Ts For Installing Vinyl Plank Floors In The Bathroom Advice Homeowners

Choosing Which Direction To Lay Vinyl Plank Flooring Install Today Reallyfloors America S Est Hardwood

5 Tips To Install Laminate Flooring Like A Pro Casa Watkins Living

Why We Chose Vinyl Plank Flooring For Our New Build Home The Happy Housie

Dos And Don Ts For Installing Vinyl Plank Floors In The Bathroom Advice Homeowners
See Also