Sheet Vinyl Flooring Installation: A Comprehensive Guide
Sheet vinyl flooring is renowned for its durability, versatility, and ease of maintenance. Whether you're a seasoned DIY enthusiast or a novice homeowner, this step-by-step guide will empower you to achieve a flawless sheet vinyl flooring installation.
Step 1: Prepare the Subfloor
A smooth and level subfloor is crucial for a successful installation. Repair any cracks or gaps using patch compound or a self-leveling underlayment. Ensure that the subfloor is clean and dry before proceeding.
Step 2: Measure and Cut the Vinyl
Measure the room thoroughly and add 3 to 4 inches to each dimension for overlap. Transfer these measurements to the vinyl and mark the cut lines. Use a sharp utility knife to cut along the marked lines, making clean, straight cuts.
Step 3: Apply the Adhesive
Spread the adhesive evenly over the subfloor using a notched trowel. Follow the manufacturer's instructions for the recommended adhesive and trowel size. Allow the adhesive to dry for the specified time, usually around 20 to 30 minutes.
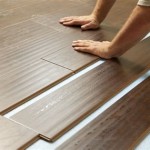
Step 4: Place the Vinyl
Carefully position the vinyl sheet over the adhesive, starting from one corner of the room. Align the overlap with the wall using a straightedge. Press down firmly on the vinyl to ensure proper adhesion.
Step 5: Trim and Seal the Edges
Use a utility knife to trim any excess vinyl around the edges and corners of the room. Install molding or baseboards to conceal the edges and provide a finished look. Seal any open seams or joints using a mildew-resistant caulk.
Step 6: Roll and Weigh Down the Vinyl
To ensure optimal adhesion, roll over the installed vinyl using a heavy roller or a 100-pound weight distributed over the entire area. This will help press the vinyl firmly against the adhesive.
Step 7: Remove Excess Adhesive
Once the adhesive has dried completely, wipe away any excess adhesive squeeze-out using a damp cloth or sponge. Avoid using harsh chemicals or cleaners that could damage the vinyl.
Tips for a Successful Installation
- Allow the adhesive to dry for the full recommended time before installing the vinyl.
- Use a sharp utility knife and make clean, precise cuts.
- Take your time to align the vinyl sheet correctly and ensure it's flat and wrinkle-free.
- Roll over the vinyl multiple times to ensure strong adhesion.
- Wipe away excess adhesive promptly to prevent stains or damage.
Conclusion
With careful planning and attention to detail, you can achieve a stunning and durable sheet vinyl flooring installation. By following these step-by-step instructions and incorporating these helpful tips, you'll enjoy a professional-looking floor that will enhance the beauty and comfort of your home for years to come.

How To Lay Sheet Vinyl Flooring

How To Lay Vinyl Flooring Sheets Tiles And Planks Tarkett

How To Lay Vinyl Flooring Sheets Tiles And Planks Tarkett

How To Install Sheet Vinyl Floor Decor Adventures

How To Lay Vinyl Flooring Sheets Tiles And Planks Tarkett

How To Lay Sheet Vinyl Flooring Installation 2024 Full Guide

How To Lay Vinyl Flooring Sheets Tiles And Planks Tarkett

Installing Vinyl Sheet Flooring In Your Rv Easy Step By Guide

A Complete Guide How To Stagger Vinyl Plank Flooring Whole Cabinet Supply

Vinyl Floor Tiles Complete Guide To Pvc And Installation
See Also