Vinyl Plank Flooring: A Step-By-Step Guide to Bathroom Installation
Vinyl plank flooring is a popular choice for bathrooms due to its durability, water resistance, and stylish appearance. If you're considering installing vinyl plank flooring in your bathroom, here's a step-by-step guide to help you get started:Step 1: Prepare the Subfloor
The first step is to prepare the subfloor. The subfloor should be level, smooth, and dry. If the subfloor is not level, you may need to level it using a self-leveling compound. If the subfloor is not smooth, you may need to sand it down. And if the subfloor is not dry, you may need to use a dehumidifier to dry it out.Step 2: Install the Underlayment
Once the subfloor is prepared, you can install the underlayment. The underlayment will help to cushion the vinyl plank flooring and reduce noise. There are a variety of underlayment options available, so be sure to choose one that is appropriate for your bathroom.Step 3: Lay Out the Vinyl Planks
Before you start laying out the vinyl planks, you need to determine the layout of the floor. You can do this by measuring the room and drawing a plan on paper. Once you have a plan, you can start laying out the vinyl planks. Be sure to leave a small gap between the planks and the walls to allow for expansion.Step 4: Cut the Vinyl Planks
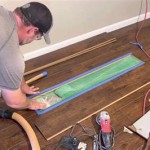
Once the vinyl planks are laid out, you need to cut them to fit the room. You can use a utility knife to score the planks and then snap them apart. Be sure to wear safety glasses when cutting the planks.Step 5: Install the Vinyl Planks
Once the vinyl planks are cut, you can start installing them. The planks are typically installed using a click-lock system. To install a plank, simply align it with the previous plank and click it into place. Be sure to stagger the joints between the planks to create a more durable floor.Step 6: Seal the Joints
Once the vinyl planks are installed, you need to seal the joints between the planks. This will help to prevent water from seeping into the subfloor. You can seal the joints using a caulk gun and a silicone-based caulk.Step 7: Install the Trim
The final step is to install the trim. The trim will help to finish off the floor and give it a polished look. You can install the trim using a nail gun or a glue gun. Vinyl plank flooring is a relatively easy flooring option to install. By following these steps, you can install a beautiful and durable vinyl plank floor in your bathroom.
How To Install Vinyl Plank Flooring In A Bathroom Fixthisbuildthat

How To Install Vinyl Plank Flooring In A Bathroom Fixthisbuildthat

How To Install Vinyl Plank Flooring In A Bathroom

How To Install Vinyl Plank Flooring In A Bathroom Fixthisbuildthat

A Complete Guide How To Stagger Vinyl Plank Flooring Whole Cabinet Supply

Simple To Use Step By Guide For Installing Vinyl Plank Everywhere

Installing Vinyl Floors A Do It Yourself Guide The Honeycomb Home

How To Install Vinyl Plank Flooring The Home

How To Install Vinyl Plank Flooring In A Bathroom

Cost To Install Vinyl Plank Flooring A Complete Guide 2024 Forbes Home
See Also