Essential Aspects of Laying Vinyl Plank Flooring
Vinyl plank flooring is a popular choice for homeowners due to its durability, affordability, and ease of installation. To ensure a successful installation, it's crucial to understand the essential aspects of the process. This article will guide you through the key steps and considerations to achieve a professional-looking vinyl plank floor.
1. Surface Preparation
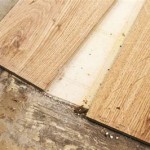
A smooth and level subfloor is essential for a successful vinyl plank installation. Remove any existing flooring, check for unevenness, and repair any cracks or holes. Leveling compounds or underlayment can be used to create a flat surface.
2. Acclimation
Before installation, allow the vinyl planks to acclimate to the temperature and humidity of the room for 24-48 hours. This prevents expansion or contraction after installation.
3. Underlayment
Underlayment provides a cushion and moisture barrier between the subfloor and vinyl planks. Choose an underlayment compatible with your flooring and subfloor type. It also enhances sound insulation and improves comfort underfoot.
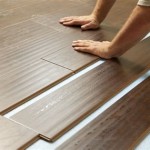
4. Layout and Dry Fit
Plan the layout of the planks before installation. This will help determine the starting point and ensure a straight and even appearance. Dry fit the planks together to check for fit and adjust the layout if necessary.
5. Adhesive or Floating
Vinyl planks can be installed using either adhesive or a floating method. Adhesive installation provides a more secure bond, while floating installation allows the planks to move slightly with temperature changes.
6. Adhesive Installation
If using adhesive, apply it evenly to the subfloor according to the manufacturer's instructions. Lay the planks and press them firmly into place, ensuring they are level. Wipe away any excess adhesive.
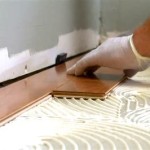
7. Floating Installation
For floating installations, connect the planks using a locking system. Tap the planks together until they snap into place, creating a tight fit. Use a tapping block and hammer to avoid damaging the planks.
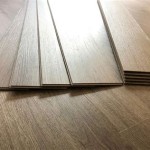
8. Trimming and Edging
Use a utility knife or circular saw to trim planks as needed around obstacles or walls. Install edge molding or transition strips to cover gaps and create a finished look.
9. Maintenance and Care
Regular cleaning and maintenance will extend the life of your vinyl plank flooring. Sweep or vacuum regularly and mop with a mild detergent solution as needed. Avoid using harsh chemicals or abrasive cleaners.

How To Install Vinyl Plank Flooring As A Beginner Home Renovation

Installing Vinyl Floors A Do It Yourself Guide The Honeycomb Home

Installing Vinyl Plank Flooring How To Fixthisbuildthat

How To Install Vinyl Flooring Planks

Installing Vinyl Plank Flooring For Beginners Anika S Diy Life

Laying Vinyl Planks The Right Way Expert Guide By Fantastic Handyman

Easy Ways To Install Vinyl Plank Flooring On Concrete

How To Install Vinyl Plank Flooring In A Bathroom Fixthisbuildthat

How To Install Luxury Vinyl Plank Flooring Wood

How To Install Luxury Vinyl Plank
See Also