How to Cover Plywood Floors in a Bathroom
Plywood floors are a common choice for bathrooms due to their durability and affordability. However, they can be unsightly and difficult to clean. If you're looking to update your bathroom's look, covering plywood floors is a great way to add style and functionality.
### Materials You'll Need: - Underlayment (optional) - Backer board - Thin-set mortar - Trowel - Tile or other flooring material - Grout (if using tile) - Grout float (if using tile) ### Step 1: Prepare the Plywood FloorBefore covering your plywood floor, it's important to make sure it's level and free of any debris or damage. If there are any uneven spots, you can sand them down or use a self-leveling compound to fill them in.
### Step 2: Install Underlayment (Optional)Underlayment is a thin layer of material that goes between the plywood floor and the backer board. It helps to reduce noise and add some cushioning to the floor. If you're installing tile, underlayment is not necessary, but it can help to prevent cracking.
### Step 3: Install Backer BoardBacker board is a thin, cement-based board that provides a stable surface for tile or other flooring materials. It's important to use backer board when covering plywood floors, as it will help to prevent the flooring from cracking or coming loose.
### Step 4: Apply Thin-Set MortarThin-set mortar is a type of adhesive that is used to bond tile and other flooring materials to backer board. To apply thin-set mortar, use a trowel to spread it evenly over the backer board. Be sure to follow the manufacturer's instructions for mixing and applying the thin-set mortar.
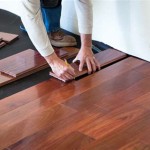
### Step 5: Install Tile or Other Flooring MaterialOnce the thin-set mortar has been applied, you can install your tile or other flooring material. If you're installing tile, start by laying out the tiles in a dry run to make sure they fit properly. Once you're happy with the layout, apply thin-set mortar to the back of each tile and press it into place.
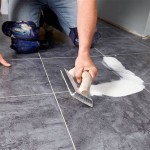
### Step 6: Grout (If Using Tile)Once the tile has been installed, you need to grout the joints between the tiles. To do this, use a grout float to apply grout to the joints. Be sure to follow the manufacturer's instructions for mixing and applying the grout. Once the grout has dried, you can wipe away any excess with a damp sponge.
### Step 7: Seal the FloorOnce your new flooring is installed, you'll need to seal it to protect it from moisture and wear. You can use a penetrating sealer or a topical sealer. Penetrating sealers soak into the pores of the flooring material, while topical sealers create a protective layer on the surface.
### Tip: - If you're not sure how to install tile or other flooring materials, it's best to hire a professional. - Be sure to follow the manufacturer's instructions for all materials and products used. - Allow ample time for each step of the process to dry completely before moving on to the next step.
Tiling On Wooden Floors Part 4 Overboarding Bathroom Guru

Tiling On Wooden Floors Part 4 Overboarding Bathroom Guru

Wood Floor Bathrooms How To Do Them Right Floorings

Ing Down Structural Plywood To Joists Bathroom Guru

Blog Expert Advice How To Tile Onto Wood Plywood Or Chipboard

How To Install Cement Board On A Floor Diy Family Handyman

Wood Floor Bathrooms How To Do Them Right Floorings

How To Paint A Plywood Floor The Easy Way Semigloss Design

Plywood For Bathroom Floor A Complete Guide And Tips Tidy

25 Diy Flooring Ideas That Will Look Amazing In Your Home
See Also