How to Remove Laminate Flooring Without Breaking Tiles in Shower
Removing laminate flooring can be a daunting task, especially when it comes to areas with sensitive surfaces like shower floors. The goal is to remove the laminate without damaging the underlying tiles, ensuring a smooth transition for your future flooring project. This guide outlines the steps involved in safely dismantling laminate flooring while protecting the tiles in your shower.
1. Prepare for Removal
Begin by gathering the necessary tools and materials:
- Utility knife or flooring pry bar
- Hammer or mallet
- Crowbar (optional)
- Gloves
- Safety Glasses
- Dustpan and broom
- Drop cloth
- Bucket for debris
- Optional: Jigsaw with laminate blade
Before starting the removal process, consider:
- Location of pipes and wires: Be careful not to damage any plumbing or electrical lines hidden beneath the flooring.
- The laminate's installation method: Was it glued, nailed, or clicked together? This will affect the removal process.
2. Begin Removal from an Edge
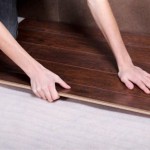
Start at an edge of the laminate where it meets another flooring type or a wall. Use a utility knife or flooring pry bar to loosen an edge of the first plank.
Gently pry up the plank while keeping the blade or pry bar parallel to the floor. Avoid using excessive force as this can damage the tiles underneath.
If the laminate is glued down, you might need to use a hammer or mallet to tap on the pry bar and break the adhesive bond. Use a pry bar with a wider base for better leverage and stability.
3. Work Systematically
Once you've removed the first plank, continue working systematically across the shower area. Pry up adjacent planks one by one, keeping them as intact as possible. Remove any nails or staples that hold the planks together.
You may encounter areas where the laminate is difficult to pry loose. Use a crowbar strategically to gently lift the planks. Be cautious and avoid applying force directly on the tiles to prevent breakage.
4. Handling the Toughest Areas
The shower's corners and areas near the drain can present challenges. For tight spaces, a jigsaw equipped with a laminate blade can be useful. Carefully cut the laminate into smaller pieces for easier removal.
Always use caution and apply gentle pressure to avoid slipping and damaging the tiles. Work slowly and patiently, removing any remaining pieces carefully.
5. Clean Up and Inspect
After removing all the laminate planks, sweep the debris and dispose of it properly. Thoroughly inspect the shower tiles for any damage caused during the removal process. If any tiles are cracked or chipped, they may need to be repaired or replaced.
Once you have completed the removal, you can assess the condition of the tiles and proceed with your flooring project.

How To Remove Laminate Flooring The Home

Removing Tiles And Installing Bathroom Floor Part 1 Frank S Handyman

How To Install Vinyl Plank Tiles In A Bathroom

How To Install Vinyl Plank Floors In A Bathroom Over Tile

How To Remove Laminate Flooring The Home

How To Install Vinyl Plank Flooring In A Bathroom Fixthisbuildthat

A Comprehensive Guide To Removing Floors Discount Dumpster

How To Install Vinyl Plank Flooring In A Bathroom As Beginner Home Renovation

How To Remove Ceramic Tile The Home

Dos And Don Ts For Installing Vinyl Plank Floors In The Bathroom Advice Homeowners
See Also